Free original lessons
How to Draw Dinosaur Skeletons and Silhouettes: A Structured Guide
Learn to draw dinosaur skeletons and matching silhouettes using bone landmarks, a simple convention, and checkable steps. Includes practice tasks and a rubric.
Free lesson
Four exercises
Worked answers
Object Drawing Lessons
Drawing a dinosaur skeleton is not about memorizing every bone. It is about building a clear, repeatable structure: a spine, a ribcage, limbs, a skull, and a tail, then wrapping a silhouette around that structure. This guide uses a simple convention: x-height is measured from the baseline to the midline of a letter, and letter styles vary, so your skeleton drawing may look different from another student's while still being correct. All measurements are hypothetical examples unless you measure your own paper and tools. The goal is a coherent skeleton that matches its silhouette, not a perfect replica of a museum mount.
Practice materials: Printable downloads are not available for this lesson yet. Use the instructions and four exercises below.
Reference illustration
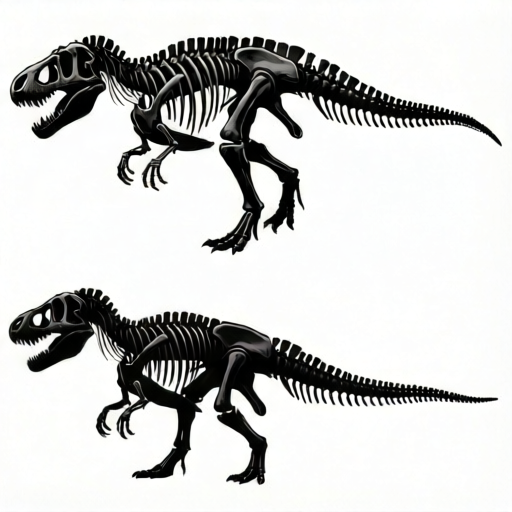
Use the stated measurements and conventions for each exercise.
Build the skeleton from a central line
Start with a single horizontal line for the spine. Mark a midpoint. From that midpoint, draw a gentle curve upward for the neck and downward for the tail. Keep the spine as one continuous line so the body reads as a connected structure.
Next, add the ribcage. Draw pairs of curved lines from the spine downward, like a series of parentheses. Keep the pairs evenly spaced and mirror them left and right. The ribcage should be widest near the shoulders and narrow toward the hips.
Then add the limbs. For a bipedal dinosaur, draw two strong hind legs from the hip area and two smaller forelimbs from the shoulder area. For a quadrupedal dinosaur, draw four legs with the front pair slightly shorter. Use simple joint marks: a circle for the hip or shoulder, a smaller circle for the knee or elbow, and a short line for the foot.
- Draw a horizontal spine line and mark its midpoint.
- Add a curved neck line upward and a tail line downward from the midpoint.
- Draw evenly spaced rib pairs from the spine, widest near the shoulders.
- Add limb joint circles at hips and shoulders, then connect them with straight bone lines.
- Add a simple skull shape at the neck end and a small pelvis shape at the hip end.
Match the silhouette to the skeleton
A silhouette is the outer outline of the animal. To match it to your skeleton, trace a light outline around the bones, leaving a consistent margin. Use a margin of about one x-height (baseline to midline of a lowercase letter) as a hypothetical example. This margin represents flesh and skin around the bones.
Check that every bone is inside the silhouette. The skull should sit inside the head outline, the ribcage inside the body outline, and the limb bones inside the leg outlines. If a bone pokes outside, either move the bone inward or widen the silhouette.
Keep the silhouette simple. Do not add scales, claws, or facial details yet. The silhouette should read as a solid shape that matches the skeleton's proportions.
- Lightly trace around the skeleton with a consistent margin.
- Check that the skull, ribcage, limbs, and tail are all inside the outline.
- Adjust the outline or the bones until they match.
- Darken the silhouette outline and erase the light tracing lines.
Use landmarks to keep proportions consistent
Landmarks are fixed points you can measure against. Use the spine midpoint as your main landmark. The hip joint should sit roughly one-third of the spine length behind the midpoint. The shoulder joint should sit roughly one-third of the spine length in front of the midpoint. These are hypothetical proportions for practice, not universal rules.
Measure the skull length and compare it to the ribcage width. In many dinosaur drawings, the skull is about half the ribcage width. If your skull is much larger, the silhouette will look top-heavy. If it is much smaller, the animal will look unbalanced.
Label your landmarks lightly: spine midpoint, hip joint, shoulder joint, skull center, and tail tip. These labels help you check the silhouette later.
- Mark the spine midpoint.
- Place the hip joint about one-third of the spine length behind the midpoint.
- Place the shoulder joint about one-third of the spine length in front of the midpoint.
- Compare skull length to ribcage width and adjust if needed.
- Label all landmarks lightly before drawing the final silhouette.
Check and refine the drawing
Use a simple check: cover the silhouette and look only at the skeleton. Does it read as a connected animal structure? Then cover the skeleton and look only at the silhouette. Does it read as a solid animal shape? If both answers are yes, the pair matches.
Check symmetry by folding the paper along the spine line, if your paper allows. The rib pairs should roughly align. Limb joints should sit at similar heights on both sides. Small differences are acceptable because letter styles and hand pressure vary.
Finally, darken the skeleton lines and the silhouette outline. Keep the interior of the silhouette blank or lightly shaded. The goal is a clear pair: one drawing shows the bones, the other shows the outer shape.
- Cover the silhouette and check that the skeleton reads as a connected structure.
- Cover the skeleton and check that the silhouette reads as a solid animal shape.
- Fold along the spine line to check rib and limb symmetry.
- Darken final lines and keep the silhouette interior simple.
Worked example
A student draws a spine line 12 cm long. The midpoint is at 6 cm. The hip joint is placed 4 cm behind the midpoint, and the shoulder joint is placed 4 cm in front. The skull is drawn 3 cm long, and the ribcage is 6 cm wide. The student traces a silhouette with a 1 cm margin. Check whether the skull and ribcage proportions are consistent with the hypothetical guideline that skull length is about half the ribcage width.
Worked answer
The skull is 3 cm and the ribcage is 6 cm. Half of 6 cm is 3 cm, so the skull length matches the guideline. The hip and shoulder joints are each 4 cm from the midpoint, which is about one-third of the 12 cm spine length (4 cm). The silhouette margin is 1 cm, which is a hypothetical example of one x-height. The proportions are consistent.
Four practice exercises
Exercise 1
Draw a bipedal dinosaur skeleton on a 12 cm spine line. Place the hip joint 4 cm behind the midpoint and the shoulder joint 4 cm in front. Draw three rib pairs, two hind legs, and two forelimbs. Then trace a silhouette with a 1 cm margin. Describe where the skull sits relative to the neck line.
Show answer and check
The skull sits at the front end of the neck line, inside the head outline of the silhouette. The hip joint is 4 cm behind the midpoint, and the shoulder joint is 4 cm in front. Three rib pairs curve down from the spine. The hind legs connect at the hip joint, and the forelimbs connect at the shoulder joint. The silhouette margin is 1 cm around all bones.
Why: The spine midpoint is at 6 cm on a 12 cm line. Moving 4 cm behind gives the hip joint at 2 cm from the start, and 4 cm in front gives the shoulder joint at 10 cm from the start. The skull is placed at the neck end, which is beyond the shoulder joint. The 1 cm margin is a hypothetical example of one x-height.
Check: Measure the spine line and confirm the midpoint. Check that the hip and shoulder joints are each 4 cm from the midpoint. Confirm three rib pairs and four limb bones. Check that every bone is inside the silhouette with about a 1 cm margin.
Exercise 2
A student draws a quadrupedal dinosaur skeleton with a 16 cm spine line. The midpoint is at 8 cm. The front shoulder joints are placed 5 cm in front of the midpoint, and the rear hip joints are placed 5 cm behind. The skull is 4 cm long, and the ribcage is 8 cm wide. Is the skull length consistent with the hypothetical guideline that skull length is about half the ribcage width? Show the arithmetic.
Show answer and check
Yes. Half of 8 cm is 4 cm, and the skull is 4 cm long, so the skull length matches the guideline. The shoulder and hip joints are each 5 cm from the midpoint, which is less than one-third of 16 cm (about 5.33 cm), so they are slightly closer to the midpoint than the hypothetical guideline suggests. This is acceptable as a valid alternative if the skeleton and silhouette still match.
Why: The guideline compares skull length to ribcage width: 8 cm divided by 2 equals 4 cm. The joint placement uses a separate hypothetical guideline of one-third of the spine length: 16 cm divided by 3 is about 5.33 cm. The student used 5 cm, which is close but not exact. The rubric allows valid alternatives, so the drawing can still be correct if the pair matches.
Check: Calculate half of the ribcage width and compare it to the skull length. Calculate one-third of the spine length and compare it to the joint distances. Check that the skeleton is connected and that the silhouette surrounds all bones with a consistent margin.
Exercise 3
Draw a dinosaur skeleton with a spine line of 10 cm. Mark the midpoint. Draw two rib pairs, one on each side of the midpoint. Draw a tail line 3 cm long from the midpoint backward and a neck line 3 cm long from the midpoint forward. Add a skull at the neck end and a pelvis at the hip area. Then draw a silhouette with a margin of 0.5 cm. Check whether the tail tip and skull center are both inside the silhouette.
Show answer and check
The tail tip is at the end of the 3 cm tail line, and the skull center is at the end of the 3 cm neck line. Both should be inside the silhouette if the margin is drawn around the entire skeleton. The 0.5 cm margin is a hypothetical example, smaller than one x-height, but it is acceptable if it is consistent around all bones.
Why: The spine is 10 cm, so the midpoint is at 5 cm. The tail line extends 3 cm backward, and the neck line extends 3 cm forward. The skull and pelvis are placed at the ends of these lines. The silhouette margin of 0.5 cm must surround every bone, including the tail tip and skull center.
Check: Measure the spine, tail, and neck lines. Confirm the midpoint. Check that the skull center and tail tip are inside the silhouette outline. Measure the margin at several points to confirm it is about 0.5 cm.
Exercise 4
A student draws a skeleton and silhouette pair. The skeleton has a 14 cm spine line, a 5 cm skull, and a 7 cm ribcage width. The silhouette margin is 1 cm. The student claims the skull length is consistent with the hypothetical guideline that skull length is about half the ribcage width. Check the claim with arithmetic and state whether the pair can still be valid under the rubric.
Show answer and check
Half of 7 cm is 3.5 cm, but the skull is 5 cm, so the skull is larger than the guideline suggests. The claim is not consistent with the guideline. However, the rubric allows valid alternatives, so the pair can still be valid if the skeleton is connected, the silhouette matches, and the proportions are internally consistent. The student should either adjust the skull to about 3.5 cm or accept the larger skull as a deliberate alternative and ensure the silhouette matches it.
Why: The guideline is a hypothetical example, not a universal rule. The arithmetic shows a mismatch: 7 cm divided by 2 equals 3.5 cm, which is less than 5 cm. The rubric prioritizes a connected skeleton and a matching silhouette over exact adherence to the guideline. The 1 cm margin is also a hypothetical example.
Check: Calculate half of the ribcage width and compare it to the skull length. Check that the skeleton is connected and that every bone sits inside the silhouette with a consistent margin. Confirm that the student either adjusted the skull or explained the alternative proportion.
Common mistakes
- Drawing the ribcage as a single outline instead of paired ribs. Draw separate curved lines on each side of the spine, evenly spaced, so the ribcage reads as a series of bones.
- Making the silhouette much larger than the skeleton. Use a consistent margin, such as one x-height, and check that every bone sits inside the outline.
- Placing the hip and shoulder joints at the spine midpoint. Move the hip joint behind the midpoint and the shoulder joint in front, using the one-third guideline as a hypothetical example.
- Adding details like scales or claws before the skeleton and silhouette match. Finish the skeleton and silhouette pair first, then add details only if the pair already reads clearly.
Self-check rubric
- Skeleton has a continuous spine line with a clear midpoint.
- Ribcage is drawn as paired curved lines, evenly spaced and mirrored.
- Limb joints are marked with circles and connected with straight bone lines.
- Skull and pelvis shapes are present and connected to the spine.
- Silhouette outline surrounds the skeleton with a consistent margin.
- Every bone sits inside the silhouette.
- Landmarks are labeled or clearly placed: spine midpoint, hip joint, shoulder joint, skull center, tail tip.
- Drawing is clear and readable as a skeleton and as a silhouette.
- Valid alternatives are accepted: different limb lengths, rib spacing, and skull shapes are allowed if the pair matches.
Questions and answers
Do I need to know dinosaur species names to draw a skeleton?
No. This guide focuses on general skeleton structure and silhouette matching, not taxonomy. You can draw a bipedal or quadrupedal dinosaur shape without naming a species.
What does x-height mean in this drawing guide?
X-height is the distance from the baseline to the midline of a lowercase letter. Letter styles vary, so use your own writing as a reference. It is a simple way to set a consistent margin or measurement.
Can my skeleton look different from another student's?
Yes. The rubric allows valid alternatives. Different limb lengths, rib spacing, and skull shapes can all be correct if the skeleton is connected and the silhouette matches it.
How do I know if my silhouette matches my skeleton?
Cover each drawing in turn. The skeleton should read as a connected structure, and the silhouette should read as a solid animal shape. Every bone should sit inside the silhouette with a consistent margin.