Free original lessons
Sketch a Realistic Dinosaur: Proportions and Scale Texture
Learn to draw a realistic dinosaur using body proportion guides and layered scale texture. Includes a worked example, four practice tasks, and a clear rubric for self-checking.
Free lesson
Four exercises
Worked answers
Object Drawing Lessons
Realistic dinosaur drawing depends on two measurable skills: placing body parts in consistent proportion, and building scale texture that follows the body's form. This lesson uses a simple convention: x-height means the distance from a baseline to a midline, and you will use that unit to check limb and torso ratios. Letter styles and scale patterns vary, so the rubric rewards any consistent, checkable choice rather than one universal answer. All measurements below are hypothetical examples; measure your own paper and tools before drawing.
Practice materials: Printable downloads are not available for this lesson yet. Use the instructions and four exercises below.
Reference illustration
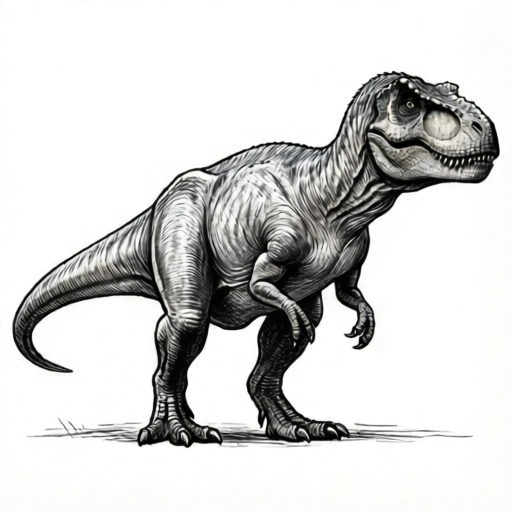
Use the stated measurements and conventions for each exercise.
Setting Up Proportion Guides
Begin by drawing a horizontal baseline and a parallel midline above it. The distance between them is your x-height unit. Use a ruler to mark this unit along the baseline. For a side-view dinosaur, plan the torso length as a multiple of x-height, for example four units, and the tail as three units. These numbers are hypothetical; choose values that fit your paper and record them.
Place the shoulder joint at the one-third point of the torso length, measured from the front, and the hip joint at the two-thirds point. Draw light vertical guides through each joint. The leg length from hip to ground should equal the torso height plus one x-height in this example. Check every ratio with simple arithmetic before adding detail.
- Draw a baseline and a midline; label the gap as one x-height.
- Mark torso length and tail length in whole x-height units.
- Place shoulder and hip guides at one-third and two-thirds of torso length.
- Measure leg length from hip guide to baseline and compare with your planned ratio.
Building the Body Outline
Connect the shoulder and hip guides with a smooth back curve and a slightly deeper belly curve. Keep the neck short and thick relative to the torso in this example; a neck length of one and a half x-height units is a checkable starting point. The head should sit forward of the shoulder guide by about one unit.
Draw the tail tapering from the hip to a point, using the tail length you marked. Add the far leg slightly offset and shorter to suggest depth. Check that the near foot lands on the baseline and the far foot sits just above it.
- Curve the back from shoulder to hip, then the belly below.
- Attach the neck and head using your recorded unit lengths.
- Taper the tail from hip to tip.
- Add the far leg offset and slightly shorter, then check foot placement.
Adding Scale Texture in Zones
Divide the body into three texture zones: large rounded scales on the back and flanks, smaller overlapping scales on the limbs, and fine wrinkles on the neck and tail underside. Draw scale rows as curved lines that follow the body's contour, not straight horizontal lines. Each scale should touch its neighbors without gaps.
Use a simple convention: a scale row is valid if its curve bends toward the nearest body edge. Vary scale size gradually from back to belly. Check texture by counting rows across one x-height on the flank; three to five rows is a reasonable hypothetical target.
- Mark three texture zones with light boundary lines.
- Draw curved scale rows following the body contour in each zone.
- Vary scale size gradually and keep neighbors touching.
- Count rows across one x-height on the flank and compare with your target.
Checking and Refining
Compare your drawing against the proportion guides: torso length, tail length, leg length, and neck length should match your recorded units within a small tolerance you set, for example half an x-height. Check that scale rows bend consistently toward body edges.
Refine only after checking. Erase guide lines lightly and strengthen the body outline. Add a few larger scales along the back ridge and smaller ones near the joints. Keep the texture consistent across zones so the body reads as one form.
- Measure each planned ratio against your drawing.
- Check scale row curvature and row count.
- Erase guides and strengthen the outline.
- Add accent scales at the back ridge and joints.
Worked example
A side-view dinosaur is planned with torso length 4 units, tail length 3 units, leg length 5 units, and neck length 1.5 units, where one unit is one x-height. The drawing shows torso 4 units, tail 3.5 units, leg 5 units, and neck 1.5 units. Which measurement is outside a half-unit tolerance, and what is the fix?
Worked answer
The tail is 3.5 units against a planned 3 units, a difference of 0.5 units. This equals the half-unit tolerance, so it is at the boundary. To stay inside, shorten the tail by 0.5 units to 3 units. Torso, leg, and neck match exactly.
Four practice exercises
Exercise 1
A dinosaur plan uses torso 5 units, tail 4 units, leg 6 units, and neck 2 units, with one unit equal to one x-height. Your drawing shows torso 5 units, tail 4.5 units, leg 6 units, and neck 2 units. Using a half-unit tolerance, is the tail acceptable?
Show answer and check
No. The tail is 0.5 units over the planned 4 units, which equals the half-unit tolerance boundary. Shorten it to 4 units to stay inside.
Why: Subtract planned from drawn: 4.5 minus 4 equals 0.5. The tolerance is 0.5, so the difference is at the limit, not inside it.
Check: Re-measure the tail in x-height units and confirm the difference is less than 0.5 units.
Exercise 2
On a flank, you count 6 scale rows across one x-height. Your target range is 3 to 5 rows. Describe one adjustment and how to check it.
Show answer and check
Reduce the number of rows by making each scale slightly larger, then recount across the same x-height. Aim for 3 to 5 rows.
Why: Six rows exceeds the target maximum of five. Enlarging scales reduces row count without changing the zone boundaries.
Check: Count rows again across one x-height on the same flank and confirm the count is between 3 and 5.
Exercise 3
A scale row on the belly curves away from the nearest body edge. According to the convention, is this valid? What is the fix?
Show answer and check
It is not valid. Redraw the row so it curves toward the nearest body edge.
Why: The convention states a valid row bends toward the nearest body edge. Curving away breaks consistency with other zones.
Check: Trace the row and confirm the curve points toward the closest outline edge.
Exercise 4
Your near foot sits on the baseline, but your far foot also sits on the baseline. What depth cue is missing, and how do you check the fix?
Show answer and check
The far foot should sit slightly above the baseline to suggest depth. Raise it by a small amount, such as half an x-height, and check that it no longer touches the baseline.
Why: Both feet on the baseline flatten the pose. Offsetting the far foot upward creates a simple depth cue.
Check: Measure the gap between the far foot and the baseline and confirm it is greater than zero and consistent with your chosen offset.
Common mistakes
- Drawing the tail as long as the torso without checking units. Mark tail length in x-height units before drawing and compare with the torso length.
- Using straight horizontal scale rows that ignore body contour. Curve each row toward the nearest body edge and check the bend direction.
- Making the far leg the same length as the near leg. Offset the far leg and shorten it slightly to suggest depth, then check foot placement.
- Changing scale size abruptly between zones. Gradually vary scale size from back to belly and count rows across one x-height.
Self-check rubric
- Torso, tail, leg, and neck lengths match recorded x-height units within the chosen tolerance.
- Shoulder and hip guides sit at the planned fractions of torso length.
- Near foot lands on the baseline and far foot sits slightly above it.
- Scale rows curve toward the nearest body edge in all three zones.
- Scale size varies gradually and neighbors touch without gaps.
- Row count across one x-height on the flank falls within the chosen target range.
- Guide lines are erased and the body outline is clear.
Questions and answers
What does x-height mean in this lesson?
X-height is the distance from a baseline to a midline. You use it as a repeatable unit to check body proportions.
Do I need to use the example numbers?
No. The numbers are hypothetical examples. Measure your paper and choose whole-unit values you can check with simple arithmetic.
How do I know my scale texture is consistent?
Check that each row curves toward the nearest body edge and that row counts across one x-height stay within your chosen target range.
Can I draw a different dinosaur species?
Yes, as long as you keep the same proportion-guide method and scale-zone convention. Record your own unit ratios and check them.