Free original lessons
Draw a Dragon Eye: Slit Pupil, Iris, Lid Folds, and Scaled Brow
Learn to construct a dragon eye with a vertical slit pupil, shaded iris, lid folds, and a scaled brow ridge using simple measured steps and a clear convention.
Free lesson
Four exercises
Worked answers
Object Drawing Lessons
This lesson teaches a repeatable way to draw a dragon eye. You will set an eye axis, build the lid shape, place a vertical slit pupil, shade the iris, add lid folds, and finish a scaled brow ridge. The method uses a simple convention: the eye's height is measured from the upper lid line to the lower lid line, and the pupil is a narrow vertical lens centered on the eye axis. Letter styles and scale shapes vary, so the rubric rewards consistent construction and clear shading rather than one exact appearance. All measurements are hypothetical examples; measure your own paper and tools.
Practice materials: Printable downloads are not available for this lesson yet. Use the instructions and four exercises below.
Reference illustration
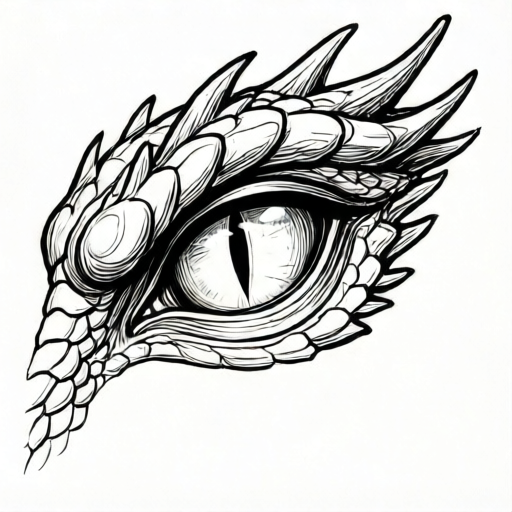
Use the stated measurements and conventions for each exercise.
Set the eye axis and lid shape
Begin with a light horizontal axis line. Mark a center point. Decide the eye width and height as simple numbers, for example 60 mm wide and 30 mm high. Draw an upper lid curve and a lower lid curve that meet at the corners. Keep the upper curve slightly flatter than the lower curve so the eye reads as a dragon eye rather than a circle.
Check symmetry by measuring from the center point to each corner. If the left half is 30 mm, the right half should also be about 30 mm. Adjust lightly before darkening any line.
- Draw a horizontal axis and mark the center.
- Mark corners at equal distances from the center.
- Draw the upper lid curve with a gentle rise.
- Draw the lower lid curve with a slightly deeper curve.
- Measure both halves and correct any imbalance.
Place the slit pupil and shade the iris
The pupil is a vertical slit shaped like a narrow lens. Its height should be about 70 percent of the eye height, and its width about 10 percent of the eye width. Center it on the vertical axis. Outline the iris as a ring between the pupil and the lid edges, leaving a small margin at the corners.
Shade the iris with radial strokes that follow the ring. Keep the darkest values near the pupil and the lid edges, and leave a lighter band in the middle of the iris. This creates depth without needing a specific color.
- Mark the pupil height at 70 percent of the eye height.
- Draw a narrow vertical lens centered on the axis.
- Outline the iris ring with a small corner margin.
- Shade radially, darker near the pupil and lid edges.
- Leave a lighter middle band in the iris.
Add lid folds and the scaled brow ridge
Add two or three lid folds above the upper lid. Each fold is a short curve that follows the lid direction but sits slightly higher. Space them evenly, for example 4 mm apart. Below the eye, add one subtle lower fold if desired.
For the scaled brow ridge, draw a row of overlapping scale rings above the upper folds. Use a consistent convention: each scale is a rounded ring with a short inner arc. Vary the ring sizes slightly, but keep the row aligned to the brow curve. Shade under each ring to separate it from the next.
- Draw two or three upper lid folds following the lid curve.
- Space folds evenly and keep them short.
- Draw a brow curve above the folds.
- Add overlapping scale rings along the brow curve.
- Shade beneath each ring to show overlap.
Refine contrast and check the construction
Darken the pupil edges and the lid outline last. Keep the iris shading softer than the pupil. Check that the pupil is centered, the iris ring is even, and the scale rings overlap in one direction. Measure key distances again: eye width, eye height, pupil height, and fold spacing.
If a measurement is off by more than a few millimeters, erase lightly and correct it. The goal is a clear, readable dragon eye with consistent construction.
- Darken the pupil and lid outline.
- Soften the iris shading where needed.
- Check pupil centering and iris ring evenness.
- Confirm scale overlap direction is consistent.
- Re-measure width, height, pupil height, and fold spacing.
Worked example
Construct a dragon eye 60 mm wide and 30 mm high with a centered slit pupil, an iris ring, two lid folds spaced 4 mm apart, and a brow row of five overlapping scale rings.
Worked answer
Draw a 60 mm horizontal axis and mark the center. Mark corners 30 mm from the center. Draw the upper lid curve and a slightly deeper lower lid curve. Mark the pupil height at 21 mm (70 percent of 30 mm) and draw a narrow vertical lens centered on the axis. Outline the iris ring with a 3 mm corner margin. Shade radially, darker near the pupil and lid edges. Add two upper lid folds 4 mm apart. Draw a brow curve above the folds and place five overlapping scale rings along it, all overlapping in the same direction. Darken the pupil and lid outline last.
Four practice exercises
Exercise 1
An eye is 50 mm wide and 25 mm high. Using the lesson convention, what are the pupil height and pupil width?
Show answer and check
Pupil height is 17.5 mm and pupil width is 5 mm.
Why: Pupil height is 70 percent of eye height: 0.70 times 25 mm equals 17.5 mm. Pupil width is 10 percent of eye width: 0.10 times 50 mm equals 5 mm.
Check: Multiply 25 by 0.70 and 50 by 0.10. Confirm the pupil is centered and narrower than the iris ring.
Exercise 2
An eye is 80 mm wide. You mark the left corner 40 mm from the center. Where should the right corner be, and what is the total eye width?
Show answer and check
The right corner should be 40 mm from the center, and the total eye width is 80 mm.
Why: Symmetry requires equal distances from the center. 40 mm plus 40 mm equals 80 mm.
Check: Measure both halves from the center point. They should match within a few millimeters.
Exercise 3
You plan three lid folds spaced 5 mm apart above the upper lid. What is the distance from the first fold to the third fold?
Show answer and check
The distance is 10 mm.
Why: Three folds create two gaps. Two gaps of 5 mm each equal 10 mm.
Check: Count the gaps, not the folds. Multiply the number of gaps by the spacing.
Exercise 4
A brow row has six scale rings. Each ring overlaps the next by 2 mm, and each ring is 8 mm wide. What is the total brow row length if the rings are placed in a straight line?
Show answer and check
The total length is 38 mm.
Why: Six rings of 8 mm give 48 mm before overlap. There are five overlaps of 2 mm each, totaling 10 mm. 48 mm minus 10 mm equals 38 mm.
Check: Add ring widths, subtract the overlap for each gap, and confirm the number of gaps is one less than the number of rings.
Common mistakes
- Making the pupil too wide, so it reads as a cat pupil rather than a slit. Keep pupil width near 10 percent of eye width and height near 70 percent of eye height.
- Shading the iris evenly, which flattens the eye. Shade darker near the pupil and lid edges, leaving a lighter middle band.
- Drawing scale rings in random directions. Choose one overlap direction and keep every ring consistent along the brow curve.
- Placing lid folds too far from the upper lid. Keep folds close to the lid and space them evenly, for example 4 mm apart.
Self-check rubric
- Eye width and height are measured and the halves are balanced within a few millimeters.
- Pupil is a narrow vertical lens centered on the eye axis.
- Iris ring is even and shaded darker near the pupil and lid edges.
- Two or three lid folds follow the upper lid and are evenly spaced.
- Scale rings overlap consistently along the brow curve.
- Final contrast separates pupil, iris, folds, and brow clearly.
Questions and answers
Do I need a specific pencil or paper?
No. Use any pencil and paper you have. Measure your actual paper and tools, and treat all numbers here as hypothetical examples.
Can the pupil be a different height?
Yes. The 70 percent height is a convention for this lesson. You may adjust it, but keep the pupil centered and narrow so it still reads as a slit.
How many scale rings should the brow have?
There is no fixed number. Use enough rings to cover the brow curve with slight overlap, and keep their size variation small.
What if my eye is not perfectly symmetrical?
Measure from the center to each corner. If the halves differ by more than a few millimeters, adjust lightly before darkening lines.