Free original lessons
Elephant Eye Close-Up: Structure, Lid Folds, and Highlight
Learn to draw an elephant eye close-up with clear lid structure, iris and pupil detail, and a convincing highlight. Includes guided steps, common fixes, and four practice tasks.
Free lesson
Four exercises
Worked answers
Object Drawing Lessons
This lesson focuses on the close-up construction of an elephant eye. You will build the eye from simple shapes, add the heavy lid folds that give elephants their characteristic look, place the iris and pupil with care, and finish with a highlight that reads as moisture without looking like a sticker. The convention for this drawing is that the visible eye opening is wider than it is tall, the upper lid sits low over the iris, and the highlight is a small, soft-edged shape near the upper-left or upper-right of the iris, depending on your chosen light direction. Letter styles and exact proportions vary between individual elephants, so treat the numerical examples as hypothetical starting points and adjust to your reference. All measurements use centimeters unless stated otherwise.
Practice materials: Printable downloads are not available for this lesson yet. Use the instructions and four exercises below.
Reference illustration
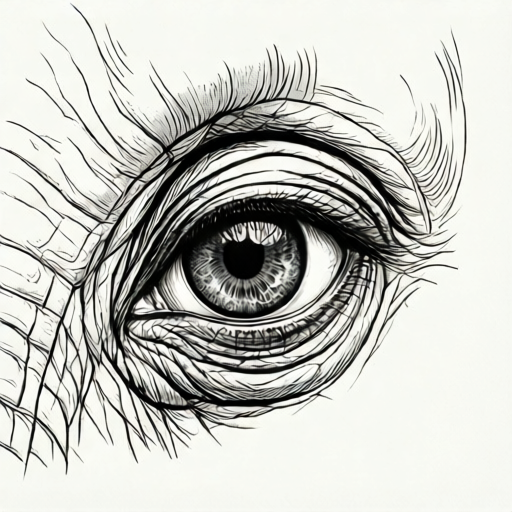
Use the stated measurements and conventions for each exercise.
Building the eye opening and lid structure
Begin with a light rectangular guide for the eye opening. A hypothetical example is 6 cm wide and 3 cm tall, but measure your own reference. The upper lid is not a single arc; it has a thick fold that runs roughly parallel to the eye opening and a second, softer crease above it. Draw the lower lid as a thinner, flatter curve that meets the upper lid at the corners.
The skin around an elephant eye is wrinkled and heavy. Add two or three short crease lines radiating from the outer corner, and one deeper fold above the upper lid. Keep these lines light at first so you can adjust their weight later.
- Draw a light horizontal rectangle 6 cm by 3 cm as a hypothetical guide.
- Sketch the upper lid as a low arc that covers the top third of the rectangle.
- Add a thicker fold line 0.5 cm above the upper lid, following the same curve.
- Draw the lower lid as a flatter arc that meets the upper lid at both corners.
- Add two short crease lines at the outer corner and one soft crease above the upper fold.
Iris, pupil, and highlight placement
The iris fills most of the visible eye opening. Draw it as a circle or slight oval that touches the upper lid and leaves a small gap at the bottom. The pupil is a vertical oval inside the iris, roughly one-third the width of the iris. Shade the iris with light strokes that follow its curve, leaving the pupil dark.
Place the highlight as a small shape near the upper edge of the iris, offset toward the side where your light comes from. A hypothetical highlight is 0.8 cm wide and 0.5 cm tall. Keep its edges soft by blending slightly, and avoid pure white unless your paper is very smooth. A second, tiny secondary highlight near the lower edge can suggest reflected light.
- Draw the iris as a circle that touches the upper lid and sits slightly above the lower lid.
- Add a vertical oval pupil about one-third the iris width, centered slightly toward the light side.
- Shade the iris with curved strokes, leaving the pupil dark.
- Place the main highlight near the upper edge of the iris, offset toward the light source.
- Add a tiny secondary highlight near the lower edge and soften both edges.
Shading and final checks
Shade the lids and surrounding skin with light, layered strokes. The upper fold should be darker underneath, and the lower lid should have a thin shadow along its top edge. Check that the highlight sits on the iris, not on the pupil, and that the pupil remains dark. Compare the width of the eye opening to the height: if it looks too round, widen it slightly.
Finally, check that the crease lines support the lid structure rather than floating on the surface. Erase any guide lines that no longer serve the drawing, and darken the upper lid edge slightly more than the lower lid edge to suggest weight.
- Shade under the upper fold with light, layered strokes.
- Add a thin shadow along the top edge of the lower lid.
- Check that the highlight is on the iris and the pupil is dark.
- Widen the eye opening if it looks too round.
- Erase guide lines and darken the upper lid edge slightly more than the lower.
Worked example
Draw an elephant eye close-up with a 6 cm by 3 cm eye opening, a thick upper fold, an iris that touches the upper lid, a vertical pupil, and a highlight near the upper-left of the iris.
Worked answer
Start with a 6 cm by 3 cm rectangle. Draw the upper lid as a low arc covering the top third. Add a fold line 0.5 cm above it. Draw the lower lid as a flatter arc meeting the upper lid at the corners. Draw the iris as a circle touching the upper lid and sitting slightly above the lower lid. Add a vertical pupil one-third the iris width. Shade the iris with curved strokes. Place a 0.8 cm by 0.5 cm highlight near the upper-left of the iris and soften its edges. Add a tiny secondary highlight near the lower edge. Shade under the upper fold and along the top of the lower lid. Check that the eye opening is wider than tall and the pupil is dark.
Four practice exercises
Exercise 1
Draw an elephant eye close-up with a 5 cm by 2.5 cm eye opening. Place the highlight near the upper-right of the iris. Describe the steps and the final check.
Show answer and check
Draw a 5 cm by 2.5 cm rectangle. Upper lid arc covers the top third. Fold line 0.4 cm above. Lower lid flatter arc. Iris circle touches upper lid. Vertical pupil one-third iris width. Shade iris with curved strokes. Highlight 0.7 cm by 0.4 cm near upper-right, softened. Secondary highlight near lower edge. Shade under upper fold and along lower lid top. Check width-to-height ratio is 2:1 and pupil is dark.
Why: The 5 cm by 2.5 cm guide keeps the opening wider than tall. The upper-right highlight matches the chosen light direction. The fold line and crease lines give lid structure. The check confirms the key proportions and highlight placement.
Check: Measure the eye opening width and height; confirm the ratio is about 2:1. Confirm the highlight is on the iris, not the pupil, and that the pupil is dark.
Exercise 2
Draw an elephant eye close-up with a 7 cm by 3.5 cm eye opening. Use two crease lines at the outer corner and a secondary highlight near the lower-left of the iris. Describe the steps and the final check.
Show answer and check
Draw a 7 cm by 3.5 cm rectangle. Upper lid arc covers top third. Fold line 0.5 cm above. Lower lid flatter arc. Iris circle touches upper lid. Vertical pupil one-third iris width. Shade iris with curved strokes. Main highlight 0.9 cm by 0.5 cm near upper-left, softened. Secondary highlight near lower-left. Add two crease lines at outer corner. Shade under upper fold and along lower lid top. Check ratio is 2:1 and pupil is dark.
Why: The larger guide still uses a 2:1 ratio. Two crease lines add structure at the outer corner. The secondary highlight near the lower-left suggests reflected light. The check confirms proportions and highlight placement.
Check: Measure width and height; confirm ratio is about 2:1. Confirm two crease lines are present at the outer corner and the main highlight is on the iris.
Exercise 3
Draw an elephant eye close-up with a 6 cm by 3 cm eye opening. Make the upper lid edge darker than the lower lid edge and place the main highlight near the upper-left of the iris. Describe the steps and the final check.
Show answer and check
Draw a 6 cm by 3 cm rectangle. Upper lid arc covers top third. Fold line 0.5 cm above. Lower lid flatter arc. Iris circle touches upper lid. Vertical pupil one-third iris width. Shade iris with curved strokes. Main highlight 0.8 cm by 0.5 cm near upper-left, softened. Shade under upper fold. Darken upper lid edge more than lower lid edge. Check ratio is 2:1 and pupil is dark.
Why: The darker upper lid edge suggests weight. The highlight placement matches the light direction. The check confirms the proportion and the relative edge darkness.
Check: Measure width and height; confirm ratio is about 2:1. Compare the upper and lower lid edges; the upper should be visibly darker. Confirm the pupil is dark.
Exercise 4
Draw an elephant eye close-up with a 4 cm by 2 cm eye opening. Add one soft crease above the upper fold and a tiny secondary highlight near the lower-right of the iris. Describe the steps and the final check.
Show answer and check
Draw a 4 cm by 2 cm rectangle. Upper lid arc covers top third. Fold line 0.3 cm above. Lower lid flatter arc. Iris circle touches upper lid. Vertical pupil one-third iris width. Shade iris with curved strokes. Main highlight 0.5 cm by 0.3 cm near upper-left, softened. Secondary highlight near lower-right. Add one soft crease above the upper fold. Shade under upper fold and along lower lid top. Check ratio is 2:1 and pupil is dark.
Why: The smaller guide keeps the 2:1 ratio. The soft crease above the upper fold adds structure without clutter. The secondary highlight near the lower-right suggests reflected light. The check confirms proportions and highlight placement.
Check: Measure width and height; confirm ratio is about 2:1. Confirm the soft crease is present above the upper fold and the main highlight is on the iris.
Common mistakes
- Drawing the eye opening as a tall oval instead of a wide one. Measure the width and height of your reference eye opening and adjust the guide rectangle to match. A hypothetical ratio is 2:1 width to height.
- Placing the highlight on the pupil or making it too large. Move the highlight to the upper edge of the iris and keep it small, about 0.8 cm wide in a 6 cm eye opening.
- Drawing the upper lid as a single thin line without folds. Add a thicker fold line above the upper lid and one or two crease lines at the outer corner.
- Shading the iris with straight strokes that flatten its curve. Use curved strokes that follow the iris circle, and keep the pupil dark.
Self-check rubric
- Eye opening is wider than it is tall, with a clear upper and lower lid.
- Upper lid has a visible fold and at least one crease line at the outer corner.
- Iris touches the upper lid and sits slightly above the lower lid.
- Pupil is a vertical oval, roughly one-third the iris width, and remains dark.
- Main highlight is small, soft-edged, and placed on the iris near the upper edge, offset toward the light source.
- Shading follows the curve of the iris and the lids, with darker shading under the upper fold.
- Guide lines are erased and the upper lid edge is slightly darker than the lower lid edge.
Questions and answers
How wide should the eye opening be?
A hypothetical starting point is 6 cm wide and 3 cm tall, but measure your own reference. The key is that the opening is wider than it is tall.
Where should the highlight go?
Place the main highlight near the upper edge of the iris, offset toward your light source. Keep it small and soft-edged.
Do I need to draw every wrinkle?
No. Two or three crease lines at the outer corner and one fold above the upper lid are enough to suggest the structure.
Can I use a different light direction?
Yes. The convention allows the highlight on either the upper-left or upper-right of the iris, as long as it is consistent with your shading.