Free original lessons
Eye Placement on a Front-Face Grid: Line and Spacing Rules
Learn to place eyes on a front-facing face grid using the eye line, one-eye spacing, and iris guides. Includes rules, mistakes, and four practice tasks.
Free lesson
Four exercises
Worked answers
Object Drawing Lessons
This lesson teaches a reliable method for placing eyes on a front-facing face grid. You will use two rules: the eye line (a horizontal guide at the vertical midpoint of the head) and the one-eye spacing rule (the gap between the eyes is about one eye width). You will also place irises with a simple guide. The lesson excludes three-quarter views, scaled eye ratios, and full facial feature construction. All measurements are checkable with a ruler or by counting grid squares. Numerical values are hypothetical examples unless you measure your own paper and grid.
Practice materials: Printable downloads are not available for this lesson yet. Use the instructions and four exercises below.
Reference illustration
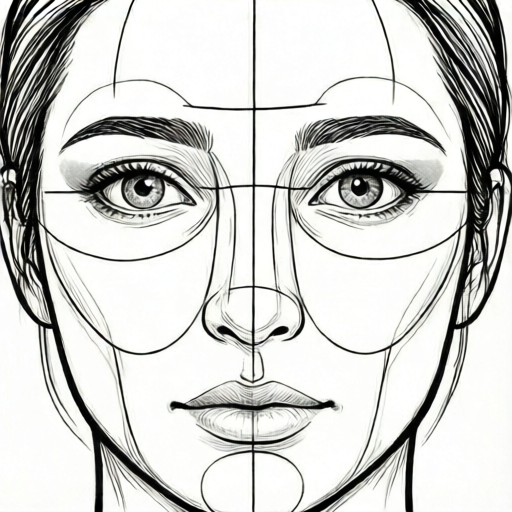
Use the stated measurements and conventions for each exercise.
Set the eye line and mark eye widths
Draw a front-facing oval or rectangle for the head. Mark the vertical midpoint from the top of the head to the chin; this is the eye line. On a grid, count squares to confirm the midpoint. For example, if the head spans 12 squares vertically, the eye line is at square 6 from the top.
Mark the total eye span across the eye line. A common rule is that the two eyes plus the gap between them fit within the width of the head, with about half an eye width of margin on each side. Using hypothetical values: if the head is 10 squares wide and each eye is 2 squares wide, then two eyes plus one gap equal 6 squares, leaving 4 squares total margin, or 2 squares per side. Adjust only after measuring your actual grid.
- Draw the head outline and mark the top and chin.
- Find the vertical midpoint and draw a light horizontal eye line.
- Measure the head width at the eye line and record it in squares or centimeters.
- Choose an eye width that fits the spacing rule; label it as a trial value.
- Mark the left margin, left eye width, gap width, right eye width, and right margin along the eye line.
- Check that the sum equals the head width before drawing eye shapes.
Draw eye sockets and place irises
Draw each eye as a simple almond or oval centered on its marked width. Keep both eyes on the same eye line. The inner corners face the gap; the outer corners face the margins. Iris placement uses a guide: draw a light vertical line through the center of each eye socket, then place the iris center on that line at about the middle of the eye height. This is a convention, not a universal rule; valid alternatives include irises slightly toward the inner corners for a focused look, as long as you state the convention.
Use the grid to keep symmetry. Count squares from the center line to each iris center; the counts should match. If they do not, adjust the iris, not the eye line, unless the eye line itself was mismeasured.
- Draw the left eye socket within its marked width.
- Draw the right eye socket within its marked width.
- Mark the vertical center of each socket.
- Place the iris center on each vertical center at mid-height.
- Check symmetry by counting squares from the face center line.
- Label any deliberate alternative convention, such as irises shifted inward.
Check spacing and line consistency
A finished placement should pass three checks: both eyes sit on the eye line, the gap between the inner corners is about one eye width, and the margins are equal. Use simple arithmetic. If the head is 10 squares wide, each eye is 2 squares, and the gap is 2 squares, then margins are (10 - 6) / 2 = 2 squares each. If your numbers differ, recompute before erasing.
Handwriting and art conventions vary. X-height is measured from baseline to midline, and letter styles vary, so do not force a single universal eye shape. The rubric rewards consistent use of a stated convention and checkable spacing, not identical drawings.
- Measure the gap between inner corners and compare to one eye width.
- Measure left and right margins and compare.
- Confirm both eye centers lie on the eye line.
- Record your measurements next to the drawing for review.
Worked example
A front-facing head is 12 squares wide at the eye line and 16 squares tall from top to chin. Using hypothetical values, place the eye line, two eyes of 2 squares each, a 2-square gap, and equal margins. State the margin and iris guide.
Worked answer
The eye line is at 8 squares from the top (16 / 2). Total eye span is 2 + 2 + 2 = 6 squares. Margins are (12 - 6) / 2 = 3 squares each. Mark left margin 3, left eye 2, gap 2, right eye 2, right margin 3. Iris centers sit on the vertical center of each eye socket at mid-height. Check: 3 + 2 + 2 + 2 + 3 = 12 squares.
Four practice exercises
Exercise 1
A front-facing head is 10 squares wide at the eye line. Each eye is 2 squares wide and the gap is 2 squares. What is each margin?
Show answer and check
Each margin is 2 squares.
Why: Total eye span is 2 + 2 + 2 = 6 squares. Head width minus span is 10 - 6 = 4 squares. Divide by two margins: 4 / 2 = 2 squares each.
Check: Add margins and span: 2 + 2 + 2 + 2 + 2 = 10 squares, matching the head width.
Exercise 2
A head is 14 squares tall from top to chin. Where is the eye line, and how many squares from the top?
Show answer and check
The eye line is at the vertical midpoint, 7 squares from the top.
Why: Midpoint is half the height: 14 / 2 = 7 squares.
Check: Count 7 squares down from the top and 7 squares up from the chin; both meet at the same line.
Exercise 3
On an eye line 12 squares wide, a student marks a 3-square left margin, a 2-square left eye, a 3-square gap, a 2-square right eye, and a 2-square right margin. Does this satisfy the spacing rule? Explain.
Show answer and check
No. The gap is 3 squares while each eye is 2 squares, and the margins are unequal (3 and 2).
Why: The gap should be about one eye width, which is 2 squares here. Margins should be equal. The total is 3 + 2 + 3 + 2 + 2 = 12, so the width fits, but the spacing rule is not met.
Check: Compare gap to eye width (3 vs 2) and compare margins (3 vs 2). Recompute equal margins as (12 - 6) / 2 = 3 squares each with a 2-square gap.
Exercise 4
A student places irises on the vertical center of each eye socket but shifts both irises one square toward the inner corners. Is this acceptable? State what must be done.
Show answer and check
Yes, if the student states the inward-shift convention and applies it consistently to both eyes.
Why: Iris placement is a convention, not a single universal rule. The rubric allows valid alternatives when labeled and consistent.
Check: Check that both irises are shifted by the same amount and that the convention is written next to the drawing.
Common mistakes
- Placing eyes above or below the vertical midpoint. Recount grid squares from top to chin and redraw the eye line at the midpoint.
- Making the gap between eyes much wider or narrower than one eye width. Measure one eye width, mark the gap with that same width, and adjust the eye sockets.
- Using unequal margins on the left and right. Subtract the total eye span from the head width, divide by two, and mark equal margins.
- Placing irises off the vertical center without stating a convention. Either center the irises or label the alternative convention and keep it consistent in both eyes.
Self-check rubric
- Eye line is at the measured vertical midpoint of the head.
- Both eyes sit on the eye line.
- Gap between inner corners is approximately one measured eye width.
- Left and right margins are equal within one grid square or 0.5 cm.
- Iris placement follows a stated convention and is consistent in both eyes.
- Measurements or grid counts are recorded and checkable.
- Valid alternative conventions are labeled rather than penalized.
Questions and answers
What is the eye line?
A horizontal guide at the vertical midpoint of the head from top to chin. On a grid, count squares to confirm it.
How wide is the gap between the eyes?
About one eye width is a common convention. Measure your actual eye width and use that same width for the gap.
Where do irises go?
A simple guide is the vertical center of each eye socket at mid-height. You may state an alternative convention, such as irises shifted slightly inward, as long as it is consistent.
Do I need exact numbers?
No. Use hypothetical example values only to practice the arithmetic, then measure your own paper and grid.