Free original lessons
Draw an Easy Kaiju with Dorsal Plates and Scale Texture
Learn to construct a Godzilla-style kaiju step by step, add dorsal plates, and build simple scale texture with a clear convention and rubric.
Free lesson
Four exercises
Worked answers
Object Drawing Lessons
This lesson teaches a repeatable way to draw a Godzilla-style kaiju: a heavy bipedal body, a long tail, a broad head, and a row of dorsal plates. You will build the figure from simple shapes, place the plates along the spine, and add scale texture using a defined convention. The convention is a set of short curved marks that suggest overlapping scales; it is not a single correct pattern. Letter styles and line weights vary, so the rubric rewards clear structure and consistent texture rather than one exact drawing. All measurements are hypothetical examples unless you measure your own paper and tools. Work on plain paper with a pencil, eraser, and a fine-tipped pen if available.
Practice materials: Printable downloads are not available for this lesson yet. Use the instructions and four exercises below.
Reference illustration
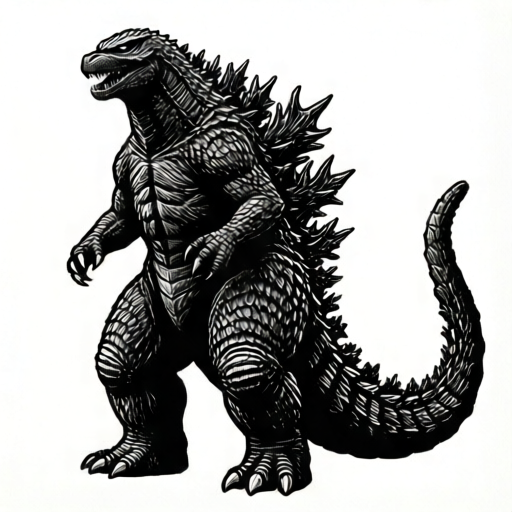
Use the stated measurements and conventions for each exercise.
Build the body from simple shapes
Start with a light construction drawing. Draw a large oval for the chest and a smaller oval for the hips, then connect them with a curved spine line. Add two thick legs as bent rectangles, and a long tail as a tapering curve. Keep the head as a rounded wedge on a short neck. These shapes are guides, not final outlines.
Check proportions by comparing the head length to the body height. A common easy ratio is a head about one-fifth of the total height, but this is a hypothetical example. Adjust until the figure looks heavy and stable. The feet should sit on a shared ground line so the kaiju does not float.
- Draw a ground line and mark the total height with two light dots.
- Place the chest oval and hip oval, then connect them with a spine curve.
- Add bent legs and a tapering tail, keeping the tail clear of the legs.
- Add the head wedge and a short neck, then erase construction lines lightly.
Place dorsal plates along the spine
Dorsal plates run from the back of the head to the tail. Draw a light spine line first, then place plates as simple triangles or rounded fins. Vary size: smaller near the head, larger over the back, and smaller again toward the tail tip. This creates a readable silhouette.
Use a consistent spacing convention. For example, leave a gap about half the width of each plate between plates. This is a hypothetical example; measure your own drawing and keep the spacing even. Plates should sit on the spine line, not float beside it. Overlap is allowed if it looks intentional.
- Draw a light spine line from the head to the tail tip.
- Mark plate positions with small dots, keeping spacing even.
- Draw each plate as a triangle or rounded fin, varying height gradually.
- Check that every plate touches the spine line and that the row reads as one connected feature.
Add scale texture with a defined convention
Scale texture is suggested with short curved marks. The convention: each mark is a shallow arc, about the width of a pencil tip, and marks are grouped in rows that follow the body form. Rows on the chest curve downward; rows on the legs curve around the leg. This is a convention, not a rule about real scales.
Keep marks loose and spaced. Do not fill every area. Leave the face and plate edges clearer so the silhouette stays readable. If you use a pen, test it on scrap paper first. Line weight and letter style vary, so the rubric checks consistency and placement rather than exact mark shape.
- Choose two or three body areas for texture, such as chest, thigh, and tail.
- Draw short arcs in rows that follow the body curve.
- Keep spacing even within each area and leave gaps between groups.
- Erase any texture that crosses the final outline, then darken the outline lightly.
Refine the silhouette and check readability
Step back and look at the drawing from a short distance. The kaiju should read as a heavy biped with a long tail and a clear plate row. If the plates disappear against the body, increase their height slightly. If the tail looks thin, widen the base. These are simple visual checks, not printer tolerances.
Finally, darken the main outline and the plate edges. Keep construction lines light or erase them. Add a simple ground shadow if you wish, but do not add detailed rendering. The goal is a clear, easy-to-read kaiju drawing with dorsal plates and scale texture.
- Check the ground line and foot placement.
- Check that the plate row is visible and evenly spaced.
- Check that texture rows follow the body form and do not cover the face.
- Darken the outline and plate edges, then erase leftover construction marks.
Worked example
A student draws a kaiju on a sheet where the total height is 15 cm. The head is 3 cm tall, the chest oval is 6 cm tall, and the hip oval is 4 cm tall. The student places 10 dorsal plates with even spacing. Check whether the head-to-height ratio is about one-fifth and whether the plate count is within the suggested range.
Worked answer
Head-to-height ratio: 3 cm divided by 15 cm equals 0.2, or one-fifth. This matches the hypothetical example. Plate count: 10 is within the suggested range of eight to twelve. The drawing meets both simple checks. If the plates looked crowded, the student could reduce to eight or increase spacing, but the count itself is acceptable.
Four practice exercises
Exercise 1
On a sheet where the total kaiju height is 20 cm, a student draws a head 4 cm tall. Is the head-to-height ratio about one-fifth? Show the arithmetic.
Show answer and check
Yes. 4 cm divided by 20 cm equals 0.2, which is one-fifth.
Why: The hypothetical example ratio is head height divided by total height. 4 divided by 20 is 0.2, matching one-fifth.
Check: Divide the head height by the total height and compare the result to 0.2.
Exercise 2
A student places 12 dorsal plates along a spine line that is 24 cm long, with even spacing. What is the spacing between plate positions if the first and last plates sit at the ends of the line? Use the simple convention that spacing equals line length divided by the number of gaps.
Show answer and check
There are 11 gaps between 12 plates. 24 cm divided by 11 gaps is about 2.18 cm per gap.
Why: With 12 plates in a row, the number of gaps is one less than the number of plates. 24 divided by 11 gives the even spacing.
Check: Count the gaps as plates minus one, then divide the line length by the gap count.
Exercise 3
A student draws scale texture on the chest and thigh. The chest marks curve downward and the thigh marks curve around the leg. Is this consistent with the convention? Explain.
Show answer and check
Yes. The convention says rows follow the local body form. Downward curves on the chest and curves around the leg both follow the body form, so the texture is consistent.
Why: The convention does not require one universal direction. It requires marks to follow the body curve in each area.
Check: For each textured area, ask whether the arc rows follow the local body curve and whether arc size is similar within that area.
Exercise 4
A drawing has 9 dorsal plates, but the plates near the head are taller than the plates over the back. Does this meet the lesson guidance? Give a fix.
Show answer and check
No. The guidance suggests smaller plates near the head and larger plates over the back. Fix by reducing the head-end plate heights and increasing the back plate heights gradually.
Why: The plate row should vary in height gradually from head to tail, with the largest plates over the back. Taller plates near the head break that pattern.
Check: Compare plate heights from head to tail and check for a gradual increase then decrease.
Common mistakes
- Drawing plates as a random scatter instead of a row along the spine. Draw a light spine line first and place every plate on that line with even spacing.
- Making the tail cross the legs and confusing the silhouette. Curve the tail away from the legs and check that the tail outline is separate from the leg outlines.
- Filling the whole body with dense scale marks so the shape is lost. Limit texture to two or three areas and leave gaps between groups of marks.
- Using inconsistent mark direction on different body parts. Make each row of arcs follow the local body curve, and keep the arc size similar within each area.
Self-check rubric
- The kaiju has a clear heavy bipedal body, a long tail, and a readable head.
- Dorsal plates sit on the spine line in an evenly spaced row and vary in height gradually.
- Scale texture uses short curved marks in rows that follow the body form, with gaps between groups.
- The final outline is clear and construction lines are light or erased.
- The drawing is original and does not copy a specific franchise character.
Questions and answers
Do I need to copy a specific franchise character?
No. This lesson teaches a general Godzilla-style kaiju with dorsal plates and scale texture. It excludes specific franchise characters and other monsters.
How many dorsal plates should I draw?
There is no fixed number. A practical range is eight to twelve plates from head to tail, but this is a hypothetical example. Keep spacing even and vary plate height gradually.
What if my scale marks look different from the example?
That is acceptable. The convention defines short curved marks in rows that follow the body form. The rubric rewards consistency and placement, not one exact mark shape.
Can I use a pen instead of a pencil?
Yes, if you test the pen on scrap paper first. Keep construction lines light with pencil, then use pen for the final outline and plate edges.