Free original lessons
Draw Godzilla-Style Scale Texture in Layered Rows
Learn to build overlapping scale rows with a clear convention, checkable spacing, and a rubric that accepts valid stylistic variation.
Free lesson
Four exercises
Worked answers
Object Drawing Lessons
This lesson teaches a repeatable method for drawing Godzilla-style scale texture as layered rows. You will set a baseline and midline for each row, place overlapping scales in a staggered pattern, and use simple arithmetic to keep spacing consistent. The convention is explicit: each scale is a rounded, slightly pointed plate whose top edge sits near the row midline and whose bottom edge overlaps the row below. Letter styles and exact scale shapes vary, so the rubric rewards clear layering and consistent spacing rather than a single universal outline. All measurements are hypothetical examples; measure your own paper and tools before drawing.
Practice materials: Printable downloads are not available for this lesson yet. Use the instructions and four exercises below.
Reference illustration
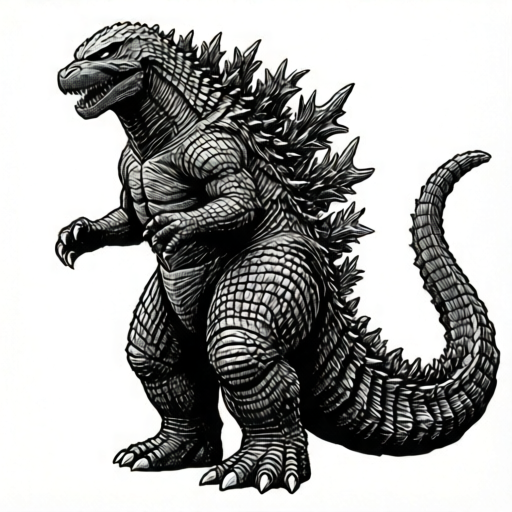
Use the stated measurements and conventions for each exercise.
Set the row grid and scale convention
Choose a drawing area and mark a baseline for the lowest row. Decide a row height, for example 12 mm, and mark midlines at 12 mm intervals above the baseline. The x-height convention here is baseline to midline: a scale's visible height is measured from its bottom edge on the baseline to its top edge near the midline. This is a drawing convention, not a handwriting standard.
Define one scale shape before repeating it: a rounded plate with a soft point at the top, wider at the base. Draw three test scales at different widths to confirm the shape reads clearly at your chosen size.
- Mark a baseline and three midlines at equal intervals; label the interval as a hypothetical value such as 12 mm.
- Draw one scale centered on the baseline with its top near the first midline.
- Draw two more scales left and right, leaving a gap of about one-third of a scale width.
- Check that all three scales touch the baseline and stay below the midline.
Build staggered overlapping rows
Rows look layered when each new row is offset by half a scale width and its scales overlap the row below. Start at the bottom and work upward so upper scales sit in front of lower ones. Keep the overlap consistent: for example, let each scale cover about one-quarter of the scale beneath it.
Use a light guide line for each row midline, then erase or ignore it once the row is complete. If a scale drifts above its midline, shorten it rather than moving the whole row.
- Draw the bottom row across the area with even gaps.
- Offset the next row by half a scale width and draw scales that overlap the bottom row.
- Repeat upward, checking that each row's tops stay near its midline.
- Add a few interior ridge lines inside each scale to suggest thickness, keeping them inside the outline.
Check spacing with simple arithmetic
Consistent spacing is checkable. If a scale is 10 mm wide and the gap is 3 mm, one repeat unit is 13 mm. For a 65 mm wide area, five repeat units fit exactly (5 × 13 = 65). Use this arithmetic to plan how many scales fit before drawing.
For staggered rows, the offset is half a repeat unit, or 6.5 mm in this example. Mark the offset once at the edge and use it to start each new row.
- Measure your drawing width and choose a scale width and gap that divide evenly or leave a planned margin.
- Calculate the repeat unit as scale width plus gap.
- Divide the drawing width by the repeat unit to find the number of scales per row.
- Mark the half-unit offset at the left edge for staggered rows.
Refine texture without losing the row structure
Texture comes from layering, not from adding many small marks. Keep interior lines short and parallel to the scale edges. Darken the overlap line where an upper scale meets a lower one to show depth.
Valid alternatives include rounder scales, sharper points, or slightly uneven widths, provided the rows remain readable and the overlap direction is consistent.
- Trace the overlap edge of each upper scale with a slightly darker line.
- Add one or two interior ridge lines per scale, stopping short of the outline.
- Compare the row midlines to the scale tops and adjust any scale that crosses its midline.
- Step back to confirm the staggered pattern reads as layered rows.
Worked example
A drawing area is 52 mm wide. Use a scale width of 10 mm and a gap of 3 mm. How many scales fit in one row, and what is the staggered offset?
Worked answer
Four scales fit in one row, and the staggered offset is 6.5 mm.
Why: The repeat unit is 10 + 3 = 13 mm. Dividing 52 by 13 gives 4, so four scales fit exactly. The staggered offset is half the repeat unit: 13 ÷ 2 = 6.5 mm.
Check: Multiply 4 by 13 to confirm 52 mm. Measure the first gap and the offset on the paper to confirm 3 mm and 6.5 mm.
Four practice exercises
Exercise 1
A drawing area is 39 mm wide. Use a scale width of 8 mm and a gap of 5 mm. How many scales fit in one row, and what is the staggered offset?
Show answer and check
Three scales fit, and the offset is 6.5 mm.
Why: The repeat unit is 8 + 5 = 13 mm. 39 ÷ 13 = 3, so three scales fit exactly. The offset is half of 13 mm, which is 6.5 mm.
Check: Multiply 3 by 13 to get 39 mm. Measure one gap as 5 mm and the offset as 6.5 mm.
Exercise 2
A row height is 12 mm and a scale is drawn 9 mm tall from baseline to top. Does the scale stay below the midline? Explain.
Show answer and check
Yes, the scale stays below the midline because 9 mm is less than 12 mm.
Why: The midline is 12 mm above the baseline. A 9 mm tall scale ends 3 mm below the midline, so it does not cross it.
Check: Subtract 9 from 12 to get 3 mm of clearance. Measure the scale height and the row height on the paper.
Exercise 3
You want five scales in a 70 mm wide row with a gap of 4 mm. What scale width should you use?
Show answer and check
Use a scale width of 10 mm.
Why: Five repeat units must equal 70 mm, so one unit is 70 ÷ 5 = 14 mm. Subtract the 4 mm gap to get a scale width of 10 mm.
Check: Add 10 + 4 = 14 mm per unit, then multiply by 5 to confirm 70 mm.
Exercise 4
A staggered row starts 7 mm from the left edge. If the repeat unit is 14 mm, where does the next scale in that row start?
Show answer and check
The next scale starts 21 mm from the left edge.
Why: Add one repeat unit to the starting position: 7 + 14 = 21 mm.
Check: Subtract 7 from 21 to confirm one repeat unit of 14 mm. Measure both start positions on the paper.
Common mistakes
- Drawing all scales in a straight vertical stack instead of staggering rows. Offset each new row by half a scale width and check the offset at the left edge before continuing.
- Letting scale tops drift far above the row midline. Shorten the scale or redraw its top edge near the midline; keep the baseline fixed.
- Making gaps uneven so the repeat unit changes mid-row. Plan the repeat unit with simple arithmetic and mark the first few gaps before drawing the full row.
- Adding too many interior lines until the scale shape is unclear. Limit interior ridges to one or two per scale and keep them inside the outline.
Self-check rubric
- Rows are clearly layered with a consistent overlap direction from bottom to top.
- Each scale's top edge stays near its row midline, using the baseline-to-midline convention.
- Staggered rows are offset by about half a scale width.
- Spacing is consistent and can be checked with a repeat unit of scale width plus gap.
- Interior ridge lines are limited and stay inside the scale outline.
- Valid stylistic alternatives such as rounder or sharper scales are accepted if row structure remains clear.
Questions and answers
Do all scales need the same shape?
No. The convention requires a rounded plate with a soft top point, but width and point sharpness can vary as long as rows stay readable and overlaps are consistent.
How do I know my spacing is correct?
Use a repeat unit of scale width plus gap. If the unit divides your drawing width evenly, the spacing is checkable. For example, 10 mm plus 3 mm gives 13 mm per unit.
Should I draw from top to bottom or bottom to top?
Draw from bottom to top so upper scales overlap lower ones. This makes the layered direction consistent.
What if my paper size differs from the example?
Measure your actual paper and choose a row height and scale width that fit. Label any chosen numbers as hypothetical examples for your own drawing.