Free original lessons
Ink Reptile Scales: Texture Drawing Guide
Learn to draw overlapping reptile scales in ink with row structure, stroke direction, and a repeatable texture method for realistic skin.
Free lesson
Four exercises
Worked answers
Object Drawing Lessons
Reptile skin reads as texture because scales overlap in rows, catch light along edges, and vary in size across the body. This guide teaches a controlled ink approach: build a row grid, vary scale shapes, direct strokes consistently, and layer density without mud. You will practice a repeatable sequence and check your work with simple visual tests. All examples use a defined convention: a scale is a closed shape whose lower edge overlaps the row below; x-height means baseline to midline for lettering only, not scale size. Numerical values are hypothetical examples to be measured on your own tools.
Practice materials: Printable downloads are not available for this lesson yet. Use the instructions and four exercises below.
Reference illustration
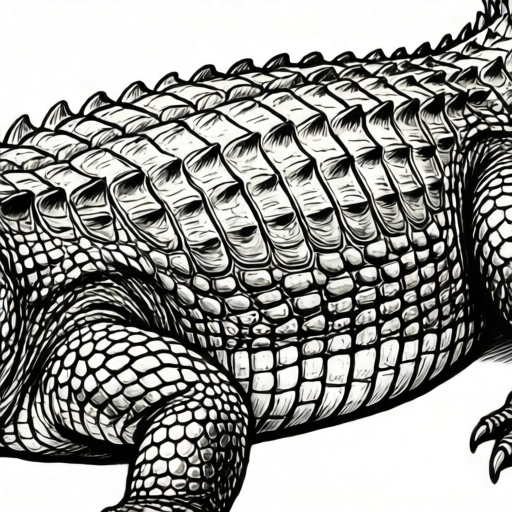
Use the stated measurements and conventions for each exercise.
Row structure and overlap
Reptile scales sit in staggered rows, like roof tiles. Each scale's lower edge covers the top of the scale beneath it. Draw a faint baseline for each row, then place scale tops slightly above the previous row's bottoms so each lower edge overlaps the row beneath. Stagger alternate rows by about half a scale width so gaps do not align vertically.
Keep row height consistent within a region. A hypothetical example: row height 6 mm, scale width 8 mm, stagger 4 mm. Measure your own paper and pen to choose values that fit your panel.
- Draw three faint horizontal baselines spaced evenly.
- On the top baseline, mark scale tops at regular intervals.
- Draw each scale as a rounded or pointed closed shape, lower edge crossing the baseline below.
- Stagger the next row by half a scale width.
- Check that no vertical gap runs through two rows.
Stroke direction and edge control
Ink texture depends on stroke direction. Use short, consistent strokes that follow the scale's curvature: down the sides, then across the lower edge. Keep pen angle steady. Vary line weight by pressure, not by repeated scratching.
Edges should be crisp on the lower overlap and softer on the upper hidden edge. Leave tiny highlights uninked along the lower rim to suggest shine.
- Outline each scale lightly with a fine pen.
- Shade the lower third with parallel strokes following the curve.
- Leave a thin uninked rim at the bottom edge.
- Darken the gap between rows with a single controlled line.
- Repeat across the row before moving down.
Variation across body regions
Scale size and shape change across a reptile body. Larger, flatter scales often appear on the back; smaller, rounded scales near limbs and head. Transition gradually by reducing scale width over two or three rows.
Use shape families: rounded, pointed, and keeled (with a central ridge). Mix families sparingly so texture stays readable.
- Divide your panel into two zones: large-scale and small-scale.
- Draw large rounded scales in the first zone.
- Reduce scale width by about one third in the second zone.
- Add a central ridge to every third scale in one row only.
- Check that transitions do not create abrupt size jumps.
Density and contrast
Texture fails when ink fills every gap. Keep some paper white. Aim for three values: white highlight, mid-tone stroke, dark gap. A hypothetical target: about 20 percent of each scale left uninked.
Build density in layers: outline, mid-tone strokes, then dark accents at row gaps. Stop before the texture becomes a solid mass.
- Outline all scales in a small test patch.
- Add mid-tone strokes to lower thirds only.
- Darken row gaps with one pass.
- Squint at the patch; if it reads as a flat gray, lift some ink by leaving more white.
- Compare against a blank panel to confirm contrast.
Worked example
Draw a three-row ink scale patch on a 40 mm by 30 mm panel. Use row height 6 mm, scale width 8 mm, stagger 4 mm. Leave a thin uninked rim at each lower edge and darken row gaps once.
Worked answer
Three baselines at 6 mm intervals. Top row: four full scales of 8 mm width centered with 4 mm margins at each end (4×8 + 2×4 = 40 mm). Second row staggered 4 mm: three full scales (3×8 = 24 mm) plus two half-scales of 4 mm at the edges (2×4 = 8 mm), giving 32 mm of scale coverage; with 4 mm margins at each end the row spans 4 mm to 36 mm (24 + 8 + 8 = 40 mm). Third row aligned with the first. Each scale outlined, lower third shaded with parallel strokes, bottom rim left white, row gaps darkened once. Squint test shows three values and no vertical gap running through two rows.
Four practice exercises
Exercise 1
On a 30 mm by 20 mm panel, draw two staggered rows with row height 5 mm and scale width 6 mm. Stagger the second row by 3 mm. Leave lower rims uninked.
Show answer and check
Two baselines 5 mm apart. Top row: four scales of 6 mm width, occupying 24 mm with 3 mm margin at each end, so the row spans 3 mm to 27 mm within the 30 mm panel (3 + 24 + 3 = 30 mm). Second row staggered 3 mm: three full scales (3×6 = 18 mm) plus two half-scales of 3 mm at the edges (2×3 = 6 mm), giving 24 mm of scale coverage; with 3 mm margins at each end the row spans 3 mm to 27 mm within the 30 mm panel (3 + 24 + 3 = 30 mm), offset 3 mm from the top row. Lower rims left white, row gap darkened once.
Why: Staggering by half a scale width prevents vertical gaps. Uninked rims create highlight and keep density controlled.
Check: Squint at the panel: confirm no vertical white or dark channel crosses both rows, and each scale's lower edge overlaps the row below.
Exercise 2
Draw one row of five scales, each 6 mm wide and 4 mm tall. Shade only the lower third of each scale with parallel strokes following the curve. Leave the upper two thirds white.
Show answer and check
Five closed scales in a row. Lower thirds shaded with consistent curved strokes. Upper portions white. Row gap darkened once.
Why: Limiting shading to the lower third builds mid-tone without filling the scale, preserving three values.
Check: Count scales and confirm each has white upper area and shaded lower third. Check stroke direction is consistent across all five.
Exercise 3
Create a transition panel: three rows of large scales 8 mm wide, one transition row, then three rows of small scales 5 mm wide. Reduce width gradually across the transition row.
Show answer and check
Seven rows total. Rows 1–3 at 8 mm width. Row 4 is the transition row at 6–7 mm width. Rows 5–7 at 5 mm width. Stagger every other row by half the current width.
Why: Gradual reduction avoids abrupt size jumps and keeps texture readable across regions.
Check: Measure row widths with a ruler. Confirm no single row changes width by more than about one third from the row above.
Exercise 4
Draw a 20 mm by 20 mm patch with three rows. Use rounded scales in the top row, pointed in the middle, and keeled (central ridge) in the bottom. Keep stroke direction consistent and leave lower rims white.
Show answer and check
Three rows of four scales each. Top row rounded, middle pointed, bottom keeled with one central ridge line per scale. Lower rims uninked, row gaps darkened once.
Why: Mixing shape families sparingly tests control while preserving row structure and edge highlights.
Check: Verify each row uses one shape family, ridges appear only in the bottom row, and squint test still shows three values.
Common mistakes
- Aligning scale gaps vertically across rows. Stagger alternate rows by half a scale width and check for continuous vertical channels.
- Filling every scale with solid ink. Leave a thin uninked rim at each lower edge and keep about one fifth of each scale white.
- Changing stroke direction randomly within a row. Follow the scale curve consistently: down the sides, across the lower edge.
- Making all scales the same size across the panel. Reduce scale width gradually over two or three rows when moving to a new body region.
Self-check rubric
- Rows are staggered so no vertical gap runs through two consecutive rows.
- Each scale has a closed shape with a lower edge overlapping the row below.
- Stroke direction is consistent within each scale and follows its curve.
- Three values are visible: white highlight, mid-tone stroke, dark gap.
- Scale size changes gradually across regions, not abruptly.
- Lower rims show a thin uninked highlight.
- Valid alternatives: rounded, pointed, or keeled shapes; parallel or controlled cross-hatch strokes; any scale size measured to fit the panel.
Questions and answers
What pen should I use for ink scales?
A fine liner or dip pen with a flexible nib works. Choose based on the line weight you can control consistently; measure your own pen's stroke width on scrap paper before starting.
How large should each scale be?
Scale size depends on your panel. A hypothetical example is 8 mm wide and 6 mm tall. Measure your paper and choose values that let you draw at least three rows.
Can I use cross-hatching instead of parallel strokes?
Yes, if it stays controlled. Keep hatch direction consistent within a scale and avoid scratching. The rubric accepts any stroke pattern that preserves three values and crisp lower edges.
How do I fix a row that looks too dark?
Stop adding ink. Leave the next row lighter and increase white space at lower rims. If needed, work a fresh test patch to recalibrate density.