Free original lessons
Negative Space Stool Drawing: Leg Gaps and Seat Contour
Learn to draw a stool by shading the background and leg gaps, leaving the stool as positive space. Includes a traced example, blank outline, and depth cues.
Free lesson
Four exercises
Worked answers
Object Drawing Lessons
Negative space drawing asks you to see the empty areas around and between objects as shapes. For a stool, the gaps between the legs and under the seat are as important as the seat itself. This lesson guides you through a negative-space stool study: you will shade the background and the leg gaps, leaving the stool as positive space. You will also learn how leg gaps read as depth cues and how to check your drawing with simple measurements. All resources are planned and free; they are not yet built, so use the text descriptions to create your own practice plate.
Practice materials: Printable downloads are not available for this lesson yet. Use the instructions and four exercises below.
Reference illustration
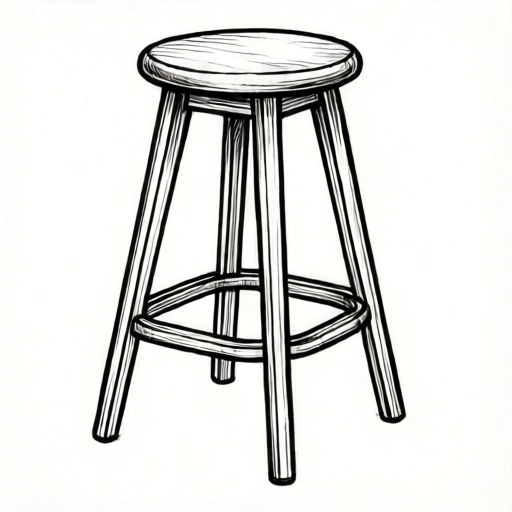
Use the stated measurements and conventions for each exercise.
Seeing the Gaps: Negative Space Basics
Negative space is the area around and between the parts of your subject. When you draw a stool, the space between the legs and the space under the seat form distinct shapes. By shading these gaps, you define the stool without drawing its outline first. This approach helps you avoid common proportion errors because you compare the gap shapes to the seat contour.
Use a simple convention: shade the background and the leg gaps with even pencil strokes, leaving the stool white. This makes the stool the positive space. The gaps should read as empty air, not as solid objects. Keep your shading direction consistent to avoid confusing the viewer.
- Place a stool outline on your paper or draw a light outline from observation.
- Identify the three main negative spaces: the two gaps between the legs and the large background area around the stool.
- Shade the background first, working from the outer edges toward the stool outline.
- Shade the leg gaps, keeping the stool legs white.
- Check that the seat contour remains clear and that the gaps look like empty air.
Leg Gaps as Depth Cues
The gaps between the legs tell the viewer how the stool sits in space. A wider gap at the bottom and a narrower gap at the top can suggest that the legs are closer together near the seat. This is a depth cue. When you shade the gaps, vary the shading slightly to show which gap is in front and which is behind. For example, the gap between the front legs may be darker at the bottom if the light comes from above.
Keep your shading simple. You do not need realistic lighting; you need clear shapes. A consistent medium-gray tone in all gaps is enough to separate the stool from the background. If you want to show depth, make the gap between the front legs slightly darker than the gap between the back legs. Label any chosen gray values as hypothetical examples; measure your own pencil pressure if you need consistency.
- Look at the stool from a slight angle so the leg gaps are visible.
- Decide which gap is in front and which is behind.
- Shade the front gap with a slightly darker tone than the back gap.
- Keep the stool legs white and the seat contour unshaded.
- Step back and check that the gaps read as empty space, not as solid shapes.
Seat Contour and Proportion Checks
The seat contour is the outline of the seat. In a negative-space drawing, you do not draw the contour directly; you leave it white while shading around it. To check proportion, measure the width of the seat and the height of the legs with a ruler or a pencil. Use the same units for all measurements. For example, if the seat is 30 cm wide and the legs are 45 cm tall, the ratio is 30:45, or 2:3. Your drawing should keep a similar ratio.
Check the leg gaps by measuring their widths at the bottom and at the top. If the bottom gap is 12 cm and the top gap is 8 cm, the gap narrows toward the seat. Your shaded gaps should reflect that narrowing. These measurements are hypothetical examples; measure your actual stool and label your numbers as your own measurements.
- Measure the seat width and leg height in centimeters.
- Measure the width of each leg gap at the bottom and at the top.
- Write the ratios as simple fractions, such as 12:8 or 3:2.
- Compare your shaded gaps to the measured ratios.
- Adjust the shading if a gap is too wide or too narrow.
From Outline to Finished Study
Start with a light outline of the stool. Then shade the background and the leg gaps. Leave the stool white. Use a soft pencil and even strokes. If you make a mistake, erase the shading in that area and re-shade. The goal is a clear separation between the stool and the empty space.
A traced example can help you see the gap shapes. Place tracing paper over a stool outline and shade the gaps on the tracing paper. Then compare your shaded gaps to the original outline. This check method works without any special tools. Remember that letter styles and handwriting vary; there is no single correct way to shade, only a consistent convention.
- Draw or trace a stool outline lightly.
- Shade the background and leg gaps with even strokes.
- Leave the stool white and the seat contour clear.
- Use tracing paper to compare your gap shapes to the outline.
- Erase and adjust any gap that does not match your measurements.
Worked example
A stool outline has a seat width of 30 cm and leg height of 45 cm. The bottom leg gap is 12 cm wide and the top leg gap is 8 cm wide. Describe how to shade the gaps and check the proportions.
Worked answer
Shade the background and both leg gaps, leaving the stool white. Make the front gap slightly darker than the back gap. Check the seat-to-leg ratio: 30:45 simplifies to 2:3. Check the gap ratio: 12:8 simplifies to 3:2. Your shaded gaps should narrow from bottom to top in a 3:2 ratio. Measure your drawing with a ruler to confirm the gap widths match these ratios. These numbers are hypothetical examples; measure your own stool and label your values.
Four practice exercises
Exercise 1
A stool outline has a seat width of 40 cm and leg height of 60 cm. The bottom leg gap is 16 cm and the top leg gap is 10 cm. What is the simplified seat-to-leg ratio and the simplified gap ratio?
Show answer and check
Seat-to-leg ratio: 40:60 simplifies to 2:3. Gap ratio: 16:10 simplifies to 8:5.
Why: Divide both numbers by their greatest common divisor. For 40 and 60, the divisor is 20, giving 2:3. For 16 and 10, the divisor is 2, giving 8:5.
Check: Multiply the simplified ratios back: 2×20=40 and 3×20=60; 8×2=16 and 5×2=10. The original numbers are recovered.
Exercise 2
You shade a stool drawing. The background is medium gray, the front leg gap is dark gray, and the back leg gap is light gray. The stool is white. Which gap is in front, and why?
Show answer and check
The front leg gap is the dark gray one, because darker shading in the front gap is a depth cue that suggests it is closer to the viewer.
Why: In this convention, the front gap is shaded slightly darker than the back gap to show depth. The light gray back gap reads as farther away.
Check: Compare the two gap tones. The darker tone should be the gap you intend as front. If the tones are reversed, swap them.
Exercise 3
A stool drawing has a seat width of 25 cm and leg height of 50 cm. The bottom leg gap is 10 cm and the top leg gap is 5 cm. A learner shades the gaps but makes both gaps the same width. What proportion error did they make, and how can they check it?
Show answer and check
They ignored the narrowing gap ratio. The correct gap ratio is 10:5, or 2:1, so the bottom gap should be twice as wide as the top gap. They can check by measuring the shaded gap widths with a ruler and comparing them to 2:1.
Why: The measured gaps narrow from bottom to top. Shading them as equal widths loses the depth cue and the proportion. The seat-to-leg ratio is 25:50, or 1:2, which is separate from the gap ratio.
Check: Measure the bottom gap and top gap in the drawing. Divide the bottom width by the top width. The result should be close to 2. If it is close to 1, the gaps are too equal.
Exercise 4
Describe how to use tracing paper to check a negative-space stool drawing. Include what you shade and what you compare.
Show answer and check
Place tracing paper over the stool outline. Shade the background and leg gaps on the tracing paper, leaving the stool white. Then place the tracing paper over the original outline and compare the shaded gap shapes to the outline. Check that the gaps narrow from bottom to top and that the seat contour remains clear.
Why: Tracing paper lets you test the negative-space shapes without altering the original drawing. Comparing the shaded gaps to the outline shows whether the gap shapes match the stool's proportions.
Check: Look for white stool legs and a white seat on the tracing paper. Measure the shaded gap widths and compare them to your recorded ratios. If a gap is too wide or too narrow, adjust the shading.
Common mistakes
- Shading the stool instead of the gaps. Keep the stool white and shade only the background and leg gaps. Check by looking for white legs and a white seat.
- Making all leg gaps the same tone, so depth is lost. Make the front gap slightly darker than the back gap. Label your chosen tones as hypothetical examples and keep them consistent.
- Drawing the seat contour as a dark line. Leave the seat contour white. The shaded background and gaps should define the contour without a drawn line.
- Ignoring measurements and guessing proportions. Measure seat width, leg height, and gap widths in centimeters. Write the ratios and compare them to your drawing.
Self-check rubric
- The stool is left white and the background and leg gaps are shaded.
- The seat contour is clear without a drawn dark outline.
- The leg gaps narrow from bottom to top in a ratio close to the measured ratio.
- The front leg gap is slightly darker than the back gap to show depth.
- Measurements are recorded in consistent units and labeled as the learner's own measurements.
- Valid alternative shading styles are accepted if the convention is followed.
Questions and answers
What is negative space in a stool drawing?
Negative space is the empty area around and between the stool parts, especially the leg gaps and the background. Shading these areas leaves the stool as positive space.
How do leg gaps show depth?
A wider gap at the bottom and a narrower gap at the top can suggest the legs are closer near the seat. Slightly darker shading in the front gap can also show which gap is in front.
Do I need special tools?
No. A pencil, paper, eraser, and ruler are enough. Tracing paper is optional for checking gap shapes.
Can I use any shading style?
Yes, as long as you follow the convention: shade the background and gaps, leave the stool white. Letter styles and handwriting vary, so valid alternatives are allowed.