Free original lessons
Negative Space Turtle Drawing: Outline and Gap Study
Learn to draw a turtle by studying negative space around its shell, flippers, and head, then refine gaps with a simple measurement check.
Free lesson
Four exercises
Worked answers
Object Drawing Lessons
Negative space drawing asks you to look at the shapes around and between parts of a subject rather than only at the subject itself. For a turtle, the gaps between flippers, the space under the shell, and the openings beside the head are as informative as the outline. This lesson uses a turtle-specific gap study: you will identify enclosed and open negative spaces, sketch their boundaries, and check proportions with simple arithmetic. The convention for judging line placement is baseline-to-midline x-height for lettering labels, while drawn shapes are assessed by gap width and alignment rather than a single correct contour. All numerical examples are hypothetical and should be replaced by measurements of your actual paper and reference.
Practice materials: Printable downloads are not available for this lesson yet. Use the instructions and four exercises below.
Reference illustration
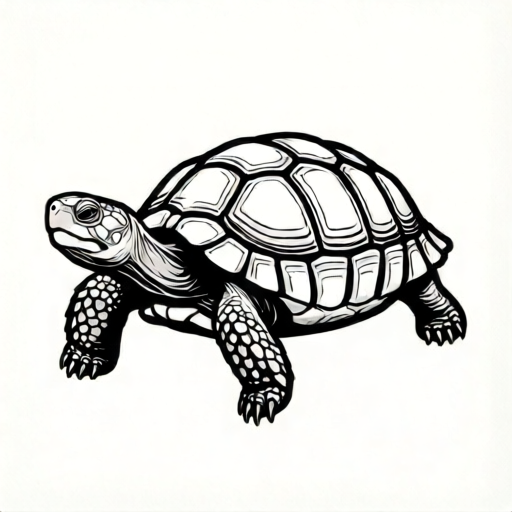
Use the stated measurements and conventions for each exercise.
Reading Turtle Negative Space
Begin with a reference turtle viewed from above or slightly angled. Trace the outer silhouette lightly, then look at the spaces that are not turtle: the wedge between the front flipper and the shell, the channel between the rear flipper and the tail, and the crescent beside the head. These gaps have their own shapes. Draw them as closed or open regions before adding shell detail.
Use a gap-identification guide with three zones: shell surround, flipper gaps, and head space. For each zone, note whether the gap is enclosed (fully bounded by turtle) or open (bounded partly by the page edge). Enclosed gaps are easier to compare because their width can be measured directly. Open gaps require you to imagine a closing line and measure to that line.
- Place the reference on a flat surface and mark the turtle's widest shell point and the tip of each flipper.
- Lightly box the whole turtle, then draw only the negative gaps as simple polygons.
- Label each gap with a letter using baseline-to-midline x-height so labels do not crowd the drawing.
- Compare gap widths with a ruler and record them in the same unit, such as millimeters.
Gap Study and Proportion Checks
A gap study is a small diagram that isolates one negative space and its neighboring edges. Make three gap studies: one for the shell-to-front-flipper wedge, one for the rear-flipper channel, and one for the head crescent. In each, draw the gap shape at the same scale as your main sketch and write its measured width at the narrowest and widest points.
Check consistency with simple arithmetic. If the shell width is 60 mm and the front-flipper gap is 12 mm, the gap is one-fifth of the shell width. If your sketch shows a gap of 20 mm against a 60 mm shell, the ratio is one-third, which is noticeably wider. Adjust the gap, not the shell, unless the shell measurement is also wrong.
- Measure the shell width and each gap width in millimeters.
- Divide each gap width by the shell width to get a ratio.
- Compare ratios across your sketch and the reference; flag any ratio that differs by more than 0.05.
- Redraw only the flagged gap boundary, keeping the shell outline fixed.
Refining the Outline Without Overworking
Once the gaps are proportioned, refine the turtle outline by following the edges that create those gaps. Keep the shell contour smooth and let flipper edges stay slightly irregular. Do not shade the turtle body heavily; the point is to preserve clear negative shapes. A light hatch in the surrounding space can make gaps visible without turning the study into a tonal drawing.
Use a consistent line weight for gap boundaries and a lighter line for internal shell divisions. If a gap becomes ambiguous, redraw its closing line as a dashed guide and measure to that guide. Valid alternatives include drawing the turtle facing left or right, as long as the gap ratios and labels remain consistent.
- Trace the final gap boundaries with a darker line than the shell detail.
- Add dashed closing lines only where a gap is open to the page edge.
- Re-measure two gaps and confirm their ratios match the reference within 0.05.
- Erase construction boxes and dashed guides after the check.
Worked example
A reference turtle has a shell width of 80 mm. The front-flipper gap is 16 mm at its narrowest and 24 mm at its widest. A sketch shows a shell width of 80 mm, a narrow gap of 20 mm, and a wide gap of 30 mm. Check the ratios and state the correction.
Worked answer
Reference ratios: narrow 16/80 = 0.20; wide 24/80 = 0.30. Sketch ratios: narrow 20/80 = 0.25; wide 30/80 = 0.375. Both sketch gaps are too wide. Narrow the front-flipper gap so its narrow width is about 16 mm and its wide width about 24 mm, keeping the shell at 80 mm.
Four practice exercises
Exercise 1
A turtle reference has shell width 50 mm. The rear-flipper gap is 10 mm narrow and 15 mm wide. Your sketch has shell width 50 mm, rear gap 12 mm narrow and 18 mm wide. Calculate the ratios and say whether the sketch gap is too wide, too narrow, or acceptable within 0.05.
Show answer and check
Reference: 10/50 = 0.20 narrow; 15/50 = 0.30 wide. Sketch: 12/50 = 0.24 narrow; 18/50 = 0.36 wide. Both differ by 0.04 and 0.06; the wide gap exceeds 0.05, so narrow the wide part slightly.
Why: Divide each gap width by shell width. Compare sketch ratios to reference ratios. A difference up to 0.05 is acceptable; 0.06 is outside that band.
Check: Re-measure the wide rear gap after adjustment and confirm the new ratio is within 0.05 of 0.30.
Exercise 2
A head-space crescent measures 9 mm at its narrowest against a shell width of 45 mm. What is the ratio? If a second sketch uses a 60 mm shell and the same ratio, what narrow head-space width should it show?
Show answer and check
Ratio = 9/45 = 0.20. For a 60 mm shell, narrow head space = 0.20 × 60 = 12 mm.
Why: The ratio is gap divided by shell width. Multiply the ratio by the new shell width to find the corresponding gap.
Check: Divide 12 by 60 to confirm the result is 0.20.
Exercise 3
You measure a front-flipper gap as 14 mm and the shell as 70 mm. A classmate measures the same gap as 1.4 cm and the shell as 7 cm. Are the ratios the same? Show the arithmetic.
Show answer and check
Yes. 14/70 = 0.20 and 1.4/7 = 0.20. The units differ but the ratios match because both measurements were converted consistently within each pair.
Why: A ratio is unitless when both quantities use the same unit. Convert centimeters to millimeters or compare directly; 1.4 cm equals 14 mm and 7 cm equals 70 mm.
Check: Convert both classmate measurements to millimeters and recalculate: 14/70 = 0.20.
Exercise 4
A sketch has shell width 64 mm. The three gap ratios should be 0.15, 0.25, and 0.35. Calculate the target gap widths in millimeters, then state one check you would perform after drawing.
Show answer and check
Targets: 0.15 × 64 = 9.6 mm; 0.25 × 64 = 16 mm; 0.35 × 64 = 22.4 mm. Check: measure each drawn gap and divide by 64; each result should be within 0.05 of its target ratio.
Why: Multiply each ratio by the shell width. After drawing, reverse the calculation by dividing measured gap width by shell width.
Check: Use a ruler on the actual sketch, record each gap in millimeters, and compare the three calculated ratios to the targets.
Common mistakes
- Drawing the turtle outline first and treating gaps as leftover space. Draw the three main negative gaps as shapes before completing the turtle contour.
- Measuring gap width at the widest point only. Record both narrowest and widest widths, then compare ratios to the shell width.
- Using different units for shell and gap measurements. Convert all measurements to millimeters before calculating ratios.
- Letting labels overlap the gap being studied. Place labels outside the gap using baseline-to-midline x-height and a short leader line.
Self-check rubric
- Three turtle-specific negative gaps are identified and labeled: shell surround, flipper gaps, head space.
- Gap widths are measured in one consistent unit and compared to shell width by ratio.
- At least two gap ratios match the reference within 0.05, or corrections are clearly stated.
- Labels use baseline-to-midline x-height and do not obscure gap boundaries.
- Valid alternative orientations are accepted if gap zones and ratio checks remain consistent.
Questions and answers
What counts as a negative space in a turtle drawing?
Any region not occupied by the turtle, such as the wedge between a flipper and the shell, the channel behind a rear flipper, or the crescent beside the head.
How do I check a gap without a printer?
Measure the reference on screen with a ruler or use the stated hypothetical values, then measure your sketch in the same unit and compare ratios.
Can I draw the turtle from a different angle?
Yes. Keep the same gap-identification zones and ratio checks; the specific gap shapes will change with the angle.
Why use baseline-to-midline x-height for labels?
It keeps lettering small and consistent so labels do not compete with the gap shapes being studied.