Free original lessons
Draw a Bundled-Up Figure in Layered Warm Clothing
Learn to draw a bundled figure with coat, scarf, hat, and boots using clear layering, overlap, and fold conventions for believable winter clothing.
Free lesson
Four exercises
Worked answers
Object Drawing Lessons
Drawing someone bundled up in warm clothes is mostly a problem of layering and overlap. A puffy coat hides the torso, a scarf wraps the neck, a hat sits low, and boots swallow the lower legs. This lesson gives you a repeatable order: establish the pose, block the body, build each garment as a simple volume, then add folds only where movement or compression creates them. You will use a defined convention for line weight and shading so your choices are checkable, and you will practice with four self-contained tasks. All measurements are hypothetical examples; measure your own paper and tools.
Practice materials: Printable downloads are not available for this lesson yet. Use the instructions and four exercises below.
Reference illustration
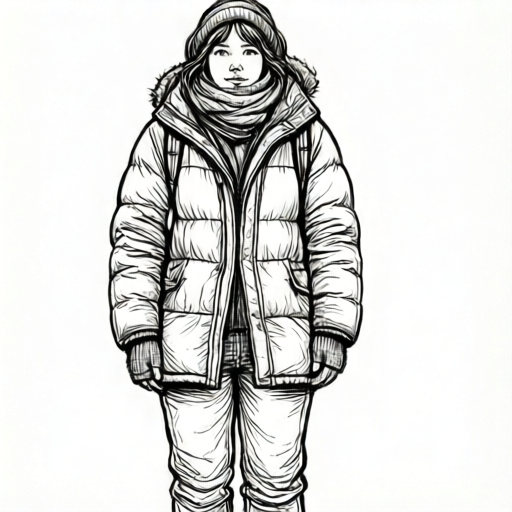
Use the stated measurements and conventions for each exercise.
Establish the pose before clothing
Start with a light stick figure or mannequin that shows the action: shoulders raised, arms crossed or tucked, knees slightly bent, head tilted into the collar. Keep the figure within a simple bounding box you draw on the page. For example, on a 20 cm by 28 cm sheet, a standing bundled figure might occupy a box 8 cm wide and 18 cm tall, centered. These numbers are hypothetical; adjust to your paper.
Mark the midline of the body and the shoulder line. Note where the chin, waist, knee, and ankle fall. Because winter clothing adds bulk, plan extra space around the torso and limbs before drawing any garment. A common mistake is drawing the coat directly on a thin body, which makes the figure look inflated rather than dressed.
- Draw a bounding box for the whole figure and a vertical midline.
- Sketch the pose with simple ovals for head, torso, and limbs.
- Mark joint positions: shoulders, elbows, hips, knees, ankles.
- Add a bulk margin of about one head-width around the torso for the coat.
Build each garment as a volume
Treat the coat as a rounded box that follows the torso and flares slightly at the hem. The scarf is a soft tube wrapping the neck, with ends hanging or tucked. The hat is a dome or folded band that sits low on the forehead. Boots are cylinders with a foot shape at the bottom. Draw each garment in order from the body outward: base layers, coat, scarf, hat, boots, then accessories like mittens.
Use overlap to show layering. The coat hem overlaps the trousers; the scarf overlaps the coat collar; the hat brim overlaps the forehead; the boot top overlaps the trouser leg. Where one garment covers another, draw the covering edge first and let the covered edge stop behind it. This single rule prevents most layering confusion.
- Draw the coat body as a rounded rectangle with a slight flare.
- Add sleeves as tapered tubes following the arm pose.
- Wrap the scarf as a tube around the neck, then add hanging ends.
- Place the hat dome and brim, checking it sits low.
- Draw boots as cylinders with a foot shape, overlapping trouser legs.
Add folds only where they are caused
Winter clothing folds for two reasons: compression and hanging. Compression folds appear at elbows, knees, waist, and ankles where the body bends or clothing bunches. Hanging folds fall from shoulders and hems. Draw a few clear folds rather than many small ones. Use a consistent convention: compression folds are short curved lines that point toward the joint; hanging folds are longer lines that follow gravity.
Shade with a simple two-value system: a mid-tone on the side away from your imaginary light, and a darker tone in deep overlaps such as under the scarf or inside the coat opening. Keep the light direction consistent across the figure. Label your chosen light direction on the page so your shading can be checked.
- Mark the light direction with a small arrow at the page edge.
- Add two or three compression folds at each bending joint.
- Add hanging folds from shoulders and hem.
- Shade the side away from the light and darken deep overlaps.
Check proportion and readability
Step back and check that the figure reads as bundled at a glance. The silhouette should be wider at the torso and narrower at the ankles, with a clear scarf mass at the neck. Check that the head is not floating above the collar and that boots connect to the legs. Use the x-height convention for any handwritten labels: x-height is measured from baseline to midline, and letter styles may vary, so do not penalize valid personal handwriting.
A useful check is to trace the outer silhouette with your finger. If you cannot tell where the coat ends and the boots begin, strengthen the overlap lines. Keep your line weight convention: heavier lines for outer contours and overlaps, lighter lines for internal folds.
- Trace the silhouette and confirm coat, scarf, hat, and boots are distinct.
- Check head-to-body ratio and joint positions against your pose sketch.
- Confirm light direction is consistent in all shading.
- Verify labels use baseline-to-midline x-height and are readable.
Worked example
On a 20 cm by 28 cm sheet, draw a standing figure bundled in a coat, scarf, hat, and boots. The figure occupies a box 8 cm wide and 18 cm tall. Light comes from the upper left. Add two compression folds at each elbow and knee, and shade the right side.
Worked answer
A completed drawing shows a rounded coat volume with a flared hem, a scarf tube wrapping the neck with one hanging end, a low hat dome, and boots overlapping the trouser legs. The silhouette is wider at the torso and narrower at the ankles. Two short curved folds point toward each elbow and knee. Shading is on the right side and in deep overlaps under the scarf. Labels are written with baseline-to-midline x-height.
Four practice exercises
Exercise 1
Draw a bundled figure in a coat and hat only, standing with arms at sides. Use a bounding box 7 cm wide and 16 cm tall on your paper. Mark the light direction from the upper right. Add one compression fold at each elbow.
Show answer and check
A figure with a rounded coat volume, a low hat dome, arms as tapered sleeves, and one short curved fold at each elbow pointing toward the joint. Shading is on the left side and under the hat brim.
Why: The bounding box controls proportion, the coat is built as a volume, and folds are limited to elbow compression. Shading follows the marked light direction.
Check: Trace the silhouette to confirm coat and hat are distinct. Check that each elbow has one fold pointing toward the joint and that shading is on the left.
Exercise 2
Draw a seated bundled figure with a scarf and boots. The figure occupies a box 9 cm wide and 14 cm tall. The scarf has one hanging end. Light comes from the left. Add two hanging folds from the coat hem.
Show answer and check
A seated figure with a rounded coat, a scarf tube around the neck with one hanging end, boots overlapping trouser legs, and two long folds falling from the hem. Shading is on the right side.
Why: Seated pose changes compression points at hips and knees, while the scarf and boots test overlap. Hanging folds follow gravity from the hem.
Check: Confirm the scarf end hangs downward, boots overlap trousers, and the two hem folds are longer than compression folds. Check shading is on the right.
Exercise 3
Draw a bundled figure from the side view wearing a coat, hat, and mittens. Use a box 6 cm wide and 17 cm tall. Mark light from above. Show the coat opening with a darker overlap tone and add one fold at the waist.
Show answer and check
A side-view figure with a coat volume, hat dome, mittens as rounded shapes, a darker tone inside the coat opening, and one short fold at the waist. Shading is on the lower side away from the overhead light.
Why: Side view tests the coat opening and overlap shading. The waist fold is a compression fold. Overhead light means lower surfaces are darker.
Check: Check that the coat opening is darker than the outer coat, the waist fold points toward the bend, and lower surfaces are shaded.
Exercise 4
Draw two bundled figures side by side in one box 14 cm wide and 18 cm tall. One wears a long coat and boots; the other wears a short coat and hat. Light from the upper left. Label each garment with baseline-to-midline x-height.
Show answer and check
Two distinct figures: one with a long coat hem overlapping boots, one with a short coat and visible hat. Both have consistent left-side shading and legible labels using the x-height convention.
Why: Comparing long and short coats tests hem overlap and silhouette differences. Labels test the handwriting convention without penalizing style.
Check: Confirm the long coat hem overlaps the boots, the short coat ends above the knee, shading is on the right for both, and labels are legible with baseline-to-midline x-height.
Common mistakes
- Drawing the coat on a thin body without adding bulk margin. Plan a bulk margin around the torso and limbs before drawing garments, then build the coat as a rounded volume.
- Adding many small folds everywhere. Limit folds to compression points and hanging areas, and use the short-curve versus long-line convention.
- Letting covered edges show through covering garments. Draw the covering edge first and stop the covered edge behind it to show overlap.
- Inconsistent light direction in shading. Mark one light direction on the page and shade all forms from that same side.
Self-check rubric
- Pose is established with visible joint positions before clothing.
- Coat, scarf, hat, and boots are drawn as distinct volumes.
- Overlap rule is applied: covering edges are drawn first.
- Folds are limited to compression and hanging areas using the stated convention.
- Shading follows one marked light direction.
- Silhouette reads as bundled at a glance.
- Labels use baseline-to-midline x-height and are legible; valid handwriting alternatives accepted.
Questions and answers
Do I need to draw the body first if the coat covers it?
Yes. A light pose sketch keeps joints and proportions believable, even when the body is hidden.
How many folds should I draw?
A few clear folds at bending joints and hanging areas are enough. Fewer, well-placed folds read better than many small ones.
What if my handwriting is not neat?
Use the baseline-to-midline x-height convention and keep labels legible. Letter styles vary, so valid alternatives are accepted.
Can I use different numerical sizes?
Yes. All numbers here are hypothetical examples. Measure your own paper and tools and keep units consistent.