Free original lessons
Draw a Pie: Crust, Filling, and Slice Construction
Learn to draw a pie with an elliptical dish, crimped crust, textured filling, and a cutaway slice using clear construction steps and a checkable rubric.
Free lesson
Four exercises
Worked answers
Object Drawing Lessons
This lesson teaches a reliable construction for a drawing of pies: start with the dish ellipse, build the crimped rim, suggest filling texture, and cut a wedge to show crust layers and filling cross-section. The method uses simple geometry and a defined line convention so you can check your own work. All measurements are hypothetical examples; measure your actual paper and tools. The convention: draw construction lines lightly and final lines firmly; x-height means baseline to midline for any lettering, and letter styles may vary. Valid alternatives are accepted when proportions and layer logic remain consistent.
Practice materials: Printable downloads are not available for this lesson yet. Use the instructions and four exercises below.
Reference illustration
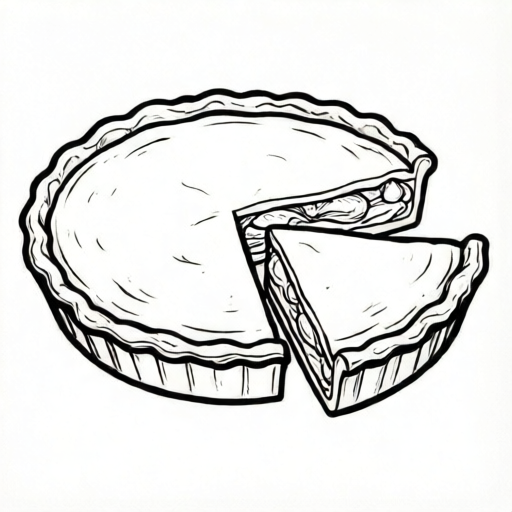
Use the stated measurements and conventions for each exercise.
Set the dish ellipse and rim
Begin with a light horizontal baseline and a vertical center line. Mark the dish width and depth as an ellipse: the full width is the major axis, the visible depth is the minor axis. A shallow pie dish often reads well when the minor axis is about one third of the major axis, but treat that ratio as a hypothetical starting point and adjust to your dish.
Draw the ellipse in two halves, checking symmetry against the center line. Add a second, slightly larger ellipse for the outer rim thickness. Keep these lines light; they are construction, not final contour.
- Mark the major axis endpoints and the minor axis endpoints on the center lines.
- Sketch the ellipse through those four points, then refine the curve.
- Offset a second ellipse outward by a small, consistent rim width.
- Check that the rim width is even at left, right, front, and back.
Build the crimped crust edge
Crimping is a repeated scalloped ridge along the rim. Divide the outer rim ellipse into equal arc segments using light tick marks; eight to twelve segments is a practical hypothetical range. At each tick, draw a small outward bump that connects smoothly to the next, keeping bump height consistent.
Vary the bump shape slightly if you wish, but keep the rhythm readable. The crimped edge should sit on the rim, not float above it. Finalize the crust contour only after the scallop spacing looks even.
- Tick equal arc segments around the outer rim.
- Draw one test scallop and compare its height to the rim width.
- Repeat the scallop around the rim, joining each bump smoothly.
- Darken the final crimped contour and erase stray construction ticks.
Suggest filling surface texture
The filling surface is an inner ellipse slightly smaller than the rim. Use short, curved marks that follow the surface curvature rather than random scribbles. Group marks in clusters to suggest fruit, custard, or mince texture, and leave some calm areas so the surface does not become noisy.
If the filling is a cut fruit or berry mixture, add a few simple rounded shapes partly embedded in the surface. Keep their scale consistent with the dish. Texture marks should stop before the crimped edge so the crust reads as a separate layer.
- Draw the inner filling ellipse inside the rim.
- Add three or four texture clusters following the ellipse curvature.
- Place a few simple filling shapes at consistent scale.
- Soften or erase marks that cross the crimped edge.
Cut a wedge and show the cross-section
Choose a wedge angle, for example a quarter of the pie, and mark two radii from the center to the rim. Remove the wedge visually by drawing the cut faces: one face shows the filling cross-section, the other shows the crust layers. The cutaway should align with the dish ellipse so the slice looks seated in the dish.
Show a bottom crust line, a filling band, and a top crust line on the cut face. If the pie has a top crust, indicate its thickness with a parallel line. Keep layer thicknesses consistent across the cut face and label any numerical values as hypothetical examples.
- Mark two radii for the wedge angle and check they meet at the center.
- Draw the cut face as a vertical section aligned with the dish depth.
- Add bottom crust, filling band, and top crust lines.
- Check layer thickness consistency and darken final cutaway lines.
Worked example
A pie dish is drawn with a major axis of 12 cm and a minor axis of 4 cm. The rim width is 0.5 cm. What is the outer rim major axis length, and how many equal crimp segments of about 1.5 cm arc length fit along the outer rim? Use hypothetical values and simple arithmetic.
Worked answer
Outer major axis = 12 + 2(0.5) = 13 cm. Outer minor axis = 4 + 2(0.5) = 5 cm. Using a rough ellipse perimeter estimate P ≈ π[3(a+b) − sqrt((3a+b)(a+3b))] with a = 6.5 cm and b = 2.5 cm gives P ≈ 29.3 cm. Dividing by 1.5 cm gives about 19.5, so choose 18 or 20 equal segments; 18 gives about 1.63 cm per segment and 20 gives about 1.47 cm per segment. Both are valid if spacing is even.
Four practice exercises
Exercise 1
A dish ellipse has a major axis of 10 cm and a minor axis of 3 cm. The rim width is 0.4 cm. Calculate the outer rim major and minor axis lengths.
Show answer and check
Outer major axis = 10 + 2(0.4) = 10.8 cm; outer minor axis = 3 + 2(0.4) = 3.8 cm.
Why: The rim adds its width on both ends of each axis, so add twice the rim width to each axis length.
Check: Verify that the difference between outer and inner major axes equals 0.8 cm, and the same for the minor axes.
Exercise 2
A pie is cut into a wedge of 90 degrees. If the dish major axis is 12 cm and the minor axis is 4 cm, describe how to mark the two radii and check the wedge angle using the center point.
Show answer and check
Mark the center where the axes cross. Draw one radius to the rim, then a second radius 90 degrees from the first using a right-angle check at the center. Confirm both radii end on the rim ellipse and that the angle between them is 90 degrees.
Why: A 90-degree wedge is a quarter of the pie; the radii must meet at the center and terminate on the rim.
Check: Measure the angle at the center with a protractor or compare the wedge arc to a quarter of the rim; both radii should be equal in length if the dish were circular, but on an ellipse check that each ends on the drawn rim.
Exercise 3
On a cut face, the bottom crust is 0.3 cm thick, the filling band is 2.0 cm thick, and the top crust is 0.4 cm thick. What is the total cut-face height, and what is the ratio of filling to total height?
Show answer and check
Total height = 0.3 + 2.0 + 0.4 = 2.7 cm. Filling ratio = 2.0 / 2.7 ≈ 0.74, or about 74%.
Why: Add the three layer thicknesses for total height, then divide the filling thickness by the total.
Check: Re-add the layers and confirm the sum; multiply the ratio by the total to recover the filling thickness.
Exercise 4
A crimped rim has 12 equal segments. If the outer rim perimeter is estimated as 30 cm, what is the approximate arc length per segment? State one adjustment if the scallops look too wide.
Show answer and check
Arc length per segment = 30 / 12 = 2.5 cm. If scallops look too wide, increase the number of segments to 15, giving 30 / 15 = 2.0 cm per segment.
Why: Divide the perimeter by the number of equal segments; increasing segments reduces arc length per scallop.
Check: Multiply the segment count by the arc length to recover the perimeter estimate, and check that spacing remains even around the rim.
Common mistakes
- Drawing the dish as a perfect circle instead of an ellipse. Set a minor axis shorter than the major axis and check symmetry against the center lines before adding the rim.
- Crimped scallops of uneven height or spacing. Tick equal arc segments first, draw one test scallop, and compare each bump to the rim width.
- Filling texture crossing the crimped edge. Stop texture marks at the inner filling ellipse and erase any marks that overlap the crust.
- Cutaway layers with inconsistent thickness. Draw parallel layer lines on the cut face and compare bottom crust, filling, and top crust bands.
Self-check rubric
- Dish ellipse is symmetric and the rim width is even around the contour.
- Crimped edge has consistent scallop height and readable spacing.
- Filling texture follows surface curvature and stops before the crimped edge.
- Wedge radii meet at the center and the cut face aligns with dish depth.
- Cutaway shows bottom crust, filling band, and top crust with consistent thickness.
- Construction lines are light and final lines are firm; lettering, if any, follows the stated x-height convention and may use varied styles.
Questions and answers
Do I need a perfect ellipse?
No. A clean, symmetric ellipse is enough. Check that the four axis endpoints sit on the center lines and that the curve is smooth.
How many crimp scallops should I draw?
Eight to twelve is a practical hypothetical range. Choose a number that divides evenly around the rim so spacing stays consistent.
Can I show a slice without a top crust?
Yes. Show the bottom crust and filling band on the cut face, and omit the top crust line if the pie is open-topped.
What if my filling texture looks too busy?
Reduce clusters to three or four and leave calm areas. Texture should suggest the filling, not cover every part of the surface.