Free original lessons
Chalk Pastel Snake Scales: A Repeatable Pattern Study
Learn to draw a repeating snake-scale motif in chalk pastel using layering, edge control, and a simple grid convention. Includes practice tasks and a rubric.
Free lesson
Four exercises
Worked answers
Object Drawing Lessons
This lesson focuses only on the repeating pattern of snake scales, not on snake anatomy or head construction. You will use chalk pastel to build a small tile of overlapping scales, then repeat it across a practice panel. The convention is simple: each scale is a rounded diamond or teardrop shape, drawn with a light outline, a mid-tone fill, and a darker edge on one side. Because chalk pastel is soft and blendable, you will work in thin layers and keep your fingers clean between tones. The goal is a consistent, readable pattern that can be repeated without gaps or crowding. All measurements are hypothetical examples; measure your own paper and pastel sticks before starting.
Practice materials: Printable downloads are not available for this lesson yet. Use the instructions and four exercises below.
Reference illustration
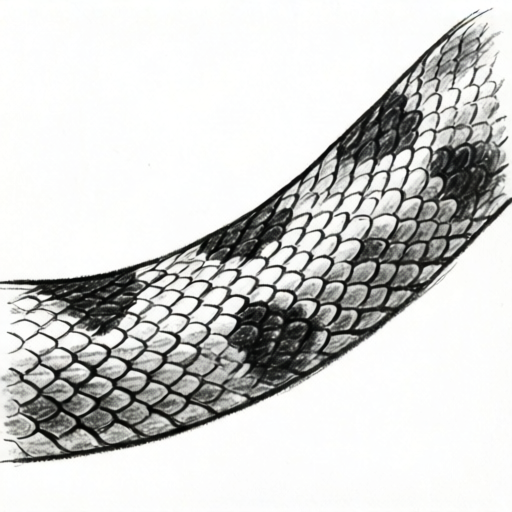
Use the stated measurements and conventions for each exercise.
Setting up the practice panel
Choose a piece of paper with a slight texture; smooth paper holds less pastel. Measure your paper and mark a rectangular practice panel. For this lesson, a hypothetical panel of 12 cm by 18 cm is used, but any size works if you keep the scale size proportional. Divide the panel into a grid of rows and columns. A hypothetical grid of 4 rows and 6 columns gives 24 cells, each about 3 cm wide and 3 cm tall. These numbers are examples only; adjust to your paper.
Tape the paper to a board so it does not shift. Keep a scrap piece of paper nearby for testing pastel tones. Wear an apron or old clothes, and avoid blowing pastel dust; wipe your hands on a damp cloth between colors to prevent muddy mixing.
- Measure your paper and draw a light pencil border for the practice panel.
- Mark rows and columns with a ruler; keep cell sizes equal.
- Label the top row and left column lightly so you can track repeats.
- Test each pastel stick on scrap paper to see its true color and softness.
Drawing one scale motif
A snake scale in this convention is a rounded diamond: wider at the middle, tapering to a soft point at the top and bottom. Draw the outline lightly with a pale pastel or a pencil. The outline is a guide, not a final line. Inside the outline, fill with a mid-tone pastel using short, gentle strokes. Then add a darker edge along one side only, usually the lower or side edge that would catch shadow. This creates a sense of overlap without drawing a full shadow.
Keep each scale slightly smaller than its cell so there is a narrow gap between neighbors. The gap helps the pattern read as separate scales. If scales touch, the pattern can look like a solid mass. Use a clean finger or a soft brush to blend only the mid-tone, not the dark edge, so the edge stays crisp.
- Draw a rounded diamond outline inside one cell, leaving a small gap from the cell edges.
- Fill the shape with a mid-tone pastel using light pressure.
- Add a darker pastel line along one edge, following the curve.
- Blend the mid-tone gently, avoiding the dark edge.
- Check that the scale sits inside the cell with a visible gap.
Repeating the pattern across the panel
Repeat the motif cell by cell. To create an overlapping look, offset each row by half a cell, like bricks. In a hypothetical 4 by 6 grid, row 1 has scales centered in each cell; row 2 has scales centered on the vertical lines between cells. This offset is a convention, not a rule; you may choose a straight grid if you prefer, as long as you state your convention and keep it consistent.
Work in small batches: complete one row, then step back to check spacing. Vary the mid-tone slightly from scale to scale to suggest natural variation, but keep the dark edge on the same side for each scale in a row. If a scale looks too dark, lift some pastel with a clean eraser or a dry brush; do not add more dark pastel to fix it.
- Complete the first row using the single-scale steps.
- Offset the second row by half a cell and repeat.
- Continue row by row, checking gaps and edge direction.
- Step back every few scales to judge the overall rhythm.
- Adjust only one variable at a time: spacing, tone, or edge darkness.
Finishing and reviewing
When the panel is full, look at it from a short distance. The pattern should read as a field of separate scales with a consistent overlap direction. Check for crowded areas where scales touch, and for scales that are much larger or smaller than their neighbors. Use a soft brush to remove loose dust, and avoid pressing hard on the paper.
Because chalk pastel can smudge, store the work flat or cover it with a clean sheet of paper. Do not spray fixative indoors without checking the product instructions and ventilation; fixative use is optional and not required for this lesson.
- Review the panel for gaps and crowding.
- Compare scale sizes across rows.
- Remove loose dust with a soft brush.
- Store the work flat or covered.
Worked example
On a hypothetical 6 cm by 6 cm panel, draw a 2 by 2 grid of cells, each 3 cm by 3 cm. Draw one rounded diamond scale in each cell with a small gap, using a mid-tone fill and a dark edge on the lower side. Describe the result.
Worked answer
The panel contains four scales, one per cell. Each scale is a rounded diamond about 2.5 cm wide and 2.5 cm tall, leaving a 0.5 cm gap to the cell edges. The mid-tone is blended lightly, and the lower edge of each scale has an unblended dark line. The pattern reads as four separate scales with a consistent shadow direction.
Four practice exercises
Exercise 1
A hypothetical practice panel is 9 cm wide and 9 cm tall. You want a 3 by 3 grid. What is the width and height of each cell in centimeters?
Show answer and check
Each cell is 3 cm wide and 3 cm tall.
Why: Divide the panel width by the number of columns: 9 cm divided by 3 equals 3 cm. Divide the panel height by the number of rows: 9 cm divided by 3 equals 3 cm.
Check: Multiply cell width by columns (3 cm times 3 equals 9 cm) and cell height by rows (3 cm times 3 equals 9 cm) to confirm the panel size.
Exercise 2
In a hypothetical offset grid, row 1 has scales centered in cells. Row 2 is offset by half a cell. If each cell is 4 cm wide, how far is the center of a row 2 scale from the left edge of the panel, assuming the first row 2 scale is offset from the first cell?
Show answer and check
The center is 2 cm from the left edge.
Why: Half of a 4 cm cell is 2 cm. An offset row shifts the scale center by half a cell width, so the first offset scale center sits 2 cm from the left edge.
Check: Measure half the cell width (4 cm divided by 2 equals 2 cm) and compare with the described position.
Exercise 3
You draw 4 rows of 6 scales. Each scale uses one short stroke of mid-tone and one short stroke of dark edge. How many short strokes in total are used for mid-tone and dark edge combined?
Show answer and check
48 short strokes.
Why: There are 4 rows times 6 scales equals 24 scales. Each scale uses 2 strokes (one mid-tone, one dark edge), so 24 times 2 equals 48 strokes.
Check: Count scales (4 times 6 equals 24) and multiply by strokes per scale (2) to get 48.
Exercise 4
A scale outline is a rounded diamond about 2.5 cm wide inside a 3 cm cell. What is the total gap on both sides of the scale if the scale is centered?
Show answer and check
The total gap is 0.5 cm, or 0.25 cm on each side.
Why: Subtract the scale width from the cell width: 3 cm minus 2.5 cm equals 0.5 cm. If centered, half of that gap is on each side: 0.5 cm divided by 2 equals 0.25 cm.
Check: Add the scale width and both side gaps: 2.5 cm plus 0.25 cm plus 0.25 cm equals 3 cm, matching the cell width.
Common mistakes
- Drawing scales that touch or overlap heavily, making a solid mass. Leave a narrow gap between each scale and its cell edge; check spacing after each row.
- Blending the dark edge until it disappears. Blend only the mid-tone and keep the dark edge unblended; use light pressure.
- Changing the offset convention halfway through the panel. Decide on a straight or offset grid before starting and keep it consistent.
- Using too much pastel in one layer, causing smudging and muddy color. Build thin layers and wipe your hands between tones.
Self-check rubric
- Pattern repeats across the panel with a stated convention (straight or offset).
- Each scale is a rounded diamond or teardrop shape with a visible gap from neighbors.
- Mid-tone is blended lightly; dark edge remains visible on one side.
- Scale sizes are consistent within rows, with acceptable natural variation.
- No crowded areas where scales merge into a solid mass.
- Work is free of excessive smudging and muddy color mixing.
Questions and answers
Do I need to draw a snake body or head?
No. This lesson covers only the repeating scale pattern. Body anatomy and head construction are outside the boundary.
What if my paper is a different size?
Measure your paper and adjust the grid. The 12 cm by 18 cm panel and 3 cm cells are hypothetical examples, not fixed requirements.
Can I use a straight grid instead of an offset one?
Yes. Choose one convention and state it. The rubric accepts either as long as it is consistent and readable.
How do I fix a scale that is too dark?
Lift pastel with a clean eraser or dry brush. Avoid adding more dark pastel to cover it.