Free original lessons
Drawing Snake Scales on a Cylindrical Dowel: Curvature and Foreshortening
Learn to wrap snake scale rows around a dowel rod, adjusting spacing for curvature and foreshortening with a clear convention and rubric.
Free lesson
Four exercises
Worked answers
Object Drawing Lessons
Drawing scales on a cylindrical dowel is not the same as drawing them on flat paper. The surface curves away from you, so rows compress near the silhouette and widen across the front. This guide defines a simple convention for scale shape and spacing, then walks through wrapping rows around the cylinder. You will measure your actual dowel, choose hypothetical spacing values, and check your work with arithmetic. The goal is a believable, consistent pattern that respects the cylinder, not a single universal answer.
Practice materials: Printable downloads are not available for this lesson yet. Use the instructions and four exercises below.
Reference illustration
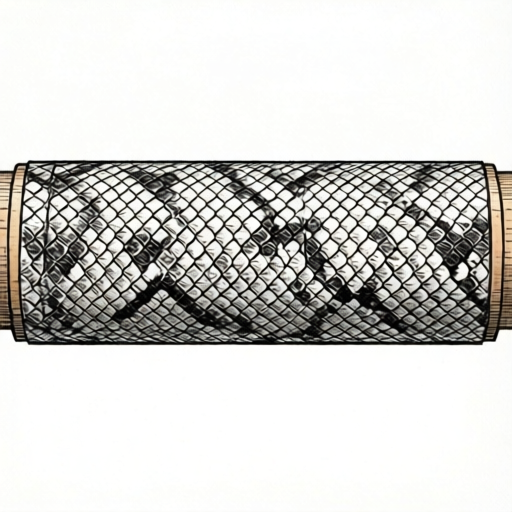
Use the stated measurements and conventions for each exercise.
Define a scale convention before you start
A convention is a repeatable rule for shape and overlap. For this task, use a rounded diamond: each scale is a four-sided shape with slightly curved sides, wider than it is tall, and overlapping the scale below by about one third of its height. Draw the top edge as a shallow arc that follows the cylinder's curve. This is one valid convention; other rounded shapes are acceptable if applied consistently.
Decide the scale height relative to the dowel circumference. Measure the dowel's circumference with a string or tape, then divide by a chosen number of scales around the cylinder. For example, if the circumference is 60 mm and you choose 12 scales around, each scale occupies 5 mm of arc. These numbers are hypothetical examples; measure your own dowel and label your chosen values.
- Measure the dowel circumference in millimeters and record it.
- Choose a whole number of scales to fit around the cylinder, such as 10 to 16 for a small dowel.
- Divide circumference by that number to get arc width per scale.
- Draw one scale on the front center as a reference, using the rounded diamond convention.
- Mark the reference scale's height and overlap fraction so later rows stay consistent.
Wrap rows using curvature guide arcs
On a cylinder, a horizontal ring of scales appears as an ellipse when viewed from the side. Draw light guide arcs across the dowel: a central arc that bulges toward you and side arcs that curve away. These arcs are not straight lines. Space the arcs by the scale height you chose, but compress the spacing near the left and right edges where the surface turns away.
Foreshortening means the apparent width of a scale shrinks as it approaches the silhouette. Keep the arc width at the front center as your full value, then reduce it gradually toward the edges. A simple rule: at the silhouette, the apparent width approaches zero. You do not need exact trigonometry; a gradual taper is enough for a convincing drawing.
- Draw three to five light curvature guide arcs across the dowel at your chosen row height.
- Mark scale positions along the front-center arc at the full arc width.
- Toward each edge, reduce the spacing between marks so scales appear narrower.
- Draw each scale as a rounded diamond whose top edge follows the local guide arc.
- Overlap each scale over the one below by the chosen fraction, keeping the overlap consistent.
Check consistency with simple arithmetic
You can check your pattern without guessing. Count the scales along the front-center arc between two guide arcs. Multiply that count by the arc width per scale; the result should be close to the measured circumference. If it is far off, adjust your count or spacing. Keep all measurements in millimeters and label any chosen values as hypothetical.
Also check row height. If you chose a scale height of 4 mm and an overlap of one third, the visible row spacing is about 2.7 mm. Multiply the number of rows by the visible spacing and compare with the dowel length you intend to cover. Small differences are acceptable because hand drawing is approximate.
- Count scales around the front-center arc and multiply by arc width.
- Compare the product with the measured circumference; note the difference.
- Count rows and multiply by visible row spacing to estimate covered length.
- Adjust one variable at a time, such as scale count or overlap fraction.
- Record your final values beside the drawing for future reference.
Handle edges and silhouette scales
At the silhouette, scales should not look like flat diamonds pasted on. Their visible width shrinks, and their side edges may disappear behind the curve. Draw only the portion that would be visible from your viewpoint. A common mistake is drawing full-width scales at the edge, which breaks the cylinder illusion.
Use a lighter line weight near the silhouette and a slightly darker line at the front center. This is a drawing convention, not a rule about lighting. It helps the eye read the curvature. Keep the overlap direction consistent: each scale overlaps the one below, so the pattern reads as a continuous surface.
- Identify the left and right silhouette lines of the dowel.
- Stop drawing scale side edges that would fall behind the silhouette.
- Reduce apparent scale width gradually as you approach each edge.
- Keep overlap direction the same across the whole surface.
- Review the drawing from a short distance to check the cylinder reads clearly.
Worked example
A dowel has a measured circumference of 48 mm. You choose 8 scales around and a scale height of 3 mm with one-third overlap. Calculate the arc width per scale and the visible row spacing, then describe how the pattern should look at the front center and near the silhouette.
Worked answer
Arc width per scale is 48 divided by 8, which equals 6 mm. Visible row spacing is 3 mm minus one third of 3 mm, which equals 2 mm. At the front center, draw scales about 6 mm wide along the arc. Near each silhouette, taper the apparent width gradually toward zero and stop side edges that would fall behind the dowel. Keep the one-third overlap consistent. These values are hypothetical examples based on the measured circumference.
Four practice exercises
Exercise 1
A dowel measures 72 mm around. You choose 12 scales around and a scale height of 4 mm with one-third overlap. Calculate arc width per scale and visible row spacing. Describe the pattern at the front center and at the silhouette.
Show answer and check
Arc width is 72 divided by 12, which equals 6 mm. Visible row spacing is 4 mm minus one third of 4 mm, about 2.67 mm. At the front center, scales are about 6 mm wide along the curved guide arc. Near the silhouette, taper apparent width toward zero and omit side edges that would be hidden.
Why: Dividing circumference by scale count gives arc width. Subtracting the overlap fraction from scale height gives visible row spacing. Foreshortening requires tapering width toward the silhouette.
Check: Multiply 12 by 6 mm to get 72 mm, matching the measured circumference. Multiply visible row spacing by the number of rows and compare with the intended covered length.
Exercise 2
A dowel has a circumference of 50 mm. You want scales about 5 mm wide at the front center. How many scales around should you choose, and what is the visible row spacing if scale height is 3 mm with one-third overlap?
Show answer and check
Choose 10 scales around because 50 divided by 5 equals 10. Visible row spacing is 3 mm minus one third of 3 mm, which equals 2 mm. Draw curved guide arcs and taper width toward the silhouette.
Why: Scale count equals circumference divided by desired arc width. Visible row spacing follows from scale height and overlap fraction.
Check: Multiply 10 by 5 mm to get 50 mm. Check that row spacing times row count is close to the covered length.
Exercise 3
You have drawn 6 rows with a visible row spacing of 3 mm. The dowel length you intend to cover is 20 mm. Does the pattern fit? Show the arithmetic and state one adjustment if needed.
Show answer and check
Six rows times 3 mm equals 18 mm, which is 2 mm short of 20 mm. Add one more row to reach 21 mm, or increase visible row spacing slightly. Keep units in millimeters and label chosen values as hypothetical.
Why: Multiplying row count by visible spacing estimates covered length. Comparing with the target length shows whether the pattern fits.
Check: Recalculate after adjustment: 7 rows times 3 mm equals 21 mm, which covers the 20 mm target with a small margin.
Exercise 4
A drawing shows full-width scales right up to the silhouette line. Identify the problem and describe two changes that would improve the cylinder illusion.
Show answer and check
The problem is missing foreshortening: scales at the silhouette should appear narrower, not full width. First, taper apparent scale width gradually toward each edge. Second, stop drawing side edges that would fall behind the silhouette. Keep the overlap fraction consistent.
Why: On a cylinder, the surface turns away at the silhouette, so apparent width shrinks. Drawing full-width scales there breaks the curvature illusion.
Check: Review the drawing from a short distance. If the edge scales look flat or pasted on, reduce their apparent width further and remove hidden side edges.
Common mistakes
- Drawing all scale rows as straight horizontal lines. Use curved guide arcs that bulge at the front center and turn away at the edges.
- Keeping the same scale width at the silhouette as at the front center. Taper apparent width toward each edge so scales foreshorten as the surface curves away.
- Changing the overlap fraction from row to row. Choose one overlap fraction, such as one third, and apply it consistently.
- Mixing units when checking circumference and scale width. Record all measurements in millimeters and convert before multiplying.
Self-check rubric
- Scale shape follows a single stated convention consistently across the drawing.
- Curvature guide arcs are curved, not straight, and bulge at the front center.
- Apparent scale width tapers toward each silhouette to show foreshortening.
- Overlap fraction is consistent from row to row.
- Arithmetic check uses consistent units and is recorded beside the drawing.
- Valid alternative scale shapes are accepted if applied consistently.
Questions and answers
Do I need to calculate exact foreshortening?
No. A gradual taper toward the silhouette is enough for a convincing drawing. Exact trigonometry is optional and not required by this convention.
How many scales should go around the dowel?
Choose a whole number that gives a comfortable arc width. For a 60 mm circumference, 12 scales gives 5 mm per scale as a hypothetical example. Measure your own dowel.
Can I use a different scale shape?
Yes. The rounded diamond is one convention. Any repeatable shape with consistent overlap is acceptable if applied uniformly.
What if my arithmetic check is slightly off?
Small differences are normal in hand drawing. Adjust one variable at a time and note the change.