Free original lessons
Pencil Water: Ripples and Reflections
Learn to draw calm and rippled water in pencil using ellipse spacing, reflection breaks, and tonal steps. Includes worked example, practice tasks, and a marking rubric.
Free lesson
Four exercises
Worked answers
Object Drawing Lessons
Water is mostly a pattern problem: the surface tilts, catches light, and breaks reflections into bands. This lesson teaches a repeatable pencil method for still water, gentle ripples, and reflective patches. You will use a simple convention: x-height means the distance from baseline to midline of a letter, used here as a consistent unit for spacing ripples and reflection bands. Letter styles vary, so treat x-height as a relative measure, not a fixed size. All numerical values are hypothetical examples; measure your own paper and pencil to set your own units. The goal is controlled tone and believable spacing, not photorealism.
Practice materials: Printable downloads are not available for this lesson yet. Use the instructions and four exercises below.
Reference illustration
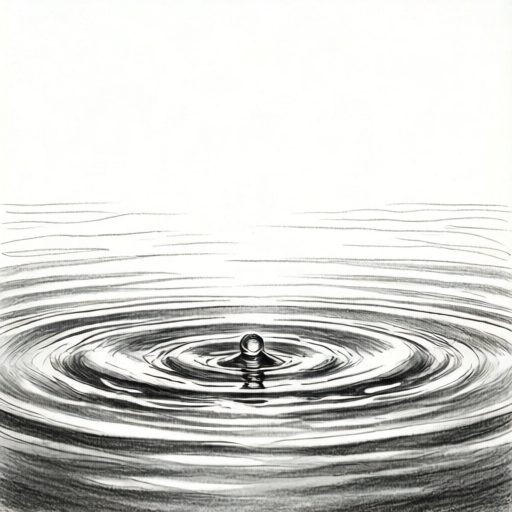
Use the stated measurements and conventions for each exercise.
Set a spacing convention before you shade
Choose a unit you can repeat: for example, one x-height equals the height of a lowercase x in your normal handwriting. Mark a light baseline and midline on scrap paper. Use that distance to space ripple ellipses and reflection bands so the pattern stays consistent across the page.
Keep pencil pressure light for layout. A 2H or HB pencil is suitable for guides; a softer pencil builds tone later. Measure your actual paper size and pencil width, then label any chosen numbers as hypothetical examples in your notes.
- Draw a faint horizon line and a baseline for the water area.
- Mark one x-height unit on the margin and divide it into halves.
- Lightly sketch three to five ellipse guides spaced by one x-height.
- Check spacing by counting units across the water area before shading.
Build ripples with ellipse spacing and tonal steps
A ripple reads as a flattened ellipse: wider than it is tall. Space ellipses closer together near the disturbance and farther apart toward calm water. Use three tonal steps: light for sky reflection, mid for tilted surface, dark for shadowed troughs.
Shade in the direction of the surface tilt, not in random scribbles. Keep the lightest band on the side facing the light source. If your ellipses crowd, erase one guide rather than darkening over it.
- Place a small disturbance point and draw the first ellipse around it.
- Add two or three larger ellipses, increasing spacing by half an x-height each time.
- Assign light, mid, and dark tones to alternating bands.
- Blend only the mid tones; leave light bands crisp.
Break reflections where the surface tilts
Reflections are not solid copies. They break into vertical bands that wobble with ripples. Draw the reflected object as a soft vertical smear, then interrupt it with light gaps where the surface catches sky.
Use the same x-height unit to set band width. A calm patch has long unbroken bands; a rippled patch has short, staggered bands. Keep edges soft with a light pencil and a tissue blend, but preserve at least one sharp break per reflection to show tilt.
- Sketch the reflected shape as a faint vertical band.
- Mark two or three break lines using the x-height unit.
- Erase small gaps to suggest sky reflection.
- Soften the band edges and recheck the tonal steps.
Check tone and spacing before finishing
Step back and compare the lightest and darkest areas. If everything is mid tone, the water looks muddy. Add one lighter band and one darker trough. Check that ripple spacing increases away from the disturbance.
Use a simple arithmetic check: count ellipses in a row and divide the row length by that count to estimate average spacing. Compare it with your x-height unit. Adjust before final shading.
- Count ellipses across one row and record the row length.
- Divide length by count to find average spacing.
- Compare average spacing with your x-height unit.
- Adjust one guide and recheck the tonal steps.
Worked example
A still pond with one small disturbance at the center. Draw three ripple ellipses spaced by one x-height, then add a broken reflection of a vertical post on the right side. Use three tonal steps.
Worked answer
Lightly mark a horizon and baseline. Set one x-height unit. Draw the first ellipse around the disturbance, then two larger ellipses spaced by one and one-and-a-half x-heights. Shade light bands facing the light, mid bands on tilted surfaces, and dark troughs between ellipses. On the right, sketch a faint vertical band for the post reflection, break it with two light gaps, and soften edges. Check average spacing by dividing row length by ellipse count and comparing with the x-height unit.
Four practice exercises
Exercise 1
Calm water: draw five horizontal reflection bands across a 10 cm wide water area. Use one x-height unit of 1 cm. Space bands evenly and shade with two tonal steps.
Show answer and check
Five bands spaced 2 cm apart across 10 cm, using light and mid tones only.
Why: 10 cm divided by five bands gives 2 cm average spacing, which is two x-height units. Calm water needs long unbroken bands and limited tone range.
Check: Count bands and measure total width. Divide width by band count and compare with the x-height unit. Confirm only two tones are used.
Exercise 2
Rippled water: place a disturbance at the center of a 12 cm row. Draw four ellipses with spacing increasing by half an x-height each time, starting at 1 cm. State the spacing sequence.
Show answer and check
Spacing sequence: 1 cm, 1.5 cm, 2 cm, 2.5 cm.
Why: Each step adds half of the 1 cm x-height unit. The sequence is checkable by simple addition.
Check: Add the spacings: 1 + 1.5 + 2 + 2.5 = 7 cm. Confirm each step increases by 0.5 cm and that ellipses are wider than tall.
Exercise 3
Reflection break: a vertical post reflection is 8 cm tall and 2 cm wide. Break it with three light gaps of 0.5 cm each. What total dark band length remains?
Show answer and check
6.5 cm of dark band length remains.
Why: Three gaps of 0.5 cm total 1.5 cm. Subtract from 8 cm to get 6.5 cm.
Check: Multiply gap count by gap width, then subtract from total height. Confirm units are consistent in centimeters.
Exercise 4
Tone check: a water area has light, mid, and dark bands in ratio 2:3:1 across a 12 cm width. Find the width of each tone band.
Show answer and check
Light 4 cm, mid 6 cm, dark 2 cm.
Why: Total ratio parts are 2 + 3 + 1 = 6. Divide 12 cm by 6 to get 2 cm per part. Multiply each ratio by 2 cm.
Check: Add the three widths: 4 + 6 + 2 = 12 cm. Confirm the ratio 2:3:1 holds.
Common mistakes
- Drawing ripples as perfect circles. Flatten each ellipse so its width is about twice its height, then check spacing with the x-height unit.
- Making reflections solid and dark. Break the reflection into vertical bands and erase light gaps for sky reflection.
- Using only one pencil pressure. Assign light, mid, and dark tones to separate bands and keep light bands crisp.
- Crowding ripples evenly across the page. Increase spacing by half an x-height away from the disturbance point.
Self-check rubric
- Ripple ellipses are flattened and spaced consistently using a stated x-height convention.
- Three tonal steps are visible and assigned to distinct bands.
- Reflections are broken into vertical bands with at least one sharp break.
- Spacing increases away from the disturbance point.
- Valid alternative conventions are accepted if spacing and tone remain consistent and checkable.
Questions and answers
Do I need special paper?
No. Use any paper you have. Measure its size and your pencil width, then set your x-height unit from your own handwriting.
How many tonal steps should I use?
Three steps are enough: light for sky reflection, mid for tilted surface, dark for shadowed troughs. Add a fourth only if your pencil allows clean separation.
Can I use a blending stump?
Yes, but blend only mid tones. Keep at least one sharp break in each reflection so the surface tilt remains visible.
What if my ripples look like waves?
Reduce ellipse height and keep spacing regular. Waves have tall crests; ripples are flattened and close to the surface.