Free original lessons
Draw a Wetland Scene: Marsh Plants, Water Edge, and Wildlife
Plan and draw a wetland composition with foreground marsh plants, a clear water-edge line, midground wildlife silhouettes, and a horizon guide using a simple framed panel.
Free lesson
Four exercises
Worked answers
Object Drawing Lessons
A wetland drawing reads clearly when three zones are separated: foreground marsh plants, a water-edge line, and midground wildlife. This lesson uses a framed panel and a horizon guide to keep the composition organized. You will measure your own paper and tools, choose a simple convention for plant and animal shapes, and check proportions with basic arithmetic. All measurements below are hypothetical examples; substitute your actual paper size and keep units consistent.
Practice materials: Printable downloads are not available for this lesson yet. Use the instructions and four exercises below.
Reference illustration
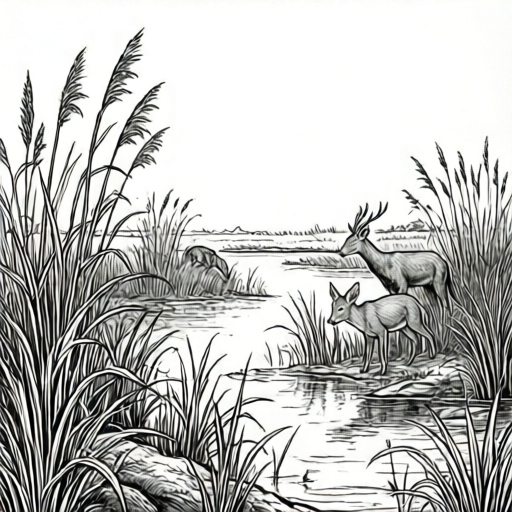
Use the stated measurements and conventions for each exercise.
Set up the framed panel and horizon guide
Measure your paper width and height in the same unit, such as centimeters. Draw a frame inset from each edge by a chosen margin, for example 2 cm on all sides. Inside the frame, place a horizon guide as a light horizontal line. A practical starting point is one-third of the frame height from the top, but any consistent fraction is valid if you record it.
Label the lower zone as foreground, the band around the water-edge line as the transition, and the upper zone as midground and sky. Keep the horizon guide light so it can be erased or covered later.
- Measure paper width and height; record both values.
- Draw a frame with a chosen margin, for example 2 cm, on all four sides.
- Mark the frame height and place a horizon guide at a chosen fraction, for example one-third from the top.
- Label foreground, water edge, and midground zones lightly in pencil.
Place the water-edge line and marsh plants
The water-edge line separates land from water and should cross the frame at a shallow angle, not parallel to the bottom. Choose two points on opposite frame sides and connect them with a gentle curve. Foreground marsh plants grow upward from anchored ground points in the lower zone, crossing the water-edge line in places to show depth.
Use a simple convention: each marsh plant is a stem plus three to five leaf shapes. Vary stem height and leaf angle, but keep the base of each plant anchored to a visible ground point. Plant heights may vary; keep each base anchored and the water edge visible.
- Mark two points on opposite frame sides for the water-edge line.
- Connect the points with a shallow curve and keep the line light.
- Draw three to five foreground marsh plants with stems and leaves.
- Anchor each plant base to a ground point and let some cross the water-edge line.
Add midground wildlife silhouettes
Wildlife silhouettes sit in the midground band between the horizon guide and the water-edge line, with the horizon guide as the upper boundary and the water-edge line as the lower boundary. Choose two or three simple animal shapes, such as a bird, a frog, or a fish near the surface. Keep silhouettes solid and smaller than the foreground plants so they do not dominate the composition.
Check scale with arithmetic: if the frame width is 16 cm and a bird silhouette is 2 cm wide, the bird occupies 2/16 = 0.125, or one-eighth of the frame width. If foreground plants are 10 cm tall, the 2 cm bird is smaller than the plants, so it reads as midground. Adjust until the wildlife reads as midground, not foreground.
- Choose two or three wildlife silhouettes suitable for a wetland.
- Place them between the water-edge line and the horizon guide.
- Keep silhouettes solid and record their approximate width.
- Check that each silhouette is smaller than the foreground plants.
Refine composition and check the framed panel
Review the framed panel for balance: foreground plants should occupy the lower third, wildlife the middle band, and sky or distant marsh the upper area. Erase or lighten the horizon guide if it competes with the scene. Add a few water-surface marks as short horizontal dashes to suggest calm water without turning the scene into an aquarium.
Use the rubric to check zone separation, water-edge clarity, plant anchoring, wildlife scale, and overall readability. Valid alternatives include different plant shapes, wildlife choices, and horizon fractions, provided the zones remain distinct.
- Compare the three zones and adjust any crowded area.
- Lighten or erase the horizon guide if needed.
- Add short horizontal dashes for water surface.
- Score the drawing against the rubric and note one improvement.
Worked example
A frame is 20 cm wide and 15 cm high with a 2 cm margin. Place a horizon guide one-third from the top of the frame and a water-edge line from the left frame side at 10 cm height to the right frame side at 8 cm height. A bird silhouette is 2 cm wide. Check the bird's share of frame width.
Worked answer
Frame width is 20 cm minus 4 cm of margins = 16 cm. Frame height is 15 cm minus 4 cm of margins = 11 cm. Bird share is 2 cm divided by 16 cm = 0.125, or one-eighth of frame width. The horizon guide sits one-third of 11 cm ≈ 3.67 cm from the top of the inside frame, which is about 5.67 cm from the top edge of the paper. The water-edge line runs from 10 cm height on the left frame side to 8 cm height on the right frame side, so it drops 2 cm across the frame width and slopes gently downward from left to right.
Four practice exercises
Exercise 1
A frame is 24 cm wide and 18 cm high with a 3 cm margin on all sides. Calculate the frame width and frame height inside the margins.
Show answer and check
Frame width = 24 - 6 = 18 cm; frame height = 18 - 6 = 12 cm.
Why: Subtract twice the margin from each overall dimension because the margin is on both sides.
Check: Add the margins back: 18 + 3 + 3 = 24 cm and 12 + 3 + 3 = 18 cm.
Exercise 2
Inside a 16 cm wide frame, a frog silhouette is 4 cm wide. What fraction of the frame width does the frog occupy? Is it suitable as a midground silhouette if foreground plants are 10 cm tall?
Show answer and check
The frog occupies 4/16 = 0.25, or one-quarter of frame width. The frog is 4 cm wide; if foreground plants are 10 cm tall, the frog's width is less than the plant height, so it can work as a midground silhouette provided it is placed behind the plants and below the horizon guide.
Why: Fraction is silhouette width divided by frame width. Midground wildlife should stay smaller than the foreground plants and sit in the midground band.
Check: Multiply 0.25 by 16 cm to recover 4 cm, and confirm 4 cm is less than the 10 cm plant height.
Exercise 3
A water-edge line runs from the left frame side at 9 cm height to the right frame side at 6 cm height. Describe the slope and state whether it is parallel to the bottom edge.
Show answer and check
The line drops 3 cm from left to right over the frame width, so it slopes gently downward and is not parallel to the bottom edge.
Why: A parallel line would have equal heights at both sides. Different heights create a shallow angle.
Check: Subtract the two heights: 9 - 6 = 3 cm difference, confirming a slope.
Exercise 4
A frame is 20 cm wide and 15 cm high inside the margins. A horizon guide is placed one-third from the top inside the frame. Calculate its distance from the top of the frame and from the bottom of the frame.
Show answer and check
One-third of 15 cm is 5 cm from the top; the remaining distance is 10 cm from the bottom.
Why: Divide frame height by 3 for the top distance, then subtract from total height for the bottom distance.
Check: Add the two distances: 5 + 10 = 15 cm, matching frame height.
Common mistakes
- Drawing the water-edge line parallel to the bottom edge. Angle the line across the frame using two points on opposite sides so the water edge reads as a boundary, not a stripe.
- Letting wildlife silhouettes become larger than foreground plants. Measure silhouette width and compare it to plant height; keep wildlife in the midground band.
- Floating marsh plants without anchored bases. Mark a ground point for each plant base and draw the stem upward from that point.
- Making the horizon guide too dark and dominant. Keep the guide light and erase or cover it once the zones are placed.
Self-check rubric
- Frame and margin are measured and recorded in consistent units.
- Horizon guide is placed at a recorded fraction and kept light.
- Water-edge line crosses the frame at a shallow angle and is clearly visible.
- Three to five foreground marsh plants have anchored bases and cross the water edge where intended.
- Two or three midground wildlife silhouettes are smaller than foreground plants and sit between water edge and horizon.
- Zones read as foreground, transition, and midground without turning into a forest, ecosystem map, or aquarium scene.
- Valid alternatives in plant shape, wildlife choice, and horizon fraction are accepted if zones remain distinct.
Questions and answers
Do I need a specific paper size?
No. Measure your actual paper and keep all measurements in the same unit. The 2 cm margin and one-third horizon are hypothetical examples.
How many marsh plants should I draw?
Three to five foreground plants are enough to establish the zone. More can work if the bases stay anchored and the water edge remains visible.
Can I use different wildlife?
Yes. Any wetland-appropriate silhouette works if it sits in the midground and stays smaller than the foreground plants.
What if my horizon fraction differs?
Record your chosen fraction and keep it consistent. The rubric checks zone separation, not a single universal fraction.