HomeSkull Proportion Landmarks: A Drawing Guide Free original lessons
Skull Proportion Landmarks: A Drawing Guide
Learn to draw a human skull using measurable landmark ratios. Practice with clear steps, common fixes, and four self-contained exercises.
Free lesson
Four exercises
Worked answers
Object Drawing Lessons
Drawing a skull accurately depends less on artistic talent and more on observing consistent proportion landmarks. This guide teaches a repeatable method: establish a vertical centerline, mark the cranial vault and jaw, then locate the eye sockets, nasal aperture, and teeth using simple ratios. You will work from an explicitly defined convention: x-height means the vertical distance from the skull's baseline (jaw bottom) to the horizontal midline reference mark at half the total skull height. Letter styles vary, so this is a chosen example convention rather than a universal standard. Learn to check your drawing with arithmetic rather than guesswork. All measurements are relative to the skull's total height, so the method scales to any paper size. The four practice tasks are solvable from the text alone; where a diagram would help, the prompt describes it explicitly. Use a pencil and ruler, and label your landmark points lightly so you can adjust them.
Practice materials: Printable downloads are not available for this lesson yet. Use the instructions and four exercises below.
Reference illustration
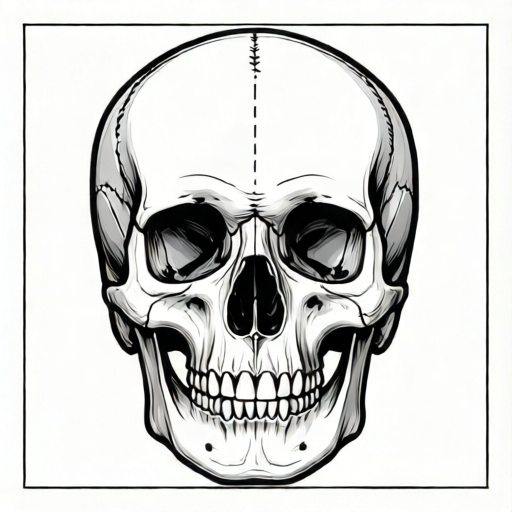
Use the stated measurements and conventions for each exercise.
Establishing the Vertical Framework
Begin with a vertical line representing the skull's midline. Mark the top of the cranial vault and the bottom of the jaw. The distance between these two points is the total skull height, which becomes your reference unit for all ratios. Divide this line into halves and quarters using a ruler; these marks will anchor the major horizontal landmarks.
The widest part of the cranium typically sits near the upper third of the total height. The eye sockets occupy the middle band, and the nasal aperture sits below them. The teeth and jaw occupy the lower third. These bands are approximate and vary between individuals, so treat them as starting guides, not fixed rules.
- Draw a vertical midline and mark top and bottom points.
- Measure total height and mark the halfway point.
- Mark quarter points along the midline.
- Draw light horizontal guides at the halfway and quarter marks.
Placing the Eye Sockets and Nasal Aperture
The eye sockets are two roughly oval shapes centered on the midline's horizontal band. Their inner edges sit close to the midline, leaving a narrow nasal bridge between them. A common convention places the socket centers at about one-quarter of the total skull width from the midline on each side. Measure your own drawing's width and apply that ratio consistently.
The nasal aperture begins below the eye sockets. Its top edge often aligns near the lower third mark, and its bottom edge sits above the teeth. The aperture is narrower than the distance between the socket centers. Check that the gap between the socket bottoms and the aperture top is roughly equal on both sides of the midline.
- Mark socket centers at one-quarter width from midline on each side.
- Draw oval sockets with inner edges near the midline.
- Mark the nasal aperture top near the lower third line.
- Check left-right symmetry by measuring from the midline.
Jaw, Teeth, and Final Proportion Checks
The jaw forms a U-shaped curve below the nasal aperture. The teeth line sits roughly halfway between the aperture bottom and the jaw bottom. Draw the jaw curve first, then place the teeth line, then add individual tooth blocks as simple rectangles. Keep the tooth row centered on the midline.
Before finishing, run three arithmetic checks: total height divided by two should match your halfway mark; socket centers should be equidistant from the midline; and the jaw width at its widest should be narrower than the cranial width. If a check fails by more than a small margin, adjust the landmark rather than redrawing everything.
- Draw the jaw curve below the nasal aperture.
- Mark the teeth line halfway between aperture bottom and jaw bottom.
- Add tooth blocks as simple rectangles centered on midline.
- Run the three arithmetic checks and adjust landmarks.
Worked example
A skull drawing has total height 12 cm. The halfway mark is at 6 cm. The eye socket centers are 2 cm from the midline on the left and 3 cm on the right. The cranial width is 8 cm and the jaw width is 9 cm. Identify two proportion errors and state the corrected values.
Worked answer
Error 1: socket centers are not equidistant from the midline. Correct both to 2.5 cm from the midline. Error 2: jaw width exceeds cranial width. Reduce jaw width to 7 cm, which is narrower than the 8 cm cranial width. The halfway mark at 6 cm is correct because 12 divided by 2 equals 6.
Four practice exercises
Exercise 1
A skull drawing has total height 10 cm. Mark the halfway point and the quarter points. The eye socket centers are placed at 2 cm from the midline on each side. The cranial width is 7 cm. Calculate the expected socket center distance from the midline using the one-quarter width convention, and state whether the drawing matches.
Show answer and check
One-quarter of 7 cm is 1.75 cm. The drawing uses 2 cm, which is close but slightly wider. Accept either 1.75 cm as the convention value or 2 cm as a valid alternative if the symmetry check passes.
Why: The convention places socket centers at one-quarter of total width from the midline. 7 divided by 4 equals 1.75. The drawing's 2 cm is a small deviation, so note it and check symmetry.
Check: Measure both socket centers from the midline; they should be equal. Compare each to 1.75 cm and record the difference.
Exercise 2
A skull drawing has total height 16 cm. The nasal aperture top is marked at 10 cm from the top. The lower third mark is at 10.67 cm. Is the aperture top close to the lower third convention? Show the arithmetic.
Show answer and check
The lower third mark is 16 divided by 3, which equals 5.33 cm from the bottom, or 10.67 cm from the top. The aperture top at 10 cm is 0.67 cm above the convention. This is a small deviation and acceptable if the aperture remains below the sockets.
Why: The lower third is calculated from total height. 16 divided by 3 equals 5.33 from the bottom. Subtracting from 16 gives 10.67 from the top. The difference is 0.67 cm.
Check: Measure the aperture top from the top edge and compare to 10.67 cm. Also check that the aperture top is below the socket bottoms.
Exercise 3
A skull drawing has cranial width 9 cm and jaw width 10 cm. The teeth line is marked at 2 cm above the jaw bottom, and the aperture bottom is at 5 cm above the jaw bottom. According to the convention, the teeth line should be halfway between the aperture bottom and the jaw bottom. Calculate the correct teeth line height and state the fix.
Show answer and check
Halfway between 0 cm (jaw bottom) and 5 cm (aperture bottom) is 2.5 cm. The drawn teeth line at 2 cm is 0.5 cm too low. Move the teeth line up to 2.5 cm. Also reduce jaw width to less than 9 cm, for example 8 cm.
Why: The teeth line convention is the midpoint of the aperture bottom and jaw bottom. 5 divided by 2 equals 2.5. The jaw width error is separate: jaw must be narrower than cranial width.
Check: Measure from jaw bottom to teeth line and from teeth line to aperture bottom; these should be equal. Measure jaw width and compare to cranial width.
Exercise 4
A skull drawing has total height 14 cm. The halfway mark is at 7 cm. The eye socket centers are 3 cm from the midline on the left and 3 cm on the right. The nasal aperture is centered. The jaw width is 6 cm and cranial width is 8 cm. Run all three arithmetic checks and state whether the drawing passes.
Show answer and check
Check 1: 14 divided by 2 equals 7, so the halfway mark passes. Check 2: socket centers are both 3 cm from the midline, so symmetry passes. Check 3: jaw width 6 cm is less than cranial width 8 cm, so the jaw check passes. The drawing passes all three checks.
Why: Each check uses simple arithmetic: halving total height, comparing left and right socket distances, and comparing jaw to cranial width. All values satisfy the stated conditions.
Check: Re-measure each value with a ruler and confirm the arithmetic. If any measurement differs, adjust the landmark and repeat the check.
Common mistakes
- Placing eye sockets too high, near the top quarter line. Move socket centers down to the middle band; re-measure from the halfway mark.
- Making the jaw wider than the cranium. Measure cranial width at its widest point and reduce jaw width to stay narrower.
- Ignoring the midline when placing the nasal aperture. Measure equal distances from the midline to each side of the aperture before drawing.
- Drawing teeth as a single block without a teeth line. Mark the teeth line first, then add individual tooth rectangles centered on the midline.
Self-check rubric
- Midline is vertical and landmarks are marked lightly.
- Total height is measured and the halfway mark is correct.
- Eye socket centers are equidistant from the midline within a small margin.
- Nasal aperture is centered and sits below the sockets.
- Jaw width is narrower than cranial width.
- Teeth line is marked before individual teeth are drawn.
- Arithmetic checks are shown or described.
- Valid alternative proportions are accepted if the checks pass and the reasoning is stated.
Questions and answers
Do these ratios apply to every skull?
No. They are starting conventions. Real skulls vary with age, ancestry, and individual differences. Use the ratios as a framework, then adjust by observation.
What does x-height mean here?
In this guide, x-height is a chosen example convention meaning the vertical distance from the skull's baseline (jaw bottom) to the horizontal midline reference mark at half the total skull height. It is not a universal standard, and letter styles vary. Use it only as a consistent measurement reference for your own drawing.
Can I use a ruler for every line?
Use a ruler for landmark marks and checks. Freehand curves are fine for sockets and jaw once the landmarks are set.
How do I know my drawing is proportionally correct?
Run the arithmetic checks in the final section. If the halfway mark, socket symmetry, and jaw width checks pass, your proportions are consistent with the method.