Free original lessons
Realistic Skull Drawing: Sutures, Jaw Depth, and Shading
Learn to draw a realistic skull with accurate suture lines, jaw depth, and cranial shading using a defined convention and checkable steps.
Free lesson
Four exercises
Worked answers
Object Drawing Lessons
This lesson teaches a repeatable method for drawing a realistic skull in three-quarter view, focusing on suture detail and jaw depth. You will use a simple measurement convention: x-height is the distance from the baseline to the midline of a letter, and all proportions are checked against that unit. Letter styles vary, so treat the convention as a guide, not a rigid rule. The goal is a believable skull with clear sutures, a deep jaw, and shading that follows cranial curvature. All resources described are planned and free; none are built yet. Work on paper with a pencil, eraser, and a ruler. Measure your own equipment if you use a printer, and label any numerical values you choose as hypothetical examples.
Practice materials: Printable downloads are not available for this lesson yet. Use the instructions and four exercises below.
Reference illustration
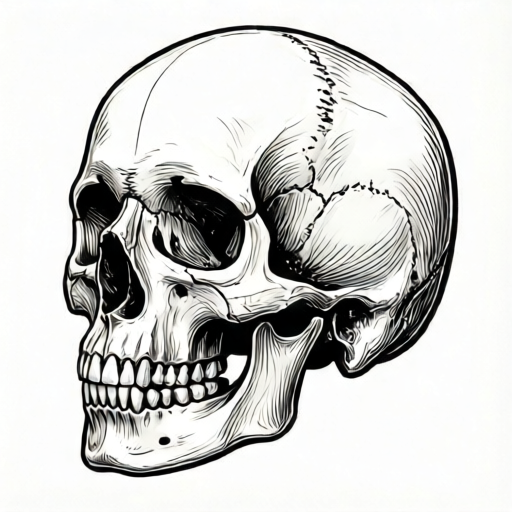
Use the stated measurements and conventions for each exercise.
Setting Up Proportions and the Three-Quarter View
Begin by drawing a light vertical axis and a horizontal midline. Choose a hypothetical x-height of 10 mm for your letter midline; this is an example, not a standard. Mark the cranial width as about 1.4 x-heights and the jaw depth as about 1.2 x-heights below the midline. These ratios are checkable and consistent in millimeters.
For a three-quarter angle, shift the far eye socket inward by about 0.3 x-heights and make it narrower. The near socket stays wider. Keep the nasal cavity centered between the sockets but offset slightly toward the near side.
- Draw a vertical axis and a horizontal midline; label the midline at 10 mm as a hypothetical x-height.
- Mark cranial width at 14 mm total (1.4 x-heights) and jaw depth at 12 mm below the midline.
- Place the near eye socket at 4 mm wide and the far socket at 3 mm wide, shifted inward by 3 mm.
- Center the nasal cavity between the sockets, offset 1 mm toward the near side.
Drawing Suture Lines with a Defined Convention
Sutures are thin, wavy lines where skull plates meet. Use a convention: draw each suture as a series of small arcs no longer than 2 mm, alternating direction. This keeps the line organic and checkable. The coronal suture runs across the top from the near temple toward the far temple; the sagittal suture runs back from the top center; the lambdoid suture curves down the back.
Do not make sutures perfectly straight or evenly spaced. Vary arc length between 1 and 2 mm. Check that each suture stays within the cranial outline and does not cross the eye sockets.
- Draw the coronal suture as 6 to 8 alternating arcs across the upper cranium.
- Add the sagittal suture from the top center backward with 4 to 5 arcs.
- Curve the lambdoid suture down the back with 5 arcs, keeping each under 2 mm.
- Erase any suture that crosses an eye socket or the nasal cavity.
Jaw Depth and Shading for Cranial Curvature
Jaw depth is the vertical distance from the midline to the bottom of the jaw. Using the 12 mm example, draw the jaw outline as a rounded trapezoid. The near side of the jaw is deeper and wider than the far side in three-quarter view. Shade the cranium with curved strokes that follow the skull's roundness: darker near the temples and under the jaw, lighter on the forehead.
Use a shading guide: divide the cranium into three bands. The top band is light, the middle band is medium, and the lower band near the temples is dark. Check that shading strokes curve with the form, not straight across.
- Draw the jaw outline 12 mm below the midline, wider on the near side.
- Mark three shading bands on the cranium: light top, medium middle, dark lower temples.
- Apply curved pencil strokes following the band direction.
- Darken under the jaw and inside the eye sockets to suggest depth.
Worked example
Draw a three-quarter skull with a 10 mm x-height, 14 mm cranial width, 12 mm jaw depth, and three sutures using 1 to 2 mm arcs. Describe the check.
Worked answer
Draw the axis and midline at 10 mm. Mark cranial width 14 mm and jaw depth 12 mm. Place near socket 4 mm wide and far socket 3 mm wide shifted 3 mm inward. Add coronal suture with 7 arcs, sagittal with 5 arcs, and lambdoid with 5 arcs, each 1 to 2 mm. Shade three bands. Check: total width 14 mm, jaw depth 12 mm, all arcs under 2 mm, no suture crosses a socket.
Four practice exercises
Exercise 1
Using a 10 mm x-height, draw a skull outline with cranial width 14 mm and jaw depth 12 mm. Add one coronal suture of 6 arcs, each 1.5 mm.
Show answer and check
Outline width 14 mm, jaw 12 mm below midline, coronal suture with 6 arcs at 1.5 mm each.
Why: The ratios 1.4 and 1.2 x-heights give checkable millimeter values; 6 arcs at 1.5 mm total 9 mm across the cranium.
Check: Measure width and jaw depth with a ruler; count 6 arcs and confirm each is 1.5 mm.
Exercise 2
Draw a three-quarter skull with near socket 4 mm wide and far socket 3 mm wide shifted 3 mm inward. Add a sagittal suture with 5 arcs of 2 mm.
Show answer and check
Near socket 4 mm, far socket 3 mm shifted 3 mm inward, sagittal suture 5 arcs at 2 mm.
Why: The inward shift creates depth; 5 arcs at 2 mm total 10 mm along the top center.
Check: Measure socket widths and shift; count 5 arcs and confirm each is 2 mm.
Exercise 3
Shade a skull cranium in three bands: light top, medium middle, dark lower temples. Use curved strokes and darken under the jaw by 2 mm.
Show answer and check
Three curved shading bands with a 2 mm dark under-jaw area.
Why: Curved strokes follow cranial roundness; the 2 mm under-jaw darkening suggests depth.
Check: Check that strokes curve with the bands and measure the under-jaw dark area at 2 mm.
Exercise 4
Draw a lambdoid suture with 5 arcs, each between 1 and 2 mm, curving down the back. Confirm no arc crosses an eye socket.
Show answer and check
Lambdoid suture with 5 arcs of 1 to 2 mm, clear of eye sockets.
Why: Varying arc length keeps the suture organic; staying clear of sockets preserves anatomy.
Check: Measure each arc between 1 and 2 mm and trace the suture to confirm it does not enter a socket.
Common mistakes
- Making suture lines perfectly straight and evenly spaced. Use alternating arcs of 1 to 2 mm and vary spacing; check each arc length with a ruler.
- Drawing the jaw too shallow or symmetrical in three-quarter view. Measure jaw depth at 12 mm below the midline and widen the near side by 2 mm.
- Shading with straight strokes across the cranium. Curve strokes to follow the three shading bands and the skull's roundness.
- Placing the far eye socket too wide. Shift the far socket inward by 3 mm and reduce its width to 3 mm.
Self-check rubric
- Cranial width measures about 1.4 x-heights and jaw depth about 1.2 x-heights below the midline.
- Three-quarter view shows a narrower far eye socket shifted inward by about 0.3 x-heights.
- Sutures use alternating arcs of 1 to 2 mm and stay within the cranium.
- Shading follows three curved bands and darkens temples and under-jaw areas.
- Valid alternatives are accepted if measurements and suture convention remain consistent.
Questions and answers
Do I need a printer to use the planned skull plate?
No. The plate is planned as a free printable, but you can draw the labeled outline yourself using the measurements in this lesson.
Is the 10 mm x-height a standard?
No. It is a hypothetical example. Measure your own paper and equipment, and label any chosen values as examples.
Can I use different letter styles for the convention?
Yes. X-height is baseline to midline, and letter styles vary. Keep the convention consistent within your drawing.
How do I check suture detail without an image?
Count arcs and measure each at 1 to 2 mm. Ensure sutures stay inside the cranium and do not cross sockets.