Free original lessons
Animal Skeleton Contour Drawing: Bone Outlines and Joint Connections
Learn to draw an animal skeleton in clean contour lines, focusing on bone outlines and joint connections without shading or muscle detail.
Free lesson
Four exercises
Worked answers
Object Drawing Lessons
Contour drawing captures the outline and edges of a subject. When the subject is an animal skeleton, the goal is to show each bone's shape and how bones meet at joints using continuous, unshaded lines. This lesson uses a single bone length as the measuring unit and treats joint gaps as hypothetical examples you can adjust to your own reference. You will practice seeing bone edges, connecting joints, and checking proportions with simple arithmetic. All resources described are planned and free; none are currently built.
Practice materials: Printable downloads are not available for this lesson yet. Use the instructions and four exercises below.
Reference illustration
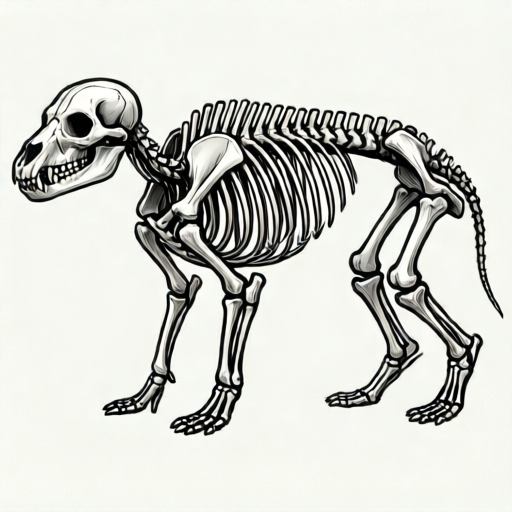
Use the stated measurements and conventions for each exercise.
Seeing Bone Edges as Contour Lines
A contour line follows the visible edge of a form. For a skeleton, that means tracing the outer boundary of each bone and the gaps where bones meet. Avoid shading or muscle shapes. Work slowly and keep the line continuous where possible.
Use a light pencil or fine pen. Start with the largest bones: skull, spine, ribcage, and limb bones. Compare lengths using a simple unit, such as the skull length. For example, if the skull is 3 units long, a femur might be about 4 units in the reference. These numbers are hypothetical examples; measure your own reference.
- Place the reference skeleton in front of you and identify the five largest bone groups.
- Choose a unit (for example, skull length) and note approximate lengths of two limb bones.
- Draw the skull outline first, keeping the line unbroken around the cranium.
- Add the spine as a series of short curves, marking each vertebra edge.
- Draw the ribcage by following the outer curve of the ribs, leaving gaps at the spine.
- Add limb bones, connecting each bone end to the joint space with a small gap.
Joint Connections and Continuous Contour
Joints are where two bone ends meet. In contour drawing, show the joint by drawing the end of one bone, a small gap, and the end of the next bone. Do not fill the gap. This gap represents cartilage and space, and it keeps the contour readable.
For a continuous-contour practice frame, draw the entire skeleton without lifting the pen, accepting that some lines will overlap. Then make a second pass on a blank frame without looking at the paper. This trains your hand to follow remembered edges.
- Mark each joint with two short parallel lines to show the bone ends.
- Keep a consistent gap size at every joint; measure it if needed.
- Draw the spine-to-rib connections as small loops, not solid joins.
- Check that each limb bone connects to the next with a visible gap.
- On the second pass, draw from memory and compare joint gaps afterward.
Checking Proportions with Simple Arithmetic
Use a single unit to compare bone lengths. If the skull is 3 units and the femur is 4 units, the femur is 4/3 of the skull length. Check that your drawing keeps this ratio. Measure with a ruler or mark units on scrap paper.
For joint spacing, choose a hypothetical gap of 1 millimeter at the drawing scale. Draw a test gap on scrap paper to confirm you can reproduce it consistently, then use that same gap at every joint.
- Measure the skull length in your drawing and call it 1 unit.
- Measure the femur and divide by the skull length to get a ratio.
- Compare your ratio to the reference ratio; adjust if the difference is more than 0.2 units.
- Measure three joint gaps and confirm they are equal within 0.5 millimeters.
- Record the ratios and gaps on the checklist.
Using the Planned Printable Resources
The planned printable includes a labeled animal skeleton reference, a continuous-contour practice frame, a joint-connection checklist, and a blank frame for a second contour pass without looking at the paper. These are proposed resources, not yet built.
The checklist asks you to confirm that each major joint has a visible gap, that no shading is used, and that bone outlines are continuous where possible. The blank frame supports the memory pass.
- Review the labeled reference and note bone names and joint locations.
- Use the practice frame for the first continuous contour.
- Complete the joint-connection checklist after the first pass.
- Use the blank frame for the second pass without looking at the paper.
- Compare both passes and note one improvement for a third attempt.
Worked example
A reference shows a skull 3 units long and a femur 4 units long. Draw a contour skeleton with a joint gap of 1 millimeter at the drawing scale. After drawing, measure your femur and skull. If your femur is 5 units and skull is 3 units, what is the ratio and how does it compare to the reference?
Worked answer
Reference ratio: 4/3 = 1.33. Your ratio: 5/3 = 1.67. Difference: 0.34 units, which is more than 0.2, so adjust the femur shorter by about 1 unit to reach 4 units. Check that three joint gaps measure 1 millimeter each within 0.5 millimeters.
Four practice exercises
Exercise 1
Draw a contour skull and spine from a reference where the skull is 2 units and the spine is 6 units. Use a joint gap of 1 millimeter. After drawing, measure your spine and skull. If your spine is 7 units, what is the ratio and what adjustment is needed?
Show answer and check
Reference ratio: 6/2 = 3. Your ratio: 7/2 = 3.5. Difference: 0.5 units, more than 0.2, so shorten the spine by about 1 unit to reach 6 units.
Why: Divide spine length by skull length to compare. A difference over 0.2 units signals adjustment.
Check: Measure skull and spine with a ruler, compute both ratios, and confirm three joint gaps are 1 millimeter within 0.5 millimeters.
Exercise 2
Draw a ribcage with five rib pairs. Each rib connects to the spine with a small loop and a 1 millimeter gap. After drawing, count the loops and measure two gaps. What should you check?
Show answer and check
Count five loops at the spine and confirm two gaps measure 1 millimeter within 0.5 millimeters. If a loop is missing, add it; if a gap is too large, redraw that joint.
Why: The loop represents the rib-to-spine connection, and the gap keeps the joint visible.
Check: Count loops and measure gaps with a ruler; compare to the planned checklist.
Exercise 3
Draw a limb with a femur 4 units and a tibia 3 units, using a 1 millimeter joint gap at the knee. After drawing, measure your femur and tibia. If your tibia is 4 units, what is the ratio and what adjustment is needed?
Show answer and check
Reference ratio: 3/4 = 0.75. Your ratio: 4/4 = 1.0. Difference: 0.25 units, more than 0.2, so shorten the tibia by about 1 unit to reach 3 units.
Why: Compare tibia to femur by division. Adjust when the difference exceeds 0.2 units.
Check: Measure both bones, compute ratios, and confirm the knee gap is 1 millimeter within 0.5 millimeters.
Exercise 4
Make a second contour pass without looking at the paper for a skeleton with a skull 3 units and a femur 4 units. Afterward, compare joint gaps at the shoulder and hip. If one gap is 2 millimeters and the other is 1 millimeter, what is the difference and what should you do?
Show answer and check
Difference: 1 millimeter. Redraw the larger gap to match 1 millimeter within 0.5 millimeters, then compare bone ratios to the reference.
Why: Consistent joint gaps make the contour readable. A 1 millimeter difference exceeds the 0.5 millimeter tolerance.
Check: Measure both gaps with a ruler and confirm they are equal within 0.5 millimeters; check femur-to-skull ratio is 4/3 within 0.2 units.
Common mistakes
- Shading the bones to show depth. Remove all shading. Use only contour lines and joint gaps to show form.
- Drawing solid joints with no gap. Leave a small, consistent gap between bone ends at every joint.
- Lifting the pen constantly during the continuous-contour pass. Accept overlapping lines and keep the pen moving; the goal is seeing, not perfection.
- Ignoring proportion ratios. Measure one bone as a unit and compare others by simple division.
Self-check rubric
- Bone outlines are drawn with contour lines and no shading.
- Each major joint shows a visible gap between bone ends.
- At least three joint gaps are equal within 0.5 millimeters.
- Bone length ratios are within 0.2 units of the reference.
- The continuous-contour pass keeps the pen moving with acceptable overlaps.
- The second pass without looking shows recognizable bone groups and joint gaps.
- Valid alternatives in line weight and joint-gap size are accepted as long as gaps remain consistent and no shading is used.
Questions and answers
Can I use a pen instead of a pencil?
Yes. A fine pen works well for contour lines. Choose a tip that can make your chosen joint gap; measure the actual tip.
How do I show a joint without shading?
Draw the end of one bone, a small gap, and the end of the next bone. The gap itself shows the joint.
What if my second pass looks different?
That is expected. Compare joint gaps and bone ratios, then note one change for the next attempt.
Are the printable resources available now?
No. They are planned and free, but not yet built. The lesson text describes their intended content.