Free original lessons
Draw an Arm Skeleton Bone by Bone: A Guided Construction Lesson
Learn to draw the humerus, radius, ulna, and hand bones in proportion using a clear bone-by-bone method, with checks, practice tasks, and a marking rubric.
Free lesson
Four exercises
Worked answers
Object Drawing Lessons
Drawing an arm skeleton is easier when you build it bone by bone instead of copying a finished outline. This lesson treats the arm as four connected units: the humerus in the upper arm, the radius and ulna in the forearm, and the hand bones grouped as carpals, metacarpals, and phalanges. You will use a simple convention: every bone is drawn as a long shape with two ends, and every joint is marked with a small gap so bones do not merge. Proportions are checked with a ruler or by counting grid squares, not by eye alone. The method works for any arm position because you first place the joint centres, then wrap each bone around them. All measurements below are hypothetical examples chosen for practice; measure your own paper and tools if you need exact values.
Practice materials: Printable downloads are not available for this lesson yet. Use the instructions and four exercises below.
Reference illustration
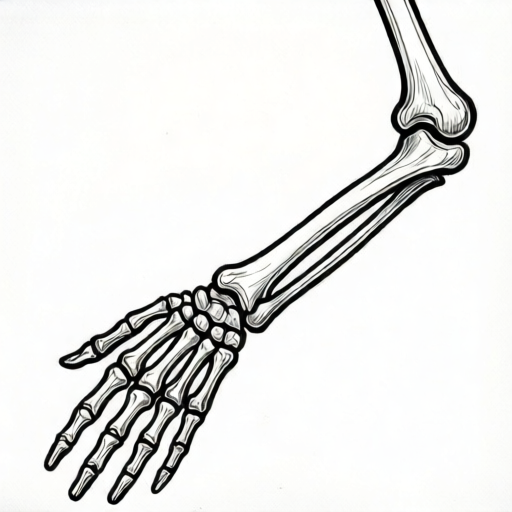
Use the stated measurements and conventions for each exercise.
Set the joint centres before any bone outline
Start with five points: shoulder, elbow, wrist, and two knuckle landmarks for the thumb side and little-finger side of the hand. These points control the whole drawing. If the elbow sits halfway between shoulder and wrist, the forearm and upper arm read as balanced. Mark each point lightly and label it in pencil so you can erase later.
Use a consistent unit. For example, if the shoulder-to-elbow distance is 6 grid squares, make the elbow-to-wrist distance about 5 squares. These are hypothetical practice values, not anatomy standards. The important check is that your own two distances stay in the same ratio when you redraw the arm at a different size.
- Mark the shoulder point and the elbow point.
- Mark the wrist point so the elbow-to-wrist line continues the upper-arm direction with a slight bend.
- Add two hand landmarks: one for the thumb-side knuckle line and one for the little-finger side.
- Check that all five points fit inside your page with room for the hand bones.
Build the humerus as one long bone with two clear ends
The humerus is the single upper-arm bone. Draw it as a long shaft that narrows slightly in the middle and widens at the shoulder and elbow ends. Keep the shaft centred on the shoulder-to-elbow line. The shoulder end is rounder and broader; the elbow end is flatter and wider side to side.
Leave a small gap at each joint. A gap of about one pencil width is enough at this scale. The gap is a drawing convention that shows where one bone ends and the next begins; it is not a measurement of real joint space.
- Draw a light centre line from shoulder to elbow.
- Outline a narrow shaft around the centre line, leaving the ends wider.
- Shape the shoulder end as a rounded cap and the elbow end as a flattened block.
- Erase the centre line and confirm the joint gaps are visible.
Place the radius and ulna side by side in the forearm
The forearm has two bones. The ulna runs on the little-finger side and is slightly thicker at the elbow end. The radius runs on the thumb side and is slightly thicker at the wrist end. Draw both as long, slightly curved shafts between the elbow gap and the wrist gap.
Keep a clear space between the two bones along most of the forearm. Near the wrist, the radius end is broader; near the elbow, the ulna end is broader. This opposite widening is the main visual cue that helps viewers read the forearm correctly.
- Draw two parallel guide lines from the elbow gap to the wrist gap.
- Outline the ulna on the little-finger side with a wider elbow end.
- Outline the radius on the thumb side with a wider wrist end.
- Check that the two bones do not touch except near the joints, where a small gap still separates them.
Group the hand bones into three simple rows
The hand is drawn as three groups: a cluster of small wrist bones near the wrist gap, a row of five long palm bones, and the finger bones beyond the knuckle landmarks. Do not try to draw every small wrist bone separately at first; draw the cluster as a rounded block divided by two or three light lines.
For the palm bones, draw five short shafts fanning from the wrist cluster to the knuckle line. The thumb-side palm bone sits lower and angles outward. Beyond the knuckles, draw finger bones as two or three short segments per finger, with small gaps at each joint. The thumb has fewer segments and angles away from the other fingers.
- Draw a rounded wrist cluster between the wrist gap and the palm bones.
- Add five palm-bone shafts from the cluster to the knuckle landmarks.
- Draw finger segments beyond the knuckles, keeping joint gaps consistent.
- Check that the thumb group angles outward and that no finger bones overlap.
Worked example
A practice grid uses 1 square = 1 unit. The shoulder is at (2, 8), the elbow at (2, 2), and the wrist at (7, 2). Draw the arm skeleton bone by bone and state the upper-arm and forearm lengths in units.
Worked answer
Upper arm length = 8 - 2 = 6 units. Forearm length = 7 - 2 = 5 units. Draw the humerus from (2,8) to (2,2) with a gap at the elbow, then draw the ulna and radius from the elbow gap to the wrist gap at (7,2), with the ulna on the little-finger side and the radius on the thumb side. Add the wrist cluster, five palm bones, and finger segments beyond the knuckle line. The ratio of upper arm to forearm is 6:5.
Four practice exercises
Exercise 1
On a grid where 1 square = 1 unit, the shoulder is at (1, 9), the elbow at (1, 3), and the wrist at (6, 3). State the upper-arm and forearm lengths and the ratio.
Show answer and check
Upper arm = 6 units; forearm = 5 units; ratio 6:5.
Why: Subtract the y-coordinates for the upper arm: 9 - 3 = 6. Subtract the x-coordinates for the forearm: 6 - 1 = 5. The ratio is 6 to 5.
Check: Re-measure both distances with the same grid unit and confirm the ratio matches 6:5.
Exercise 2
A draft has an upper arm of 8 units and a forearm of 4 units. The learner wants the forearm to follow the lesson's 6:5 practice ratio. What forearm length should they use, and by how much must they change the draft?
Show answer and check
Forearm should be about 6.7 units, so lengthen it by about 2.7 units.
Why: Set up 8 / forearm = 6 / 5. Cross-multiply: 6 x forearm = 40, so forearm = 40 / 6, which is about 6.7. The change is 6.7 - 4 = 2.7 units.
Check: Divide the new upper arm by the new forearm: 8 / 6.7 is about 1.2, matching 6 / 5 = 1.2.
Exercise 3
Describe where to place the ulna and radius in a forearm drawn from an elbow gap to a wrist gap, and state one visible difference between their ends.
Show answer and check
Place the ulna on the little-finger side and the radius on the thumb side. The ulna is wider at the elbow end; the radius is wider at the wrist end.
Why: The two forearm bones run side by side between the elbow and wrist gaps. Their opposite widening is the main cue that distinguishes them in a drawing.
Check: Confirm the two bones are separate along the forearm and that each has its wider end at the correct joint.
Exercise 4
A hand drawing shows a wrist cluster, five palm bones, and finger segments, but the thumb group points in the same direction as the other fingers. State the correction and one check.
Show answer and check
Angle the thumb group outward from the other fingers and keep a joint gap at its base. Check that the thumb-side palm bone sits lower and angles away from the little-finger side.
Why: The thumb is drawn as a separate group with fewer segments and an outward angle. If it parallels the other fingers, the hand reads as a block rather than a grouped structure.
Check: Trace from the wrist cluster to the thumb tip and confirm the path leaves the palm-bone row at a different angle from the other fingers.
Common mistakes
- Drawing the humerus as two bones or merging it with the forearm. Keep one long upper-arm bone and leave a visible gap at the elbow before starting the radius and ulna.
- Making the radius and ulna the same thickness at both ends. Widen the ulna at the elbow end and the radius at the wrist end so the pair reads as two different bones.
- Drawing the hand as a solid block with no joint gaps. Divide the hand into wrist cluster, palm bones, and finger segments, leaving a small gap at every joint.
- Changing the shoulder-to-elbow and elbow-to-wrist ratio between drafts. Measure both distances with the same unit and record the ratio before redrawing at a new size.
Self-check rubric
- All four bone groups are present: humerus, radius, ulna, and hand bones.
- Joint gaps separate every bone group and remain consistent in size.
- The humerus is drawn as one long bone with two distinct ends.
- The radius and ulna are drawn as two separate forearm bones with opposite widening.
- The hand is grouped into wrist cluster, palm bones, and finger segments.
- Proportions are checked with a stated unit or grid count and remain consistent.
- Valid alternative styles are accepted if the bone order, joint gaps, and proportion checks are clear.
Questions and answers
Do I need to draw every small wrist bone?
No. At this scale, a rounded wrist cluster with two or three dividing lines is enough. The lesson focuses on bone-by-bone construction, not clinical detail.
How large should the joint gaps be?
Use about one pencil width at a practice scale where the upper arm is 6 grid squares. This is a drawing convention, not a real joint measurement.
Can I draw the arm bent?
Yes. Place the joint centres first, then wrap each bone around its two endpoints. The same bone-by-bone order works for straight or bent arms.
What if my hand looks too small?
Check the wrist-to-knuckle distance against the elbow-to-wrist distance. If the hand is less than about half the forearm length in your draft, lengthen the palm-bone row slightly and redraw the finger segments.