Free original lessons
Draw a Realistic Skeleton: Bone Proportions and Joint Placement
Learn to construct a believable skeleton by measuring bone lengths, placing joints, and checking proportions with simple arithmetic and a defined drawing convention.
Free lesson
Four exercises
Worked answers
Object Drawing Lessons
A realistic skeleton drawing depends less on memorizing anatomy than on consistent proportion and joint logic. This lesson teaches a repeatable construction method: establish a vertical axis, mark joint stations at measured fractions of total height, build each bone as a tapered segment between joints, and verify lengths with simple ratios. You will use a defined convention for line weight and joint markers so that your work can be checked objectively. All measurements are hypothetical examples; measure your own paper and reference figure to set your own scale.
Practice materials: Printable downloads are not available for this lesson yet. Use the instructions and four exercises below.
Reference illustration
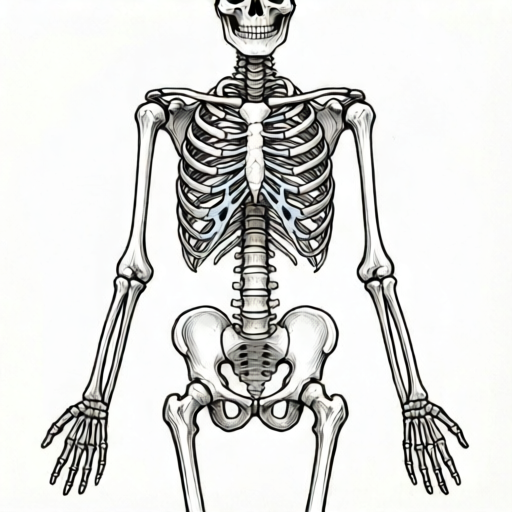
Use the stated measurements and conventions for each exercise.
Set a scale and a vertical axis
Begin by choosing a total figure height in convenient units, for example 180 mm on paper. This is a hypothetical value; use whatever fits your sheet. Draw a light vertical axis and mark the top of the skull and the ground line. Divide the axis into equal bands that you can measure with a ruler. A common construction uses eight head-lengths, but you may choose any consistent division as long as every later measurement refers back to it.
Define your drawing convention before you draw bones. Use a single thin line for the axis, a medium line for bone outlines, and a small circle for each joint center. Label joint centers with letters so you can check placement later. This convention is arbitrary but must be applied consistently; valid alternatives include using crosses instead of circles, provided every joint is marked the same way.
- Measure your paper height and choose a total figure height that fits with margins.
- Draw the vertical axis and mark top and ground line.
- Divide the axis into equal bands and number them lightly.
- Write your convention at the top of the sheet: line weights and joint marker shape.
Place joint stations by fraction of height
Joints are the anchors of the skeleton. Place them at fractions of total height so that the figure remains consistent even if you change scale. For a hypothetical 180 mm figure, the hip joint might sit at 0.50 of height (90 mm from ground), the knee at 0.28 (about 50 mm), and the ankle at 0.04 (about 7 mm). These numbers are examples, not standards. Measure your own reference or use a proportion you can defend, then keep it constant across the drawing.
Mark shoulder, elbow, and wrist on the upper body using the same fractional method. Record each joint's height and horizontal offset from the axis. Horizontal offsets matter: a joint placed too far from the axis will make the limb look disconnected. Use a ruler to check that paired joints on left and right are symmetric within a small tolerance you choose, for example 2 mm.
- Mark hip, knee, and ankle stations on the axis at your chosen fractions.
- Mark shoulder, elbow, and wrist stations with horizontal offsets.
- Measure each station from the ground line and write the value beside it.
- Check left-right symmetry and adjust before drawing bone outlines.
Build bones as tapered segments between joints
Each bone is a segment connecting two joint centers. Draw the segment first as a straight line, then add taper: long bones are wider near the joint and narrower at the shaft. Keep the taper subtle so the bone reads as a structural element rather than a shape. For the femur, the segment runs from hip to knee; for the tibia, knee to ankle. Check that the sum of segment lengths along a limb matches your planned total limb length.
Use simple arithmetic to verify proportions. If the femur is 40 mm and the tibia is 35 mm, the leg from hip to ankle is 75 mm before adding the foot. Compare this to your planned hip height minus ankle height. A mismatch larger than your chosen tolerance means a joint station or bone length needs adjustment. Do not invent printer tolerances; measure your actual ruler and paper.
- Draw a straight center line between each pair of joint centers.
- Add gentle taper to each bone outline.
- Measure each bone length and record it.
- Sum limb segments and compare with joint-station distances.
Check the whole figure and refine
Step back and compare the constructed skeleton to your reference proportions. Check three things: joint stations lie on the axis or at planned offsets, bone lengths sum to the planned limb lengths, and paired bones are symmetric within tolerance. If a check fails, adjust the joint station first, because moving a joint is easier than redrawing every bone. Then re-measure the affected segments.
Refine line weight last. Keep joint markers visible so the construction remains checkable. A valid alternative convention is to use dotted outlines for bones and solid circles for joints; the rubric accepts any consistent convention that makes joints identifiable and lengths measurable.
- Re-measure all joint stations from the ground line.
- Re-sum each limb and compare to planned lengths.
- Check symmetry of paired joints and bones.
- Adjust joints first, then bone outlines, then line weight.
Worked example
A learner plans a 180 mm figure with hip at 90 mm, knee at 50 mm, and ankle at 7 mm from the ground. They draw a femur of 42 mm and a tibia of 38 mm. Check whether the leg segments match the joint stations and state an adjustment.
Worked answer
Hip to knee is 90 minus 50 equals 40 mm. Knee to ankle is 50 minus 7 equals 43 mm. The drawn femur is 42 mm, which is 2 mm longer than the station distance; the drawn tibia is 38 mm, which is 5 mm shorter. Total drawn leg is 80 mm, while hip to ankle is 83 mm. Adjust the knee station or shorten the femur by 2 mm and lengthen the tibia by 5 mm, then re-measure.
Four practice exercises
Exercise 1
A figure is 160 mm tall. The hip is at 0.50 of height, the knee at 0.30, and the ankle at 0.05. Calculate each joint height from the ground in millimeters.
Show answer and check
Hip 80 mm, knee 48 mm, ankle 8 mm.
Why: Multiply total height by each fraction: 160 times 0.50 equals 80; 160 times 0.30 equals 48; 160 times 0.05 equals 8.
Check: Add the differences: hip minus knee is 32 mm; knee minus ankle is 40 mm; hip minus ankle is 72 mm. Confirm 32 plus 40 equals 72.
Exercise 2
A learner draws a femur of 45 mm and a tibia of 40 mm. The hip station is 95 mm from the ground and the ankle station is 10 mm. Does the drawn leg match the station distance? Show the arithmetic.
Show answer and check
Drawn leg is 85 mm; station distance is 85 mm; they match.
Why: Femur plus tibia equals 45 plus 40 equals 85 mm. Hip minus ankle equals 95 minus 10 equals 85 mm.
Check: Re-measure both bones with the same ruler and confirm the sum equals the hip-to-ankle distance within your chosen tolerance.
Exercise 3
On a 200 mm figure, the shoulder is at 0.80 of height and the elbow at 0.60. The wrist is 35 mm below the elbow. Calculate the wrist height from the ground.
Show answer and check
Wrist is 85 mm from the ground.
Why: Shoulder is 200 times 0.80 equals 160 mm. Elbow is 200 times 0.60 equals 120 mm. Wrist is 120 minus 35 equals 85 mm.
Check: Check that shoulder minus elbow is 40 mm and elbow minus wrist is 35 mm; both are positive and consistent with the stated offsets.
Exercise 4
A learner uses circles for joints on the left arm and crosses on the right arm. State whether this satisfies the convention and propose a fix.
Show answer and check
It does not satisfy the convention because joint markers differ. Use one marker shape for all joints, for example circles everywhere, and relabel both arms.
Why: The convention requires a single joint marker so that placement can be checked consistently across the figure.
Check: Inspect every joint marker on the sheet and confirm they are the same shape and size within your stated tolerance.
Common mistakes
- Placing joints by eye without recording measurements. Write each joint's height and offset beside its marker, then check with a ruler.
- Making bones uniform in width along their length. Add gentle taper so bones are wider near joints and narrower at the shaft.
- Ignoring the sum of limb segments. Add femur and tibia lengths and compare with the hip-to-ankle distance.
- Using different marker shapes for joints on the same sheet. Choose one joint marker convention and apply it to every joint.
Self-check rubric
- Vertical axis and ground line are present and measurable.
- Joint stations are marked with one consistent convention and labeled.
- Each joint station has a recorded height and horizontal offset.
- Bone segments connect joint centers and show gentle taper.
- Limb segment sums are compared with joint-station distances.
- Paired joints and bones are symmetric within a stated tolerance.
- Valid alternative conventions are accepted if applied consistently.
Questions and answers
Do I need exact anatomical bone lengths?
No. Use consistent proportions you can measure and defend. The lesson checks internal consistency, not clinical accuracy.
What if my ruler measures in different units?
Choose one unit and convert all measurements to it before drawing. Record the unit at the top of the sheet.
Can I use crosses instead of circles for joints?
Yes, provided every joint uses the same marker and the marker remains visible after refinement.
How do I know my proportions are realistic enough?
Compare your joint fractions and limb sums to a reference figure you trust, and keep deviations within a tolerance you set in advance.