Free original lessons
Cross-Contour Bird Drawing: Wrapping Lines Around Form
Learn to draw a bird using cross-contour lines that wrap around its body and wing, communicating volume through line spacing and direction.
Free lesson
Four exercises
Worked answers
Object Drawing Lessons
Cross-contour lines are surface lines that travel across a form, like stripes on a melon or seams on a baseball. Unlike outline contour, which traces edges, cross-contour lines describe how a surface curves through space. In this lesson you will draw a bird using wrapped lines on the body and wing, adjusting spacing to show volume. The convention for this study is simple: lines follow the visible surface, curve with the form, and never cross the outer silhouette unless they continue onto a visible adjacent surface. Line spacing is your main tool: closer lines suggest a surface turning away or compressing, wider lines suggest a flatter or more frontal area. You will work from a described bird form, not a photograph, so the exercise is self-contained. All measurements and numerical examples are hypothetical and should be checked against your actual paper and pencil.
Practice materials: Printable downloads are not available for this lesson yet. Use the instructions and four exercises below.
Reference illustration
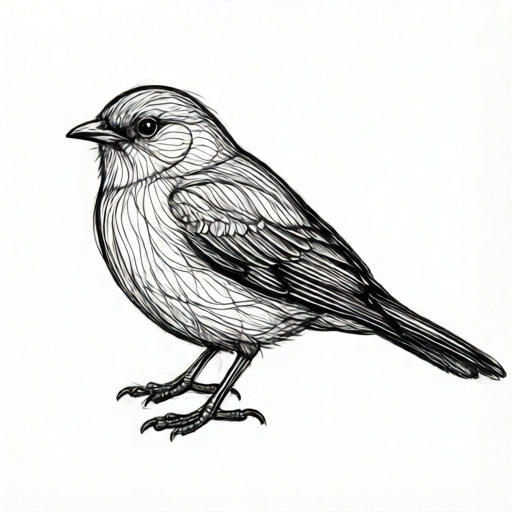
Use the stated measurements and conventions for each exercise.
Understanding Cross-Contour Lines
A contour line marks an edge. A cross-contour line marks a surface path. Imagine wrapping a string around an egg: the string curves with the shell and disappears around the back. On paper, you draw only the visible portion, but the curve implies the hidden continuation. For a bird, the body is roughly egg-shaped and the wing is a flattened teardrop. Cross-contour lines on the body run around the barrel of the chest and belly; on the wing they run across the flat surface from leading edge to trailing edge.
Line spacing communicates volume. Where the surface turns sharply away from you, place lines closer together. Where the surface faces you more directly, space lines farther apart. This is a convention, not a rule of perspective; it is a drawing language that viewers read as three-dimensional form. Keep your lines smooth and deliberate, and avoid shading or feather texture in this study.
- Draw a light outline of the bird: an egg-shaped body, a rounded head, a teardrop wing, and a simple tail.
- Mark three to five guide points along the body where wrapped lines will start and end on the visible silhouette.
- Draw the first body line as a smooth curve from one side of the silhouette to the other, imagining it wrapping around the back.
- Add two more body lines, varying spacing: closer near the chest turn, wider across the belly.
- Draw wing lines from the leading edge to the trailing edge, curving slightly to suggest the wing's camber.
- Check that no line crosses the silhouette without continuing onto an adjacent visible surface.
Planning Line Spacing for Volume
Before drawing final lines, plan spacing. On a hypothetical bird body 10 cm long and 6 cm wide, you might place body lines at 1 cm intervals near the chest and 2 cm intervals across the belly. These numbers are examples only; measure your own drawing and choose spacing that reads clearly. The goal is contrast: tight spacing where the form turns away, loose spacing where it faces you.
Wing lines should follow the wing's shape. A wing that curves downward will have lines that bow slightly. Keep line direction consistent across the wing so the surface reads as one continuous plane. If your wing has a folded edge, let lines stop at that edge rather than crossing it.
- Measure your drawn body length and width with a ruler; record the values.
- Choose two spacing values, one tight and one loose, and label them as hypothetical examples.
- Lightly mark where each body line will meet the silhouette.
- Draw body lines first, then wing lines, keeping the pencil pressure light until spacing is confirmed.
- Step back and check whether the spacing pattern suggests a rounded body and a flat wing.
Drawing the Body and Wing Lines
Start with the body. Place your pencil at one silhouette point and draw a smooth arc across the body to the opposite silhouette point. The arc should curve as if it is wrapping around a cylinder. Repeat with two or three more lines, changing spacing according to your plan. On the wing, draw lines from the leading edge to the trailing edge. These lines can be straighter than body lines because the wing is flatter, but a slight curve suggests camber.
Keep lines clean and avoid sketching over them repeatedly. If a line goes wrong, erase it fully before redrawing. The study is about clear wrapped lines, not about shading or texture. When finished, your drawing should show a bird whose body and wing read as three-dimensional surfaces.
- Draw the first body line from left silhouette to right silhouette, curving with the chest.
- Add a second body line closer to the first near the chest turn.
- Add a third body line with wider spacing across the belly.
- Draw three wing lines from leading edge to trailing edge, bowing slightly.
- Review line spacing and adjust any line that does not read as wrapping.
Checking and Refining Your Study
Use a simple check: trace each line with your finger and ask whether it could continue around the back of the form. If a line stops abruptly at the silhouette without implying continuation, redraw it. Check spacing: tight groups should correspond to surfaces turning away. Check consistency: body lines should curve similarly, and wing lines should share a direction.
Valid alternatives exist. You may draw more or fewer lines, use different spacing values, or place lines at different angles, as long as the wrapped-line convention is followed and spacing communicates volume. There is no single correct number of lines. The rubric rewards clear wrapping, purposeful spacing, and clean line quality.
- Trace each line and confirm it implies continuation around the form.
- Compare tight and loose spacing groups; adjust if the volume reading is unclear.
- Check that wing lines do not cross the folded edge.
- Erase any stray marks and confirm the drawing contains no feather texture or shading.
Worked example
A described bird has an egg-shaped body 8 cm long and 5 cm wide, with a teardrop wing 6 cm long. Plan and describe three body cross-contour lines and two wing lines, using hypothetical spacing values.
Worked answer
Body lines: place line one 1 cm from the chest end, line two 1.5 cm from line one, line three 2.5 cm from line two toward the tail. This gives tight spacing near the chest turn and wider spacing across the belly. Each line curves smoothly from left silhouette to right silhouette, bowing toward the tail. Wing lines: draw two lines from leading edge to trailing edge, spaced 2 cm apart, each bowing slightly downward to suggest camber. Stop both at the wing edges. Check: trace each line and confirm it implies wrapping; confirm tight spacing near chest and wider spacing on belly.
Four practice exercises
Exercise 1
A described bird body is 10 cm long and 6 cm wide. Plan four body cross-contour lines with hypothetical spacing of 1 cm, 1.5 cm, 2 cm, and 2.5 cm from chest to tail. Describe where each line starts and ends and how it curves.
Show answer and check
Line one starts at left silhouette 1 cm from chest, curves around the chest, ends at right silhouette. Line two starts 1.5 cm farther toward tail, curves slightly less, ends opposite. Line three starts 2 cm farther, curves across belly with wider bow. Line four starts 2.5 cm farther near tail, curves gently. All lines bow toward the tail and imply wrapping around the back.
Why: Spacing increases from chest to tail, suggesting the chest turns away more sharply than the belly. Curvature follows the egg shape.
Check: Measure spacing on your drawing with a ruler and confirm the four intervals match your plan; trace each line to confirm it implies continuation around the form.
Exercise 2
A described wing is a teardrop 7 cm long and 3 cm wide at its widest. Plan three cross-contour lines from leading edge to trailing edge with hypothetical spacing of 1.5 cm and 2 cm. Describe their curvature and where they stop.
Show answer and check
Line one starts at leading edge 1.5 cm from wing base, bows slightly downward, ends at trailing edge. Line two starts 1.5 cm farther along leading edge, bows similarly, ends at trailing edge. Line three starts 2 cm farther, bows gently, ends at trailing edge. All lines stop at the wing edges and do not cross the folded edge.
Why: Wing is flatter than body, so lines are straighter but slightly bowed to suggest camber. Spacing varies to show surface change.
Check: Confirm each line touches both edges without crossing them; check that spacing intervals match the plan and that curvature is consistent across lines.
Exercise 3
A described bird has a body 9 cm long and 5 cm wide. You draw three body lines with even 2 cm spacing. Explain why this may look flat and describe one adjustment using hypothetical values.
Show answer and check
Even spacing gives no cue about which surfaces turn away, so the body reads flat. Adjust by moving the chest line closer: use 1 cm spacing near chest, 2 cm across belly, and 2.5 cm near tail. This creates tight-to-loose contrast that suggests volume.
Why: Spacing contrast is the convention for volume; even spacing removes that cue.
Check: Compare the adjusted spacing pattern visually: tight near chest, wider on belly. Trace lines to confirm wrapping is still clear.
Exercise 4
A described bird body is 8 cm long. You plan lines at 1 cm, 2 cm, and 3 cm intervals from chest to tail. Check whether the total planned distance fits the body length and state a correction if needed.
Show answer and check
Total planned distance is 1 + 2 + 3 = 6 cm, which fits within 8 cm, leaving 2 cm at the tail end. No correction is needed for fit, but you could add a fourth line at 2 cm from the last line to use the remaining space. Confirm spacing still communicates volume.
Why: Simple arithmetic checks whether planned intervals exceed the drawn length. The remaining space can be used or left blank.
Check: Add the intervals and compare to measured body length; if the sum exceeds the length, reduce intervals proportionally and relabel them as hypothetical examples.
Common mistakes
- Drawing cross-contour lines as straight horizontal stripes across the body. Curve each line to follow the body's rounded surface, imagining it wrapping around a cylinder.
- Using even spacing everywhere, so the body looks flat. Vary spacing: tighter where the surface turns away, wider where it faces you.
- Letting wing lines cross the outer silhouette or folded edge. Stop lines at visible edges unless they continue onto an adjacent visible surface.
- Adding feather texture or shading instead of wrapped lines. Keep the study to clean cross-contour lines only; remove texture marks.
- Making all body lines parallel and identical in curvature. Adjust curvature slightly for chest, belly, and back so each line reads as a different surface path.
Self-check rubric
- Lines wrap around the body and wing rather than lying flat or straight.
- Line spacing varies purposefully to communicate volume.
- Lines stop at visible edges unless continuing onto an adjacent visible surface.
- Body lines curve consistently with the form; wing lines share a coherent direction.
- No feather texture, shading, or edge-only contour is used.
- Line quality is clean and deliberate, with stray marks erased.
- Valid alternatives in line count, spacing values, and angle are accepted if the wrapping convention is followed.
Questions and answers
What is the difference between contour and cross-contour?
Contour traces an edge or outline. Cross-contour travels across a surface, wrapping around the form to show volume.
How many lines should I draw?
There is no fixed number. Three to five body lines and three wing lines are a useful starting point, but valid alternatives exist as long as wrapping and spacing are clear.
Can I use a ruler for spacing?
Yes, for planning. Measure your actual drawing and label any chosen numerical values as hypothetical examples.
Why does line spacing matter?
Closer spacing suggests a surface turning away; wider spacing suggests a flatter or more frontal area. This convention communicates volume.
Should I draw feathers?
No. This study excludes feather texture rendering. Focus on wrapped surface lines only.