Free original lessons
Cross-Contour Still Life Drawing: Map Curved Surfaces with Wrapping Lines
Learn to draw a still life using cross-contour lines that wrap around vessels and objects, revealing form through surface mapping rather than shading.
Free lesson
Four exercises
Worked answers
Object Drawing Lessons
Cross-contour drawing describes three-dimensional form using lines that travel across a surface, as if a string were wrapped around the object. Unlike outline drawing, which traces edges, cross-contour lines reveal volume by following the curvature of the surface from one side to the other. In a still life, this means mapping the belly of a jug, the neck of a bottle, and the rounded shoulder of a bowl with lines that curve in response to the object's shape. This lesson focuses on that mapping skill alone; it excludes shaded rendering and composition planning. You will work from direct observation, using a simple convention: each cross-contour line is drawn as a continuous curve that crosses the object's visible surface, and lines are spaced to suggest even wrapping. Because letter styles and handwriting vary, the rubric rewards clear surface description and consistent spacing rather than a single correct line shape.
Practice materials: Printable downloads are not available for this lesson yet. Use the instructions and four exercises below.
Reference illustration
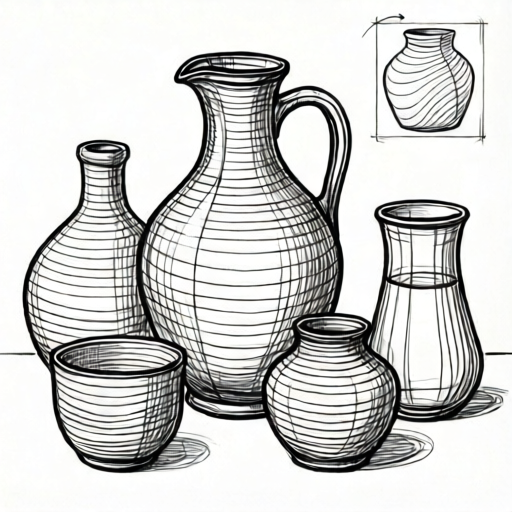
Use the stated measurements and conventions for each exercise.
Understanding cross-contour lines
A contour line defines an edge or boundary. A cross-contour line crosses the form, traveling over the surface rather than around the silhouette. Imagine pressing a length of string onto a jug: the string follows the curve of the belly, dips into a hollow, and rises over a ridge. Drawn as a line, that path becomes a cross-contour.
Cross-contour lines are not shading. They do not darken areas to suggest shadow. Instead, they communicate form through direction and spacing. Lines that curve gently suggest a broad, smooth surface; lines that bunch together suggest a tighter curve or a change in direction. The goal is to make the surface feel three-dimensional through line behavior alone.
- Place one object in front of you and identify its widest and narrowest visible parts.
- Draw a single line that crosses the object's surface from left to right, following the curve you see.
- Add a second line above or below the first, keeping the spacing roughly even where the surface is smooth.
- Adjust the curve of each line where the surface changes direction, such as at a shoulder or lip.
Mapping a jug and a rounded object
Begin with a jug because its form combines a narrow neck, a swelling belly, and a base. Draw the outer contour lightly first, then add cross-contour lines that wrap across the belly. On the front of the jug, these lines curve downward in the center and upward at the sides, following the bulge. Near the neck, the lines become tighter and more circular.
For a rounded object such as a bowl or an apple, cross-contour lines behave like latitude lines on a globe. Across the front surface, they curve in one direction; near the top, they flatten or reverse curvature. Keep your lines continuous and avoid stopping at the object's edge unless the surface genuinely ends there.
- Draw the jug's outer contour with a light line.
- Mark the widest point of the belly and the narrowest point of the neck.
- Draw three to five cross-contour lines across the belly, spacing them evenly.
- Draw two or three tighter lines around the neck, following its smaller curve.
- Repeat the process on a second object, comparing how its curves differ from the jug's.
Using spacing and direction to describe form
Spacing is your main tool for describing curvature. Where the surface turns away from you quickly, place cross-contour lines closer together. Where the surface is broad and gently curved, space them farther apart. This is a convention, not a rule: different artists use different spacing, and the rubric accepts any consistent choice that clearly describes the surface.
Direction matters too. A line that curves upward in the center suggests a surface bulging toward you; a line that curves downward suggests a hollow or a receding surface. Test your lines by asking whether a viewer could infer the object's three-dimensional shape from the lines alone, without shading.
- Choose one object and draw two versions of its cross-contour lines: one with even spacing and one with spacing that tightens at a curve.
- Compare which version better describes the surface.
- Keep the version that communicates form more clearly and note why.
Checking your cross-contour still life
A finished cross-contour still life should read as a group of three-dimensional objects described by wrapping lines. Check that each object has lines that cross its surface rather than only outlining it. Check that spacing changes where curvature changes. Check that lines remain continuous and that they respond to the object's actual shape rather than a generic curve.
Because handwriting and line style vary, there is no single correct appearance. A valid drawing may use loose, sketchy lines or precise, even lines, as long as the lines describe surface form consistently. Use the rubric to evaluate clarity, consistency, and observation rather than neatness alone.
- Trace each cross-contour line with your eye and confirm it follows a plausible surface path.
- Check that at least three lines cross each major object.
- Confirm that spacing tightens where the surface curves sharply.
- Ask whether the drawing would still communicate form if all outer contours were removed.
Worked example
A mug is placed with its handle to the right. Describe how to draw cross-contour lines across the mug's cylindrical body and handle.
Worked answer
Draw the mug's outer contour lightly. Across the cylindrical body, draw three to five lines that curve gently downward in the center and upward at the sides, spacing them evenly on the broad front and tightening near the left and right edges where the surface turns away. On the handle, draw two or three short lines that follow the handle's curve, crossing its thickness rather than outlining it. Check that the body lines describe a cylinder and the handle lines describe a curved loop.
Why: The mug's body is a cylinder, so cross-contour lines behave like latitude lines: they curve consistently and tighten at the turning edges. The handle is a curved form, so its lines follow the loop's direction. This mapping communicates form without shading.
Check: Confirm that body lines curve in the same direction, that spacing tightens at both side edges, and that handle lines cross the handle's surface rather than tracing its outline.
Four practice exercises
Exercise 1
A bottle has a narrow neck and a wide, rounded body. Describe where cross-contour lines should be spaced tightly and where they should be spaced widely.
Show answer and check
Lines should be spaced tightly around the narrow neck and widely across the broad, gently curved body.
Why: Tight spacing describes surfaces that curve sharply or turn away quickly, as at the neck. Wide spacing describes broad, gently curved surfaces, as across the body.
Check: Confirm that the neck has closer spacing than the body and that the body lines curve gently rather than sharply.
Exercise 2
A bowl is viewed from slightly above. Its front surface curves outward, and its rim is nearly circular. Describe the direction of cross-contour lines across the front and near the rim.
Show answer and check
Across the front, lines curve downward in the center and upward at the sides. Near the rim, lines become tighter and more circular, following the rim's curve.
Why: The front surface bulges toward the viewer, producing a downward center curve. The rim is a tighter, more circular form, so lines there follow a smaller radius.
Check: Check that front lines curve consistently and that rim lines are tighter and more circular than front lines.
Exercise 3
An apple sits beside a tall jar. The apple is round; the jar is cylindrical. Describe how the cross-contour lines on each object differ in curvature and spacing.
Show answer and check
The apple's lines curve more strongly and change direction near its top and bottom, with spacing tightening at the edges. The jar's lines curve gently and consistently, with even spacing across the front and tighter spacing at the sides.
Why: A round form produces lines that change curvature across its surface, while a cylinder produces consistent curvature. Spacing tightens where each surface turns away.
Check: Confirm that apple lines change curvature near top and bottom, jar lines remain consistent, and both tighten at turning edges.
Exercise 4
A rectangular box is placed at an angle. Describe how cross-contour lines cross its flat faces and what happens at its edges.
Show answer and check
On each flat face, lines are nearly straight and evenly spaced. At edges, lines change direction sharply, turning to follow the adjacent face.
Why: Flat surfaces produce straight or nearly straight cross-contour lines. Edges are boundaries where the surface direction changes, so lines turn there.
Check: Check that face lines are straight and evenly spaced and that lines turn sharply at edges rather than curving gradually.
Common mistakes
- Drawing only outlines and calling them cross-contours. Add lines that cross the interior of each object's visible surface, not just its edge.
- Using identical spacing on every part of an object. Tighten spacing where the surface curves sharply and widen it on broad, gentle areas.
- Making cross-contour lines perfectly straight across a curved object. Curve each line in response to the surface it crosses, checking against the object in front of you.
- Stopping lines at the object's edge when the surface continues. Continue the line across the visible surface until it reaches a genuine boundary or the object's far edge.
- Adding shading to compensate for unclear lines. Remove shading and improve the line spacing and direction instead; this task excludes shaded rendering.
Self-check rubric
- Each major object has at least three cross-contour lines crossing its visible surface.
- Line spacing changes in response to changes in surface curvature.
- Lines curve in directions consistent with the observed object's form.
- Lines remain continuous across surfaces and do not stop arbitrarily.
- No shading is used to compensate for unclear line description.
- Line style may vary, but the drawing consistently communicates three-dimensional form.
Questions and answers
How is cross-contour different from regular contour drawing?
Regular contour follows edges and boundaries. Cross-contour crosses the surface, describing curvature and volume through the path and spacing of lines.
Do I need to draw every line perfectly?
No. Line style varies, and the goal is clear surface description. Consistent spacing and responsive curvature matter more than perfect uniformity.
Can I use a ruler for cross-contour lines?
A ruler produces straight lines, which rarely describe curved surfaces well. Use freehand lines that respond to the object's form.
How many cross-contour lines should each object have?
There is no fixed number. Three to six lines per major object is a practical starting point, adjusted to the object's size and curvature.
What if my object is boxy rather than round?
Cross-contour lines still apply: they cross flat faces and turn sharply at edges. On flat faces, lines may be nearly straight; at edges, they change direction.