Free original lessons
Draw a Bug: Segmented Body and Leg Construction
Learn to draw an insect with a three-part body, six jointed legs, and clear segment labels using a simple construction method.
Free lesson
Four exercises
Worked answers
Object Drawing Lessons
Drawing a bug becomes manageable when you build it from clear parts instead of copying a finished outline. This lesson focuses on a beetle-style insect with three body segments and six legs. You will place the head, thorax, and abdomen along one axis, attach legs at the thorax, and add joints that read as bent limbs. The method uses simple shapes, consistent units, and a labeling step so you can check your own work. A convention is defined for segment boundaries and leg attachment points; valid stylistic alternatives are allowed as long as the construction logic stays visible. All measurements below are hypothetical examples chosen for practice, not equipment standards.
Practice materials: Printable downloads are not available for this lesson yet. Use the instructions and four exercises below.
Reference illustration
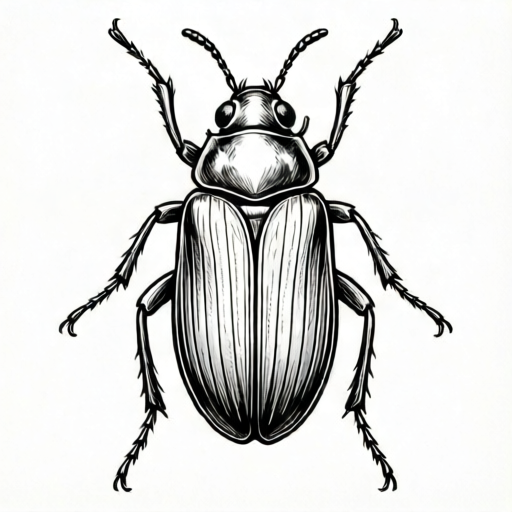
Use the stated measurements and conventions for each exercise.
Set the body axis and three segments
Start with a light horizontal line for the body axis. Mark three zones along it: head, thorax, and abdomen. In this convention, the head is the front zone, the thorax is the middle zone where legs attach, and the abdomen is the rear zone. Keep the zones adjacent with no gaps, because a segmented body reads as connected parts.
Use a simple unit system. For example, let one unit equal the width of your thumb. A hypothetical practice bug might use a head length of 1 unit, a thorax length of 2 units, and an abdomen length of 3 units. These numbers are examples only; choose values that fit your paper and write them down so your labels and checks stay consistent.
- Draw a faint horizontal axis about 12 units long.
- Mark the head zone from 0 to 1 unit, the thorax from 1 to 3 units, and the abdomen from 3 to 6 units.
- Draw a rounded outline around each zone, keeping the boundaries visible as thin lines.
- Label H, T, and A under the three zones before adding legs.
Attach six legs at the thorax
Insects have six legs, and in this construction all six attach to the thorax. Divide the thorax into three attachment positions: front, middle, and rear. Each position carries one leg on the left and one on the right, giving six legs total. This is a counting rule you can verify after drawing.
Each leg has two visible segments: an upper segment from the attachment point and a lower segment that bends downward. The bend is the joint. Keep the upper segments shorter than the lower segments in this convention, and angle the lower segments outward so the legs do not overlap the abdomen.
- Mark three attachment points along the thorax: front, middle, rear.
- From each point, draw a short upper segment outward and slightly down.
- At the end of each upper segment, draw a joint dot.
- From each joint dot, draw a longer lower segment angling down and outward.
- Count the legs: three positions times two sides equals six.
Add segment labels and check the construction
Labeling is part of the drawing, not an extra step. Write H, T, and A inside or beside the three body zones. Number the legs 1 through 6 at their attachment points. This makes the construction checkable by eye and by count.
Check three things: the body has exactly three adjacent zones, the legs number exactly six, and every leg attaches at the thorax rather than the head or abdomen. If a leg crosses the abdomen outline, shorten the upper segment or change its angle. These checks use simple counting and position, so no special tools are required.
- Write H, T, and A beside the three zones.
- Number the six leg attachment points 1 to 6.
- Verify that no leg starts on the head or abdomen.
- Verify that each leg has one visible joint dot.
- Erase construction lines only after the labels and counts are correct.
Worked example
A student draws a bug with a head of 1 unit, a thorax of 2 units, and an abdomen of 3 units. They place two legs on the head, two on the thorax, and two on the abdomen. Identify the error and state the corrected leg placement.
Worked answer
The error is leg placement: legs must attach only to the thorax. The corrected drawing keeps six legs but places all six on the thorax using three positions, front, middle, and rear, with one leg on each side of each position. The body zones remain head 1 unit, thorax 2 units, and abdomen 3 units.
Four practice exercises
Exercise 1
Draw a bug using hypothetical units: head 1, thorax 2, abdomen 3. Place six legs on the thorax at three positions. Label H, T, and A, and number the legs 1 to 6.
Show answer and check
A drawing with three adjacent zones of 1, 2, and 3 units, six legs attached only at the thorax, three attachment positions with two legs each, and labels H, T, A plus leg numbers 1 to 6.
Why: The unit values set the zone lengths, and the three thorax positions times two sides give six legs. Labels and numbers make the construction checkable.
Check: Count the zones (3), count the legs (6), confirm every leg starts on the thorax, and confirm six leg numbers are present.
Exercise 2
A drawing shows four legs on the thorax and two legs on the abdomen. State the minimum change needed to meet the six-leg thorax rule.
Show answer and check
Move the two abdomen legs to the thorax so all six legs attach there, keeping three positions with two legs each.
Why: The rule requires six legs and all attachments on the thorax. Moving the two misplaced legs satisfies both conditions without changing the total count.
Check: Count legs on the thorax after the change: should be six. Count legs elsewhere: should be zero.
Exercise 3
Using hypothetical units, a bug has head 2, thorax 3, abdomen 4. How many units long is the body axis from the front of the head to the rear of the abdomen?
Show answer and check
9 units.
Why: Add the three zone lengths: 2 plus 3 plus 4 equals 9. The zones are adjacent, so the total axis length is the sum.
Check: Re-add the three values and confirm the sum equals the marked axis length on the drawing.
Exercise 4
A student draws six legs but only four joint dots. Describe the correction and the check that confirms it.
Show answer and check
Add one joint dot to each of the two legs missing a dot so every leg has one joint dot. Then count joint dots: should be six.
Why: The convention requires one visible joint per leg. Six legs therefore need six joint dots. Adding the two missing dots makes the count match.
Check: Count legs (6), count joint dots (6), and confirm each leg has exactly one dot between its upper and lower segments.
Common mistakes
- Attaching legs to the abdomen or head. Move every leg attachment point onto the thorax zone and renumber the legs.
- Drawing more or fewer than six legs. Use three thorax positions with one leg on each side, then count to six before adding details.
- Making body zones overlap or leaving gaps between them. Keep the three zones adjacent along one axis and redraw the boundary lines as thin shared edges.
- Drawing legs with no visible joint. Add a joint dot between the upper and lower segment on every leg so the bend is clear.
Self-check rubric
- Three body zones are present and adjacent: head, thorax, abdomen.
- Exactly six legs are drawn.
- All six legs attach to the thorax.
- Each leg shows one visible joint dot between upper and lower segments.
- Segment labels H, T, and A are present and readable.
- Leg attachment points are numbered 1 through 6.
- Valid stylistic alternatives are accepted if the three-zone order, six-leg count, and thorax attachment remain clear.
Questions and answers
Do all bugs have exactly six legs?
Insects have six legs. This lesson uses an insect construction, so the leg count is six. Other small animals may have different counts, but they are outside this task.
Can I change the body proportions?
Yes. The unit values are hypothetical examples. Keep the three-zone order and the six-leg attachment rule, and write down any new values you choose.
Where should the joint dots go?
Place one joint dot between the upper and lower segment of each leg. The dot marks the bend and makes the leg construction easy to check.
How do I know my drawing is correct?
Count three body zones, six legs, and six joint dots. Confirm every leg starts on the thorax. These checks are simple and do not require measuring tools.