Free original lessons
Realistic Ant Drawing: Segmented Body and Leg Construction
Learn to draw a realistic ant with three body segments, six jointed legs, and antennae using measured shapes and a clear construction sequence.
Free lesson
Four exercises
Worked answers
Object Drawing Lessons
This lesson teaches a realistic ant drawing built from observable anatomy: a head, a thorax, and an abdomen, plus six legs with visible joint segments and two antennae. You will use simple shapes to establish proportion, then refine outlines and add exoskeleton texture. The method is checkable with a ruler and a pencil, and it allows valid stylistic variation in line weight and surface detail. All measurements below are hypothetical examples; measure your own paper and reference photo before drawing.
Practice materials: Printable downloads are not available for this lesson yet. Use the instructions and four exercises below.
Reference illustration
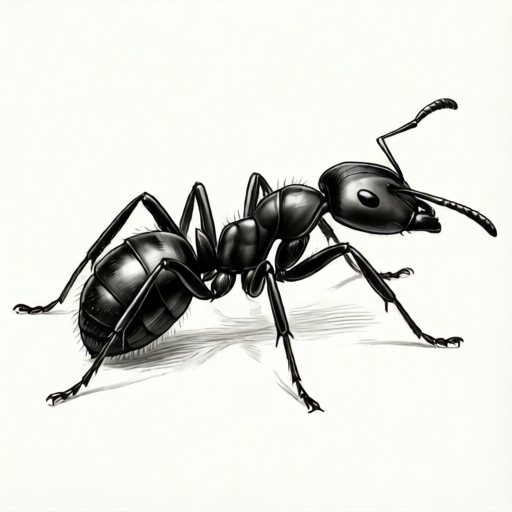
Use the stated measurements and conventions for each exercise.
Establish the three body segments
Begin by drawing a faint horizontal midline across your paper. Mark three ovals along it: a small head, a narrower thorax, and a larger abdomen. In a side view of a worker ant, the thorax is often the narrowest of the three, while the abdomen is the bulkiest. Keep the ovals light so they can be adjusted.
Use a simple proportion check: if the head length is one unit, the thorax is about one and a half units, and the abdomen about two and a half units. These are hypothetical example ratios, not a universal rule. Compare your own reference and adjust. The three segments should touch or nearly touch at narrow joints, not overlap heavily.
- Draw a faint midline and mark three evenly spaced centers for head, thorax, and abdomen.
- Draw a small oval for the head, a narrower oval for the thorax, and a larger oval for the abdomen.
- Check that the thorax is narrower than the abdomen and that the head is the smallest segment.
- Lightly connect the segments at narrow waist points, leaving gaps for joint detail.
Construct six jointed legs
Ant legs attach to the thorax and have several joint segments. For a realistic side view, draw three legs on the near side and three on the far side, offset slightly. Each leg can be built from a short coxa near the body, a longer femur, a knee joint, a tibia, and a small tarsus ending in a claw. Use straight or slightly curved line segments rather than one smooth curve.
A practical check is to count joints: each leg should show at least two visible bends. Keep the far-side legs shorter or partially hidden to suggest depth. Leg length varies by species and posture; measure your reference rather than copying a fixed number.
- Mark six attachment points along the lower edge of the thorax, three near and three far.
- For each leg, draw a short segment from the body, then a longer segment to a knee bend.
- Add a lower segment from the knee to a small foot, then a tiny claw line.
- Check that every leg has at least two bends and that far-side legs are slightly shorter or occluded.
Refine outline and exoskeleton texture
Once the construction lines are correct, darken the final outline. Vary line weight: heavier lines at the body outline and lighter lines at joints and antennae. Add two antennae from the head, each with a bend and a slight taper. Antennae are not legs; keep them thinner and attach them near the front of the head.
For exoskeleton texture, use short parallel hatch marks or small curved strokes along the abdomen and thorax. Avoid uniform shading; instead, suggest rounded surfaces with marks that follow the segment curves. A texture study can be a small box on the same page where you practice three stroke directions.
- Darken the final outline of head, thorax, abdomen, legs, and antennae.
- Add two antennae with one bend each and a tapered tip.
- Practice short hatch marks in a small texture box, then apply them lightly to the abdomen.
- Check that texture follows the curve of each segment and does not obscure the joint structure.
Worked example
A student draws a side-view ant with a head oval 2 cm long, a thorax oval 3 cm long, and an abdomen oval 5 cm long. They draw six legs but only four show two bends. What should they check and adjust?
Worked answer
The segment ratio is 2:3:5, which is a reasonable hypothetical proportion. The main issue is leg construction: two legs lack a second bend. The student should redraw those legs with a knee joint and a lower joint, and check that far-side legs are slightly shorter or partially hidden. No segment length change is required unless their reference shows a different ratio.
Four practice exercises
Exercise 1
Draw a side-view ant using three ovals with lengths 2 cm, 3 cm, and 5 cm for head, thorax, and abdomen. Add six legs, each with at least two bends, and two antennae. Label the three segments.
Show answer and check
A completed drawing should show a small head oval, a narrower thorax oval, and a larger abdomen oval in a row, with six jointed legs from the thorax and two thinner antennae from the head. Labels should correctly identify head, thorax, and abdomen.
Why: The 2:3:5 ratio gives a checkable proportion. Six legs and two antennae test the anatomical boundary. Labels confirm segment identification.
Check: Count the ovals (three), count legs (six), count antennae (two), and verify each leg has at least two bends. Check labels against the correct ovals.
Exercise 2
A partial ant outline shows a head and thorax but no abdomen and only three legs. Complete the drawing by adding an abdomen oval longer than the thorax and three more jointed legs. Describe where the new legs attach.
Show answer and check
The abdomen should be a larger oval attached behind the thorax. The three new legs should attach to the thorax alongside the existing three, with at least two bends each. The final drawing has six legs total.
Why: This exercise tests completion from partial information and reinforces that all legs attach to the thorax, not the abdomen.
Check: Verify the abdomen is longer than the thorax, count six total legs, and confirm all leg attachment points are on the thorax.
Exercise 3
In a small 4 cm by 4 cm texture box, practice three short stroke directions for an ant exoskeleton: horizontal hatch, curved hatch following an oval, and short cross-hatch. Then apply one direction lightly to an abdomen oval.
Show answer and check
The box should contain three distinct stroke patterns. The applied texture on the abdomen should follow the oval curve and remain light enough that the outline is still visible.
Why: Texture study builds control and shows that surface detail should follow form. The exercise allows valid alternatives in stroke direction and density.
Check: Check that three patterns are present, that the applied texture follows the oval, and that the abdomen outline remains readable.
Exercise 4
Draw an ant with the thorax wider than the abdomen, then correct it. Explain the correction using a simple measurement or comparison.
Show answer and check
The corrected drawing should show a thorax narrower than the abdomen. The explanation should state that the thorax was too wide and was narrowed, or the abdomen was widened, based on a ruler comparison or a paper strip check.
Why: This exercise targets a common proportion mistake and requires a checkable correction method rather than a vague redraw.
Check: Compare thorax and abdomen widths with a ruler or paper strip; the corrected drawing should show the thorax narrower. The written explanation should mention the comparison used.
Common mistakes
- Drawing only four or five legs because the far-side legs are forgotten. Count six attachment points on the thorax before drawing legs, and mark far-side legs with shorter lines.
- Making the thorax wider than the abdomen, which reads as a different insect. Compare segment widths with a ruler or a paper strip; the thorax should be narrower than the abdomen in a typical worker ant side view.
- Drawing legs as smooth curves with no visible joints. Build each leg from straight segments with at least two bends, then soften only slightly.
- Attaching antennae like extra legs or placing them on the thorax. Attach two thinner antennae to the front of the head, each with a bend and taper.
Self-check rubric
- Three body segments are clearly distinguishable: head, thorax, and abdomen.
- Thorax is narrower than the abdomen in the chosen view, unless the reference shows otherwise.
- Six legs are present and attach to the thorax.
- Each leg shows at least two visible bends or joint segments.
- Two antennae attach to the head and are thinner than the legs.
- Outline is clean enough to read the anatomy; texture supports rather than obscures structure.
- Valid alternatives in line weight, hatching, and slight posture are accepted if anatomy remains clear.
Questions and answers
Do I need a reference photo?
A reference helps with proportion and leg posture, but the construction method works from the described shapes alone. Measure your own reference if you use one.
How many leg segments should be visible?
Show at least two bends per leg: a knee joint and a lower joint near the foot. More detail is optional and depends on your reference.
Can I use a different line style?
Yes. The rubric allows valid alternatives in line weight, hatching direction, and slight posture changes as long as the three segments, six legs, and two antennae remain clear.
What does x-height mean here?
X-height is the distance from baseline to midline in lettering. It is not used for the ant drawing itself; it is only relevant if you label the plate with handwritten notes.