Free original lessons
Devil Wolf Drawing: Horns, Wings, and Snarl
Learn to draw a devil wolf with structured horn and wing guides, a snarling expression sequence, and clear proportion checks for fantasy art.
Free lesson
Four exercises
Worked answers
Object Drawing Lessons
This lesson teaches a repeatable method for drawing a devil wolf: a fantasy creature combining a wolf-like head, curved horns, bat-style wings, and a snarling mouth. You will use simple shape guides, a defined line convention, and checkable proportions rather than copying a single finished image. The approach separates construction into head, horns, wings, and expression so each part can be adjusted independently. All measurements are hypothetical examples; measure your own paper and tools. The convention for this lesson is that all construction lines are light and removable, while final contour lines are dark and continuous. X-height refers to the distance from baseline to midline in any lettering or label you add; letter styles vary, so use your own consistent handwriting. Work on plain paper with a pencil, eraser, and ruler. The goal is a clear, recognizable devil wolf that reads well at a glance, not realistic wolf anatomy.
Practice materials: Printable downloads are not available for this lesson yet. Use the instructions and four exercises below.
Reference illustration
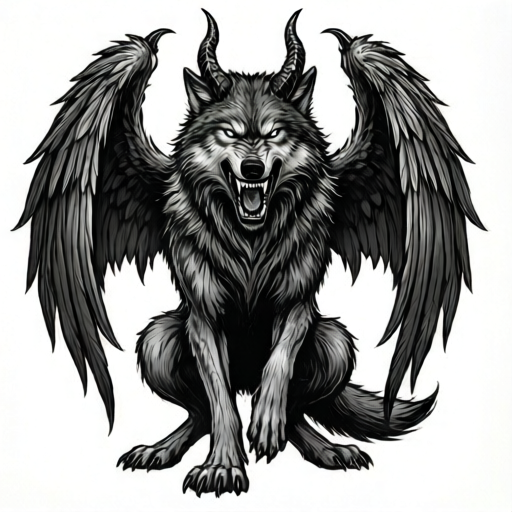
Use the stated measurements and conventions for each exercise.
Building the Head and Body Proportion
Start with a light circle for the cranium and a tapered wedge for the muzzle. Place the circle in the upper third of your page. The muzzle extends forward about one circle diameter. A vertical midline and a horizontal eye line divide the face. Keep these guides light so they can be erased later.
The body is a rounded rectangle below the head, roughly two head heights tall. Shoulders sit just outside the head width. This gives a sturdy fantasy silhouette without realistic anatomy. Check that the head is not wider than the shoulders; if it is, narrow the head circle slightly.
- Draw a light circle about 6 cm across as a hypothetical example; adjust to your paper.
- Add a tapered wedge for the muzzle, one circle diameter long.
- Mark a vertical midline and a horizontal eye line.
- Draw a rounded rectangle for the body, two head heights tall.
- Check shoulder width is slightly wider than the head circle.
Horns and Wings: Shape Guides
Horns grow from the top of the cranium, curving outward and back. Draw each horn as a tapered curve made of two arcs: an outer arc and an inner arc that meet at a point. Keep both horns similar in length; a difference of more than one centimeter is a visible imbalance. Wings attach at the shoulder area. Use a bat-style guide: a long leading edge, three finger struts, and scalloped trailing edges. The wing span can be about one and a half body widths on each side.
Draw wings behind the body so the body overlaps them. This layering makes the creature read clearly. Keep wing struts light until the final pass. If a wing looks too small, lengthen the leading edge rather than widening the struts.
- Draw two tapered horn arcs from the top of the cranium, curving outward and back.
- Check horn lengths are within about 1 cm of each other.
- Draw a long leading edge for each wing from the shoulder area.
- Add three finger struts per wing and scalloped trailing edges.
- Place wings behind the body outline so the body overlaps them.
Snarling Expression Sequence
A snarl reads through three cues: raised upper lip, exposed teeth, and narrowed eyes. Draw the eye line first, then place two almond shapes tilted inward. Add a small brow line above each eye angled toward the nose. For the mouth, draw a wide curved line that lifts at the corners. Add a second line above it for the raised lip. Teeth are simple triangles along the upper lip; keep them small and even.
Check that the mouth curve is wider than the muzzle base. If the teeth look too large, reduce them to half the lip height. The expression should be readable even if you cover the horns and wings.
- Draw two almond eyes tilted inward along the eye line.
- Add angled brow lines above each eye.
- Draw a wide mouth curve that lifts at the corners.
- Add a raised upper lip line above the mouth curve.
- Place small even triangles for teeth along the upper lip.
Final Pass and Line Convention
Erase construction lines gently, then draw final contours with a dark continuous line. Keep the horn tips sharp and the wing edges scalloped. Add a few fur tufts at the cheeks and shoulders using short curved strokes. Do not add realistic wolf anatomy such as detailed paw pads or accurate skeletal structure; this is a fantasy design.
Check the whole drawing at arm's length. The devil wolf should read as one creature with clear horns, wings, and snarl. If any part is unclear, adjust that part only rather than redrawing everything.
- Erase light construction lines.
- Draw final contours with a dark continuous line.
- Sharpen horn tips and scallop wing edges.
- Add short fur tufts at cheeks and shoulders.
- Check the drawing at arm's length for clear horns, wings, and snarl.
Worked example
Draw a devil wolf on a page where the head circle is 5 cm across. The muzzle is one circle diameter long. The body is two head heights tall. Horns curve outward and back, each about 4 cm along the outer arc. Wings span about one and a half body widths on each side. The snarl has a mouth curve wider than the muzzle base and small even teeth.
Worked answer
A completed light-guide construction with a 5 cm cranium circle, a 5 cm muzzle wedge, a body 10 cm tall, two tapered horns about 4 cm along the outer arc, bat-style wings behind the body, and a snarling mouth with a wide curve and small teeth. Final contours are dark and continuous after erasing guides.
Four practice exercises
Exercise 1
On plain paper, draw only the head and horns of a devil wolf. Use a light circle 6 cm across as a hypothetical example. Draw two tapered horns from the top of the circle, each about 4 cm along the outer arc. Check that horn lengths differ by no more than 1 cm.
Show answer and check
A head circle with two tapered horn arcs growing from the top, similar in length within 1 cm, with light construction lines still visible.
Why: This isolates the horn guide so you can check taper and balance before adding the body or wings.
Check: Measure each horn's outer arc with a ruler or a marked paper strip. If the difference is more than 1 cm, adjust the shorter horn.
Exercise 2
Draw a body rounded rectangle two head heights tall, where the head height is 5 cm. Add bat-style wings behind the body. Each wing has a leading edge, three finger struts, and scalloped trailing edges. Check that the body overlaps the wings.
Show answer and check
A 10 cm tall body rectangle with wings drawn behind it, body outline overlapping the wing bases, and three struts per wing.
Why: This practices layering and wing structure without the distraction of the face.
Check: Look at the overlap: the body contour should cross over the wing bases. Count three struts per wing.
Exercise 3
Draw a snarling wolf face only. Use an eye line, two tilted almond eyes, angled brows, a mouth curve wider than the muzzle base, a raised upper lip line, and small even teeth. Check that the snarl reads when you cover the rest of the page.
Show answer and check
A face with narrowed tilted eyes, angled brows, a wide lifted mouth curve, raised lip line, and small even teeth.
Why: This focuses on expression cues so the snarl is clear before combining with horns and wings.
Check: Cover everything except the face. If the snarl is not obvious, widen the mouth curve or reduce tooth size.
Exercise 4
Combine your head, horns, wings, body, and snarl into one devil wolf. Erase light guides and draw final contours dark and continuous. Add short fur tufts at cheeks and shoulders. Check the whole drawing at arm's length for clear horns, wings, and snarl.
Show answer and check
A complete devil wolf with all parts integrated, light guides erased, dark continuous contours, fur tufts, and a readable snarl.
Why: This integrates the separate skills and tests the final line convention and overall readability.
Check: At arm's length, confirm you can point to horns, wings, and snarl. Check that no light construction lines remain dark and confusing.
Common mistakes
- Horns are drawn as straight spikes instead of tapered curves. Use two arcs per horn that meet at a point, and check both horns are similar in length.
- Wings are placed in front of the body, hiding the torso. Draw wings behind the body outline so the body overlaps them.
- The snarl is too small to read because the mouth curve is narrow. Make the mouth curve wider than the muzzle base and keep teeth small and even.
- Construction lines are left dark and confuse the final contour. Erase light guides before the final pass and use one dark continuous line for contours.
Self-check rubric
- Head and body proportion: head circle and body height follow the stated ratio within about 1 cm.
- Horns: two tapered curves, similar length within about 1 cm, growing from the cranium.
- Wings: bat-style guides with leading edge, three struts, and scalloped trailing edges, placed behind the body.
- Snarl: raised lip, exposed small even teeth, narrowed tilted eyes, and angled brows.
- Line convention: light construction lines erased; final contours dark and continuous.
- Valid alternatives: different horn curves, wing spans, and fur tufts are acceptable if the checks pass.
Questions and answers
Do I need to copy a single finished devil wolf?
No. Use the shape guides and checks, then make your own choices for horn curve, wing span, and fur tufts. Valid alternatives are expected.
How large should the drawing be?
Any size that fits your paper. The 6 cm circle and 1 cm checks are hypothetical examples; measure your own page and keep units consistent.
Can I use a ruler for the guides?
Yes. A ruler helps with proportion checks, but final contours can be freehand.
What if my handwriting labels are uneven?
X-height is baseline to midline, and letter styles vary. Keep your own labels consistent rather than matching a single style.