Free original lessons
Dragon Pen Drawing: Scale Hatching and Wing Texture
Learn to draw a dragon in pen using scale hatching and wing texture. Includes a convention, worked example, four practice tasks, and a rubric for valid alternatives.
Free lesson
Four exercises
Worked answers
Object Drawing Lessons
This lesson teaches a repeatable pen-and-ink approach to a dragon's scales and wing membranes. You will use a simple convention: scale hatching means short curved strokes that follow a scale's lower edge, and wing texture means directional strokes that radiate from the wing's leading edge. Letter styles and stroke shapes vary, so the rubric rewards consistent, readable texture rather than one universal mark. All measurements are hypothetical examples; measure your own paper and pen before drawing.
Practice materials: Printable downloads are not available for this lesson yet. Use the instructions and four exercises below.
Reference illustration
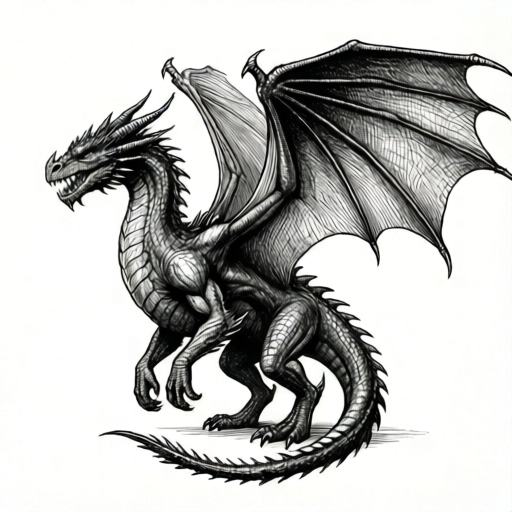
Use the stated measurements and conventions for each exercise.
Set the convention before you ink
Choose one pen and one paper size. On a scrap, draw a 20 mm by 20 mm square and fill it with ten short curved strokes, each about 3 mm long, spaced about 2 mm apart. This is your scale-hatching sample patch. If the strokes merge into a solid block, increase spacing or reduce stroke length.
For wing texture, draw a 30 mm line as the leading edge. From it, draw eight strokes fanning outward at roughly 20-degree intervals, each 8 mm long. These are texture strokes, not outlines. Keep them lighter than the wing outline by spacing them farther apart.
- Measure and mark a 20 mm square for the scale patch.
- Draw ten curved strokes following the lower edge of each imagined scale.
- Draw a 30 mm leading edge and eight radiating wing strokes.
- Label both samples with the pen used and the date.
Build the dragon outline in pen
Work from large shapes to small. Draw the body as two overlapping ovals, the neck as a tapered tube, and the wing as a triangle with a curved trailing edge. Keep outlines thin and continuous; do not shade yet.
Place scale hatching only on the body and neck. Place wing texture only inside the wing triangle. Leave a 2 mm clear gap between the body outline and the wing texture so the two textures do not compete.
- Draw two overlapping ovals for the body.
- Add a tapered neck tube and a triangular wing.
- Ink the outlines with a thin continuous line.
- Mark a 2 mm gap between body and wing texture zones.
Apply scale hatching in bands
Divide the body into three horizontal bands. In the top band, draw scale hatching with 4 mm strokes spaced 3 mm apart. In the middle band, use 3 mm strokes spaced 2 mm apart. In the bottom band, use 2 mm strokes spaced 1.5 mm apart. This creates a readable density gradient from sparse at the top to dense at the bottom without pencil shading.
Check each band by counting strokes in a 10 mm segment. Expect about one to two strokes in the top band, about two in the middle band, and about two to three in the bottom band. If a count falls well outside its expected range, adjust spacing rather than pen pressure.
- Mark three horizontal bands on the body.
- Fill each band with the specified stroke length and spacing (top: 4 mm strokes, 3 mm gaps; middle: 3 mm strokes, 2 mm gaps; bottom: 2 mm strokes, 1.5 mm gaps).
- Count strokes in a 10 mm segment and adjust spacing.
- Keep all strokes curved in the same direction within a band.
Add wing texture and finish
Inside the wing triangle, draw radiating strokes from the leading edge toward the trailing edge. Use 8 mm strokes spaced 3 mm apart. Where the wing overlaps the body, stop texture strokes 2 mm before the body outline.
Finish by thickening the wing outline slightly and leaving the scale bands untouched. Do not add cross-hatching over the wing texture; it would erase the directional read.
- Draw eight radiating strokes from the leading edge.
- Stop strokes 2 mm before the body outline.
- Thicken only the wing outline.
- Leave scale bands and wing texture separate.
Worked example
A dragon body is 20 mm tall and 30 mm wide. You divide it into three horizontal bands of equal height. In the top band you draw 4 mm strokes spaced 3 mm apart. How many strokes fit across a 30 mm width in the top band, assuming each stroke plus gap uses 7 mm?
Worked answer
Four strokes, with 2 mm left over. Each stroke plus gap uses 4 mm + 3 mm = 7 mm. 30 mm divided by 7 mm equals 4 full strokes (28 mm) with 2 mm remaining.
Four practice exercises
Exercise 1
A 20 mm wide scale band uses 2 mm strokes spaced 1.5 mm apart. How many strokes fit across the width if each stroke plus gap uses 3.5 mm?
Show answer and check
Five strokes, with 2.5 mm left over.
Why: Each stroke plus gap is 2 mm + 1.5 mm = 3.5 mm. 20 mm divided by 3.5 mm equals 5 full strokes (17.5 mm) with 2.5 mm remaining.
Check: Multiply 5 by 3.5 mm to get 17.5 mm, then add 2.5 mm to reach 20 mm.
Exercise 2
A wing leading edge is 30 mm long. You draw eight texture strokes whose start points are evenly distributed along the edge, with the first start point at 0 mm and the last start point at 30 mm. What is the spacing between adjacent start points?
Show answer and check
About 4.29 mm between adjacent start points.
Why: Eight start points create seven equal intervals along the 30 mm edge. 30 mm divided by 7 intervals equals about 4.29 mm per interval.
Check: Multiply 7 intervals by 4.29 mm to get about 30 mm, confirming the spacing covers the full edge.
Exercise 3
A dragon body is 40 mm tall, divided into three equal bands. The middle band uses 2 mm strokes spaced 1.5 mm apart. How many strokes fit across a 40 mm width if each stroke plus gap uses 3.5 mm?
Show answer and check
Eleven strokes, with 1.5 mm left over.
Why: Each stroke plus gap is 3.5 mm. 40 mm divided by 3.5 mm equals 11 full strokes (38.5 mm) with 1.5 mm remaining.
Check: Multiply 11 by 3.5 mm to get 38.5 mm, then add 1.5 mm to reach 40 mm.
Exercise 4
A wing texture stroke is planned to run 8 mm from the leading edge and would otherwise end exactly at the body outline. You must stop the stroke 2 mm before the body outline to keep a clear gap. How long is the visible texture stroke?
Show answer and check
Six mm of visible texture stroke.
Why: The full planned stroke is 8 mm. Stopping 2 mm before the body outline removes the last 2 mm, so 8 mm minus 2 mm equals 6 mm of visible stroke.
Check: Add the 6 mm visible stroke and the 2 mm gap to get 8 mm, matching the planned stroke length.
Common mistakes
- Making scale strokes too long so they cross band boundaries. Keep each stroke within its band and count strokes per 10 mm segment.
- Drawing wing texture strokes perpendicular to the leading edge instead of radiating. Fan strokes outward at roughly 20-degree intervals from the leading edge.
- Letting wing texture touch the body outline. Maintain the 2 mm clear gap and stop strokes early.
- Using the same spacing in all three scale bands. Vary spacing by band as specified (top sparsest, bottom densest) to create a density gradient.
Self-check rubric
- Scale hatching strokes are short, curved, and follow the lower edge of imagined scales.
- Three scale bands show distinct spacing or stroke-length differences.
- Wing texture strokes radiate from the leading edge at roughly consistent intervals.
- A clear gap separates body scale hatching from wing texture.
- Outlines are continuous and thin except where the wing outline is intentionally thickened.
- Alternative stroke shapes are accepted if consistency and readability are maintained.
Questions and answers
Do I need a specific pen?
No. Use any pen you have. Measure its line width on scrap and adjust stroke spacing so textures remain readable.
Can I use pencil first?
Yes for layout, but the final texture must be pen. Erase pencil guides before inking textures.
What if my dragon is a different size?
Scale all measurements proportionally. If your body is 40 mm tall instead of 20 mm, double stroke lengths and spacings.
Is there one correct scale shape?
No. Curved, rounded, or slightly pointed strokes are valid if they follow the lower edge and stay consistent within a band.