Free original lessons
Draw a Winged Dragon: Wing Attachment and Membrane Structure
Learn to draw a winged dragon with clear wing-to-body attachment, bone structure, and membrane layout using a simple convention and checkable steps.
Free lesson
Four exercises
Worked answers
Object Drawing Lessons
This lesson focuses on how a dragon's wings connect to its torso and how the membrane and bones are arranged. You will use a simple drawing convention: the body is a rounded rectangle, the wing root is a short thick line from the shoulder area, and the membrane is drawn as a series of triangles between bone lines. X-height is baseline to midline; letter styles vary, so use your own handwriting for labels. All measurements are hypothetical examples; measure your own paper and tools. The goal is a clear, readable winged dragon, not a single universal answer.
Practice materials: Printable downloads are not available for this lesson yet. Use the instructions and four exercises below.
Reference illustration
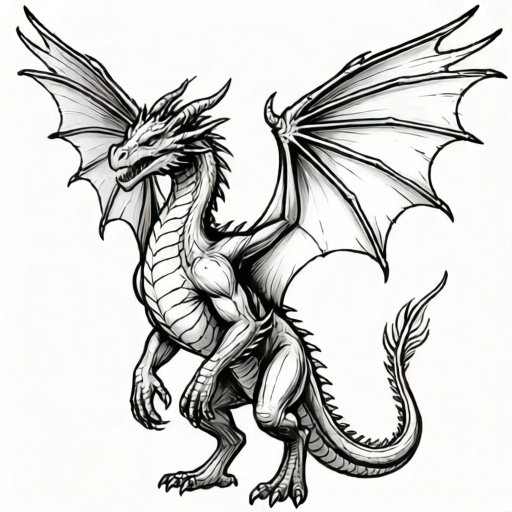
Use the stated measurements and conventions for each exercise.
Wing Bones and Membrane Layout
A dragon wing can be simplified into a root, a leading edge bone, several finger bones, and a trailing membrane. Draw the root as a short thick line from the shoulder area of the torso. From the root, draw one long leading edge bone upward and outward. Then draw three or four finger bones fanning from the root or from a wrist point. Connect the tips with a curved line to suggest the membrane edge. The membrane is the area between the bones; draw it as a series of triangles or curved panels. Keep the bone lines slightly thicker than the membrane lines so the structure reads clearly.
Use a convention: label the root R, the leading edge L, and finger bones F1, F2, F3. The membrane attaches along the torso from the shoulder to the mid-back. Draw a short attachment line on the torso and connect the root to it. This line shows where the wing meets the body. Avoid drawing the wing floating away from the torso; the root must touch the attachment line.
- Draw a rounded rectangle for the torso, about 6 cm wide and 9 cm tall (hypothetical example).
- Mark the shoulder point on the upper side of the torso and draw a short attachment line down the back.
- Draw the wing root as a thick line from the shoulder point outward.
- Add the leading edge bone and three finger bones fanning from the root.
- Connect the bone tips with a curved membrane edge and fill the panels with light lines.
Body-Plus-Wing Construction
Start with the torso and a simple head and neck. Then add the wing root and attachment line before drawing the full wing. This order keeps the wing connected. Next, draw the far wing smaller and behind the body to show depth. Use the same bone and membrane convention for both wings. Finally, add legs and tail, but keep them simple so the wing attachment remains the focus.
Check that the wing root touches the torso at the attachment line. The membrane should not cross the torso outline except at the attachment line. If the wing looks detached, redraw the root so it starts inside the torso outline and extends outward.
- Draw the torso, head, and neck.
- Add the near wing root and attachment line.
- Draw the near wing bones and membrane.
- Add the far wing smaller and behind the torso.
- Add legs and tail, then check that both wing roots touch the torso.
Checking Proportions and Clarity
Use simple arithmetic to check proportions. For example, if the torso is 6 cm wide, make the near wing span about 9 cm from root to tip (hypothetical example). The far wing can be about 6 cm. Measure with a ruler or count grid squares. Keep units consistent: use centimeters or grid squares, not both. Check that the membrane panels are not too narrow; each panel should be at least 1 cm wide at its widest point (hypothetical example).
Clarity check: can you trace the root from the torso to the first bone without lifting your pencil? If not, the attachment is unclear. Also check that the membrane edge does not cross bone lines except at the tips. Label the root and attachment line lightly so you can erase them later.
- Measure the torso width and wing span; compare the ratio.
- Check each membrane panel width at its widest point.
- Trace the root from torso to first bone.
- Erase construction labels if desired, but keep the attachment line visible.
Worked example
Draw a near wing on a torso 6 cm wide. Use a root from the shoulder, one leading edge bone, three finger bones, and a membrane. Check that the root touches the torso.
Worked answer
Torso: rounded rectangle 6 cm wide, 9 cm tall. Shoulder point at upper left. Attachment line 3 cm down the back. Root: thick line 2 cm from shoulder outward. Leading edge bone: 7 cm upward and outward. Finger bones: three lines fanning from root, each 5–6 cm. Membrane edge: curved line connecting tips. Check: root starts inside torso and touches attachment line; near wing span about 9 cm; each panel at least 1 cm wide. Far wing omitted for this example.
Four practice exercises
Exercise 1
Draw a torso 5 cm wide and 8 cm tall. Add a near wing root from the shoulder and an attachment line 2 cm down the back. Draw one leading edge bone and three finger bones. Check that the root touches the torso.
Show answer and check
A torso with a visible attachment line, a root starting inside the torso, one leading edge bone, three finger bones, and a membrane edge connecting the tips. The root touches the attachment line.
Why: The attachment line shows where the wing meets the body. Starting the root inside the torso prevents floating. Three finger bones are enough to show structure without clutter.
Check: Trace from the torso to the first bone without lifting your pencil. Measure the torso width and confirm the root starts inside the outline.
Exercise 2
Draw two wings on a torso 6 cm wide. Make the near wing span 9 cm and the far wing span 6 cm. Use the same bone convention for both. Check that both roots touch the torso.
Show answer and check
A torso with two wings: near wing larger and in front, far wing smaller and behind. Both roots touch the torso at attachment lines. Bone and membrane convention is consistent.
Why: Different wing sizes show depth. Consistent convention keeps the structure readable. Both roots must touch the torso to avoid floating wings.
Check: Measure both wing spans and compare to the torso width. Trace each root from torso to first bone.
Exercise 3
Draw a near wing with four membrane panels. Make each panel at least 1 cm wide at its widest point (hypothetical example). Check panel widths with a ruler or grid squares.
Show answer and check
A wing with four readable panels, each at least 1 cm wide at its widest point. Bone lines are thicker than membrane lines.
Why: Wide panels are easier to read. Measuring with one unit keeps checks consistent. Thicker bone lines clarify structure.
Check: Measure each panel at its widest point. Confirm all measurements use the same unit.
Exercise 4
Draw a complete winged dragon with torso, head, neck, near wing, far wing, legs, and tail. Use the attachment convention. Check that the membrane does not cross the torso outline except at the attachment line.
Show answer and check
A complete dragon with clear wing attachment, readable membrane panels, and no membrane crossing the torso except at the attachment line. Far wing is smaller and behind.
Why: The attachment line defines where the wing meets the body. Keeping the membrane outside the torso except at the attachment line prevents visual confusion.
Check: Trace the torso outline and note where the membrane touches it. Confirm contact only at the attachment line. Check that both roots touch the torso.
Common mistakes
- Drawing the wing root floating away from the torso. Start the root inside the torso outline and draw a short attachment line on the torso; connect the root to that line.
- Making the membrane panels too narrow or tangled. Keep each panel at least 1 cm wide at its widest point (hypothetical example) and draw bone lines first, then membrane edges.
- Using inconsistent units when checking proportions. Choose centimeters or grid squares and use only that unit for all measurements.
- Drawing the far wing the same size as the near wing. Make the far wing smaller and place it behind the torso to show depth.
Self-check rubric
- Wing root touches the torso at a visible attachment line.
- Bone structure includes a leading edge and at least three finger bones.
- Membrane panels are readable and do not cross bone lines except at tips.
- Near and far wings show depth with the far wing smaller.
- Labels or construction lines are clear and use a consistent convention.
- Measurements use one unit and are checked with simple arithmetic.
Questions and answers
Do I need to draw every finger bone?
No. Three or four finger bones are enough to show structure. Keep the bone lines clear and the membrane panels readable.
Can I use my own letter style for labels?
Yes. X-height is baseline to midline; letter styles vary. Use any readable handwriting for labels like R, L, and F1.
How do I know the wing is attached correctly?
The wing root must touch the torso at the attachment line. Trace from the torso to the first bone without lifting your pencil.
Are the measurements in this lesson exact?
No. All numerical values are hypothetical examples. Measure your own paper and tools and keep units consistent.