Free original lessons
Dragon Wings Drawing Reference: Bone Arm, Membrane Spans, Folded and Spread Poses
Learn to draw dragon wings by mapping the bone arm and membrane spans, then posing them folded or spread with clear, checkable steps.
Free lesson
Four exercises
Worked answers
Object Drawing Lessons
Dragon wings read as believable when the bone arm and the membrane spans agree with each other. This reference treats the wing as a simple hinged frame: a shoulder joint, an elbow joint, a wrist joint, and finger struts that fan out to hold the membrane. You will first map those struts on a spread wing, then compress the same frame into a folded pose. The goal is not a single correct outline but a consistent structure you can check with a ruler or by eye. All measurements below are hypothetical examples; measure your own paper and tools before relying on any number.
Practice materials: Printable downloads are not available for this lesson yet. Use the instructions and four exercises below.
Reference illustration
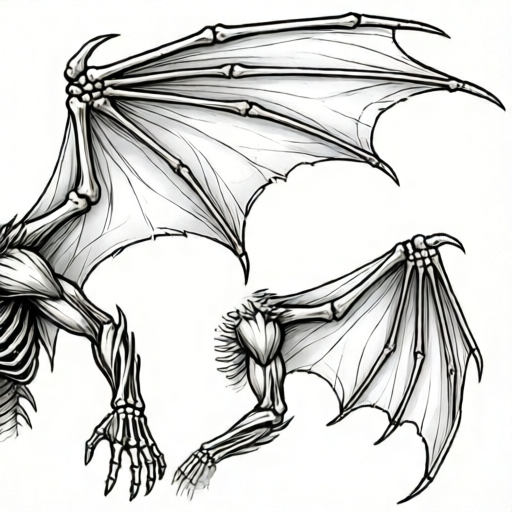
Use the stated measurements and conventions for each exercise.
Map the bone arm before any membrane
Start with the arm as a chain of three segments: upper arm from shoulder to elbow, forearm from elbow to wrist, and a short hand section from wrist to the first finger joint. Draw these as light lines, not final contours. Keep joint angles explicit so the wing can later fold without redrawing the whole shape.
Next add finger struts. A practical convention is one leading-edge strut along the top of the wing and three to four trailing struts fanning backward. Label each strut at its base so you can track it when the pose changes. The membrane will later span between adjacent struts, so the gaps between struts are as important as the struts themselves.
- Draw a shoulder point and an elbow point; connect them with a straight upper-arm line.
- Add a wrist point and connect elbow to wrist for the forearm.
- Draw the leading-edge strut from the wrist outward, then fan three trailing struts backward at clearly different angles.
- Mark each joint with a small circle and label struts A, B, C, D from leading edge to trailing edge.
Span the membrane between struts
Membrane spans are the panels between adjacent struts. Draw each span as a shallow curve that sags slightly toward the trailing edge, not as a straight line. The sag should be consistent: if one span bows deeply, neighboring spans should bow similarly or the wing will look torn rather than stretched.
At the wing tip, the membrane usually extends a little past the last strut. At the body end, the membrane meets the shoulder or back. Keep the attachment line simple and continuous so the wing reads as one surface. Do not add scale texture here; the brief excludes it and texture will hide structural errors.
- Between struts A and B, draw a shallow curve from tip to base.
- Repeat between B and C, and between C and D, matching the sag depth.
- Close the trailing edge with a gentle curve from the last strut back toward the body.
- Check that every span connects two labeled struts and no span crosses a strut.
Fold the same frame into a compact pose
A folded wing is the spread frame compressed, not a new anatomy. Keep the shoulder fixed, bend the elbow sharply, and rotate the wrist so the finger struts stack close together. The membrane spans then bunch into narrow folds between the stacked struts.
Draw the folded pose by first repeating the labeled struts from the spread version, then rotating each strut toward the body. The leading-edge strut often stays outermost, with trailing struts tucked behind it. Membrane folds appear as short curves between adjacent struts, and their spacing should shrink as the struts close.
- Copy the labeled strut layout from the spread wing onto a new area.
- Bend the elbow to roughly half its spread angle and rotate the wrist inward.
- Stack struts B, C, and D behind strut A, keeping their order.
- Draw short membrane folds between adjacent stacked struts, narrowing the gaps toward the tip.
Check pose consistency with simple arithmetic
Use a ruler to compare strut lengths between poses. If the leading-edge strut is 6 cm in the spread drawing, it should still be about 6 cm in the folded drawing; folding changes angles, not bone length. A difference of more than about 1 cm on a 6 cm strut suggests the frame was redrawn rather than rotated.
Check membrane area by counting spans. A spread wing with four struts has three main spans; a folded wing should still show three spans, even if they are narrow. If a span disappears, a strut was probably omitted. These checks are approximate and meant to catch structural drift, not to enforce a single outline.
- Measure each labeled strut in both poses and note any difference greater than 1 cm on a 6 cm example.
- Count membrane spans in each pose; the count should match the number of gaps between struts.
- Confirm that joint order (shoulder, elbow, wrist, tip) is the same in both poses.
- Mark any mismatch and adjust the folded pose rather than the spread reference.
Worked example
A spread wing uses a 6 cm leading-edge strut, a 5 cm second strut, and a 4 cm third strut, with three membrane spans. The folded version shows the same three struts but the leading strut measures 8 cm. Identify the likely error and state a fix.
Worked answer
The leading strut grew by 2 cm, which exceeds the 1 cm tolerance on a 6 cm example, so the folded frame was probably redrawn rather than rotated. Fix by copying the 6 cm leading strut from the spread drawing, then rotating it into the folded angle without changing its length. Recheck that three spans remain visible.
Four practice exercises
Exercise 1
A spread wing has four labeled struts and three membrane spans. The folded drawing shows four struts but only two visible spans. What is the most likely error, and how would you check it?
Show answer and check
One membrane span was probably omitted or hidden behind a strut. Check by counting gaps between adjacent labeled struts in the folded pose; there should be three. Trace each span from one strut to the next and redraw any missing span as a narrow fold.
Why: The number of spans equals the number of gaps between struts. Four struts create three gaps, so a folded wing should still show three spans even if they are narrow.
Check: Count struts and spans in both poses; the span count should be one less than the strut count in each.
Exercise 2
In a spread wing, the second strut measures 5 cm. In the folded version it measures 7 cm. Using the hypothetical 1 cm tolerance on a 6 cm example, is this consistent? State a fix.
Show answer and check
No. A 2 cm change on a 5 cm strut is larger than the 1 cm tolerance, so the folded strut was likely redrawn. Fix by copying the 5 cm strut and rotating it into the folded angle, then rechecking span count.
Why: Folding changes angles, not bone length. A large length change signals a structural mismatch between poses.
Check: Measure the same labeled strut in both poses and compare the difference to the stated tolerance.
Exercise 3
You are drawing a folded wing with struts A, B, C, and D. Strut A is the leading edge. In what order should the struts stack, and where do membrane folds appear?
Show answer and check
Stack A outermost, then B, C, and D behind it in order. Membrane folds appear as short curves between adjacent stacked struts: A to B, B to C, and C to D, narrowing toward the tip.
Why: Preserving the labeled order keeps the folded pose consistent with the spread frame. Folds occupy the gaps between adjacent struts.
Check: Verify that the stacking order matches the labels and that three short folds connect the four struts.
Exercise 4
A spread wing shows a leading strut of 6 cm and three spans with a sag depth of about 0.5 cm each. The folded drawing shows the same struts but one span sags 2 cm while the others sag 0.5 cm. What should you adjust?
Show answer and check
Reduce the deep sag to about 0.5 cm so it matches neighboring spans. A single deep sag makes the membrane look torn rather than folded. Keep the fold narrow but consistent with the other spans.
Why: Consistent sag across neighboring spans reads as an evenly stretched membrane. One outlier span breaks that consistency.
Check: Compare sag depth across adjacent spans by eye or with a small ruler; they should be similar within about 0.2 cm on this hypothetical example.
Common mistakes
- Drawing the membrane as straight lines between struts. Add a shallow, consistent sag to each span so the membrane reads as a stretched surface rather than a rigid panel.
- Changing strut lengths when folding the wing. Rotate the existing labeled struts instead of redrawing them; measure to confirm lengths stay close.
- Letting membrane spans cross over struts. Trace each span from one labeled strut to the next and erase any line that passes through a strut.
- Stacking folded struts in the wrong order. Keep the leading-edge strut outermost and tuck trailing struts behind in their original sequence.
Self-check rubric
- Bone arm shows shoulder, elbow, wrist, and labeled finger struts in a clear order.
- Membrane spans connect adjacent struts without crossing them.
- Span sag is shallow and consistent across neighboring panels.
- Folded pose preserves strut lengths within about 1 cm on a 6 cm example.
- Folded pose keeps the same number of membrane spans as the spread pose.
- Strut stacking order is preserved in the folded pose.
- Valid alternative strut counts are accepted if labeled and consistent across poses.
Questions and answers
How many finger struts should a dragon wing have?
A workable convention is one leading-edge strut plus three trailing struts, giving three main membrane spans. You can use four trailing struts if you label them and keep the span count consistent between poses.
Should the membrane sag toward the body or toward the tip?
Sag toward the trailing edge, which is usually the lower or rear edge. Keep the sag depth similar across neighboring spans so the wing looks evenly stretched.
Can I draw the folded pose first?
It is easier to map the spread pose first because the struts are separated and easier to label. Then compress the same labeled frame into the folded pose.
How do I know my folded wing is consistent with my spread wing?
Compare strut lengths and span counts. On a hypothetical 6 cm leading strut, a difference over about 1 cm suggests redrawing rather than rotation.