Free original lessons
Great Dane Drawing: Head Proportions, Ear Shape, and Stance
Learn to draw a Great Dane by mapping head proportions, shaping ears, and setting a balanced stance using a simple grid and measured steps.
Free lesson
Four exercises
Worked answers
Object Drawing Lessons
This lesson teaches a repeatable method for drawing a Great Dane. You will first establish head proportions with a measured grid, then shape the ears using a defined fold convention, and finally build a stable stance from paw placement to topline. The approach uses simple arithmetic and consistent units so you can check your work at each stage. All measurements are hypothetical examples; measure your own paper and adjust the scale. The convention for ear shape is a folded ear with a soft forward crease, but upright or partially folded ears are valid alternatives if you state your choice and keep the proportions consistent. X-height refers to the distance from baseline to midline in your lettering or labeling, not to the dog’s anatomy. Use a pencil for construction lines and a darker tool for final contours.
Practice materials: Printable downloads are not available for this lesson yet. Use the instructions and four exercises below.
Reference illustration
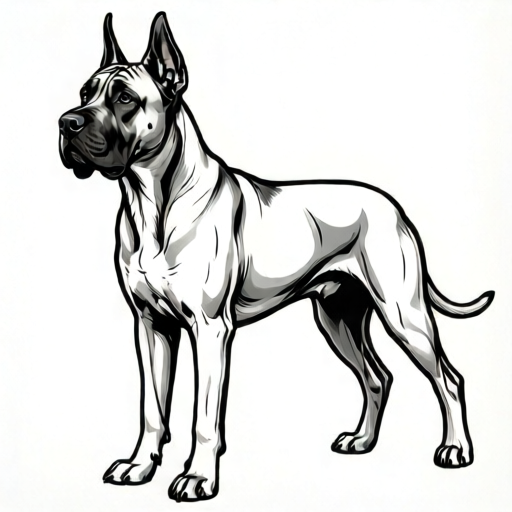
Use the stated measurements and conventions for each exercise.
Mapping Head Proportions with a Measured Grid
Begin by drawing a light rectangle for the head. For a hypothetical example, make the rectangle 6 units wide and 8 units tall, where 1 unit equals 2 cm on your paper. This gives a 3:4 width-to-height ratio. Divide the rectangle horizontally into four equal bands of 2 units each. The top band holds the forehead, the second band the eyes, the third band the muzzle, and the bottom band the chin and jaw. Mark the vertical centerline. The eyes sit on the line between the second and third bands, spaced about 2 units apart. The nose is centered in the third band, and the muzzle width is about 3 units.
Check proportions by measuring the distance from the top of the head to the eye line and from the eye line to the chin. In this example both are 4 units, so the eye line is the midpoint. The ear bases attach at the top corners of the rectangle, just below the top edge. Keep construction lines light so you can adjust. If your paper is smaller, scale all units by the same factor; for instance, use 1 unit = 1.5 cm and keep the 6-by-8 rectangle. Record your chosen unit on the page so every later step uses the same scale.
- Draw a 6-unit by 8-unit rectangle in light pencil.
- Divide the height into four equal 2-unit bands and mark the horizontal lines.
- Draw a vertical centerline and mark eye positions 2 units apart on the eye line.
- Place the nose at the center of the third band and sketch the muzzle width at 3 units.
- Mark ear base points at the top corners, 1 unit below the top edge.
Shaping the Ears with a Fold Convention
Use a folded-ear convention: each ear is a soft triangle that folds forward, with the crease running from the base toward the tip. Draw the ear base as a 2-unit line angled slightly outward from the top corner of the head rectangle. From the outer end of that base, draw a curved line forward and down to a tip about 3 units from the base. The inner edge curves back to the base’s inner end. The fold line runs from the midpoint of the base to a point one-third of the way from the tip, creating a gentle crease. This convention is one valid choice; upright ears or partially folded ears are also acceptable if you declare the style and keep both ears symmetrical in size and angle.
Check ear symmetry by measuring the distance from each ear tip to the centerline. In the folded convention, both tips should be about 2.5 units from the centerline. The ear length from base to tip should be about 3 units, matching the muzzle width. If you choose upright ears, make the ear length 4 units and keep the base width 2 units. Write your chosen ear style beside the drawing so the rubric can assess consistency rather than a single universal shape.
- Draw a 2-unit ear base angled outward from each top corner.
- Sketch a curved outer edge to a tip 3 units from the base.
- Add the inner edge and a soft fold line from base midpoint toward the tip.
- Measure both ear tips to the centerline and adjust for symmetry.
- Label the chosen ear style (folded, upright, or partially folded).
Building a Balanced Stance
Set the stance with four paw points on a ground line. For a hypothetical example, place the front paws 3 units apart and the rear paws 4 units apart, with the front pair 10 units ahead of the rear pair. The body length from chest to rump is 14 units, and the shoulder height is 12 units. Draw a light box from the ground line to the shoulder height to keep the topline level. The chest drops about 6 units below the topline, and the belly line rises gently from chest to rear. The neck connects the head rectangle’s bottom center to the shoulder area with a slight forward lean.
Check balance by drawing a vertical line from the nose to the ground; it should fall between the front paws. Measure the distance from the ground line to the shoulder and to the rump; in this example both are 12 units, so the topline is level. Confirm that the front paw spacing (3 units) is narrower than the rear (4 units) and that the body length (14 units) is longer than the shoulder height (12 units). Adjust any line that breaks these checks before adding final contours.
- Draw a ground line and mark four paw points using the example spacings.
- Sketch a light box 14 units long and 12 units tall for body length and shoulder height.
- Draw the topline level from shoulder to rump and the chest drop at 6 units.
- Connect the head rectangle to the shoulders with a slightly forward-leaning neck.
- Check that a vertical from the nose falls between the front paws and that the topline is level.
Refining Contours and Labeling
Once the construction checks pass, darken the final contours: the head outline, ear edges, neck, topline, chest, belly, legs, and paws. Keep the eye line and ear fold visible as subtle guides. Add simple labels using a consistent x-height convention: define x-height as the distance from baseline to midline for lowercase letters, and keep all labels at the same x-height, for example 1 unit. Letter styles may vary; the rubric checks consistency, not a single handwriting style. Erase construction lines that are no longer needed, but keep the unit scale note and ear-style label.
Final check: measure the head rectangle’s width-to-height ratio (6:8, or 3:4), the ear length (3 units), the shoulder height (12 units), and the paw spacings (3 and 4 units). Confirm that all measurements use the same unit you recorded at the start. If any measurement is off by more than half a unit, adjust the contour rather than redrawing the whole plate. This keeps the drawing coherent and makes the rubric checks straightforward.
- Darken final contours over the checked construction lines.
- Add labels at a consistent x-height and note the unit scale.
- Erase unnecessary construction lines but keep the ear-style label.
- Re-measure the head ratio, ear length, shoulder height, and paw spacings.
- Adjust any contour that deviates by more than half a unit.
Worked example
Using 1 unit = 2 cm, draw a Great Dane head rectangle 6 units wide and 8 units tall, place the eye line at the midpoint, and mark ear bases at the top corners 1 unit below the top edge. State the eye-line height from the top and the ear-base height from the top.
Worked answer
The head rectangle is 12 cm wide and 16 cm tall. The eye line is at 4 units (8 cm) from the top because the height is divided into four 2-unit bands and the eye line sits between the second and third bands. The ear bases are at 1 unit (2 cm) below the top edge. Check: 4 units from top plus 4 units to chin equals 8 units total, so the eye line is the midpoint.
Four practice exercises
Exercise 1
With 1 unit = 1.5 cm, draw a head rectangle 6 units wide and 8 units tall. Mark the eye line at the midpoint and the nose at the center of the third band. Report the rectangle’s width and height in centimeters and the eye-line distance from the top in units.
Show answer and check
Width = 9 cm, height = 12 cm, eye line = 4 units from the top.
Why: Multiply each unit dimension by 1.5 cm: 6 × 1.5 = 9 cm and 8 × 1.5 = 12 cm. The height has four 2-unit bands, so the midpoint is 4 units from the top.
Check: Verify that 4 units from top plus 4 units to chin equals 8 units, and that 9 cm divided by 12 cm reduces to 3:4.
Exercise 2
Choose the upright-ear convention. Draw ear bases 2 units wide at the top corners, 1 unit below the top edge, and make each ear 4 units long. State the ear length in units and describe how you would check symmetry without a ruler.
Show answer and check
Ear length = 4 units. Check symmetry by folding a paper strip to the ear length and comparing each tip’s distance to the centerline; both should match within half a unit.
Why: The upright convention sets ear length at 4 units, longer than the folded example’s 3 units. Symmetry is a comparison of equal distances, so a marked strip works as a simple gauge.
Check: Measure both ear tips to the centerline with the same strip and confirm the two distances differ by no more than half a unit.
Exercise 3
Using the stance example, place front paws 3 units apart and rear paws 4 units apart, with the front pair 10 units ahead of the rear pair. If 1 unit = 2 cm, what is the distance between the front and rear paw pairs in centimeters?
Show answer and check
20 cm.
Why: The front pair is 10 units ahead of the rear pair. Multiply 10 units by 2 cm per unit to get 20 cm.
Check: Confirm that 10 × 2 = 20 and that the rear spacing (4 units = 8 cm) is wider than the front spacing (3 units = 6 cm).
Exercise 4
Draw a light body box 14 units long and 12 units tall with a level topline. Mark the chest drop at 6 units below the topline. If the shoulder height is 12 units and 1 unit = 1.5 cm, what is the shoulder height in centimeters, and how far below the topline is the chest in centimeters?
Show answer and check
Shoulder height = 18 cm; chest drop = 9 cm below the topline.
Why: Multiply 12 units by 1.5 cm to get 18 cm for shoulder height. Multiply 6 units by 1.5 cm to get 9 cm for the chest drop.
Check: Verify that 12 × 1.5 = 18 and 6 × 1.5 = 9, and that the chest drop is half the shoulder height (6 of 12 units).
Common mistakes
- Making the head too narrow or too wide relative to the 3:4 example ratio. Re-measure the head rectangle’s width and height in your chosen units and adjust to the 6-by-8 example or scale both dimensions by the same factor.
- Drawing ears of different lengths or angles without declaring a style. Choose folded, upright, or partially folded ears, label the choice, and measure both ear tips to the centerline for symmetry.
- Placing the nose vertical outside the front paws, making the stance look unbalanced. Draw a vertical from the nose to the ground line and shift the front paw points or neck angle until the line falls between the front paws.
- Using different units for different steps, such as centimeters for the head and arbitrary marks for the body. Record one unit scale at the start and convert every measurement to that unit before drawing.
Self-check rubric
- Head rectangle uses a consistent unit scale and a width-to-height ratio close to the 3:4 example, with the eye line near the midpoint.
- Ear style is explicitly labeled as folded, upright, or partially folded, and both ears are symmetrical in length and angle within half a unit.
- Stance shows four paw points on a ground line, a level topline, and a nose-to-ground vertical that falls between the front paws.
- All labels use a consistent x-height convention, and the unit scale is recorded on the plate.
- Final contours are clean, construction lines are mostly erased, and measurements are re-checked against the chosen unit.
Questions and answers
Do I have to use the folded-ear convention?
No. Folded, upright, and partially folded ears are all valid if you label your choice and keep both ears symmetrical in size and angle. The rubric checks consistency, not a single universal ear shape.
What does x-height mean in this lesson?
X-height is the distance from baseline to midline for lowercase letters in your labels. Keep all labels at the same x-height, for example 1 unit, so the plate looks consistent. Letter styles may vary.
Are the numerical measurements real Great Dane standards?
No. All numbers are hypothetical examples for practice. Measure your own paper and equipment, choose a unit, and keep it consistent. Do not treat the examples as breed standards.
How do I check the stance without a ruler?
Use a straight edge or a folded paper strip marked with your unit. Compare the nose-to-ground vertical, the topline level, and the front and rear paw spacings against the example values.