Free original lessons
Pencil Nose Rendering: Hatching, Blending, and Nostril Form
Learn to draw a nose in pencil using directional hatching, controlled blending, and clear nostril form. Includes steps, mistakes, and practice tasks.
Free lesson
Four exercises
Worked answers
Object Drawing Lessons
This lesson teaches a repeatable pencil method for rendering a nose: establish simple planes, hatch in consistent directions, blend selectively, then refine edges and nostril form. The convention used here is that the nose is drawn as a simplified wedge with a rounded tip, two nostril openings, and a bridge that narrows toward the brow. Hatching direction follows the form: vertical strokes on the bridge, diagonal strokes on the side planes, and curved strokes around the tip. Blending is done with a dry brush or paper stump, always along the hatch direction, and only where the form turns away from the light. Keep the pencil sharp for hatching and slightly dull for blending. All numerical values in this lesson are hypothetical examples; measure your own paper and tools before relying on any measurement.
Practice materials: Printable downloads are not available for this lesson yet. Use the instructions and four exercises below.
Reference illustration
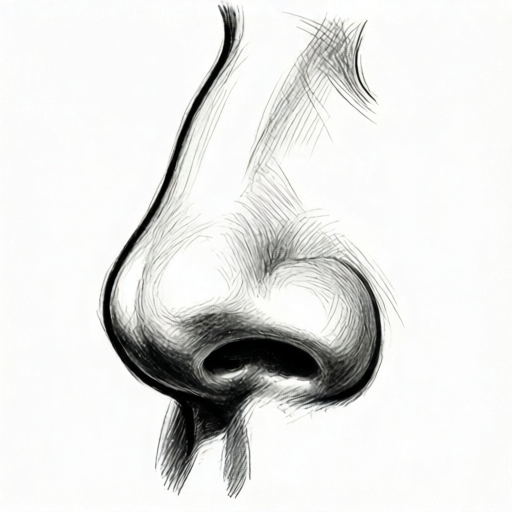
Use the stated measurements and conventions for each exercise.
Set the nose planes before hatching
Begin with a light outline: a vertical bridge line, a rounded tip, and two nostril shapes. Mark the side planes as narrow bands beside the bridge. These bands are where hatching will later suggest curvature.
Decide a single light direction, for example from the upper left. The left side plane stays lighter; the right side plane and the underside of the tip receive denser hatching. This decision keeps every later step consistent.
- Draw the bridge as two nearly parallel lines that narrow toward the top.
- Add a rounded tip and two nostril openings; keep them small and asymmetrical if your reference shows that.
- Mark the side planes with faint boundary lines so hatching has a home.
- Choose one light direction and note it at the edge of the page.
Hatch in three directions
Hatching is a set of parallel pencil strokes. Use three directions only: vertical on the bridge, diagonal on the side planes, and short curved strokes around the tip. Keep strokes evenly spaced and stop before the edge of each plane so the form stays readable.
Build density in layers rather than pressing harder. A second pass of the same direction darkens the area without changing the stroke character.
- Hatch the bridge with light vertical strokes, leaving the lit side almost clear.
- Hatch the shadowed side plane with diagonal strokes that follow its slope.
- Add curved strokes under the tip to suggest the rounded underside.
- Layer a second pass only in the darkest zone, keeping the same direction.
Blend selectively, then refine
Blend with a dry brush or paper stump using light pressure and short strokes along the hatch direction. Do not blend the entire nose; leave some hatch visible on the lit side to keep texture. After blending, sharpen the nostril edges and the bridge line with a crisp pencil.
If blending smudges too far, erase gently with a kneaded eraser and re-hatch the area. Refinement is about restoring edges, not adding new shading.
- Blend the shadowed side plane first, moving along the diagonal hatch.
- Blend under the tip with curved strokes, then stop before the lit edge.
- Redraw the nostril openings with a sharp pencil, keeping them dark but not solid black.
- Check that the bridge line remains visible and that the lit side still shows hatch texture.
Check nostril form and value balance
Nostrils are openings, not flat ovals. Draw each as a small shape with a darker inner edge and a slightly lighter rim. The rim catches light, so keep it thin and clean. Compare the darkest nostril value with the darkest side-plane value; they should be close but not identical.
Step back from the page and squint. If the nose reads as a flat shape, add one more layer of hatching on the shadowed plane rather than blending more.
- Outline each nostril with a thin, slightly curved line.
- Darken the inner edge and leave a narrow lighter rim.
- Compare nostril darkness with the side-plane shadow and adjust one of them.
- Squint at the drawing; if it flattens, add hatch instead of blending.
Worked example
A learner draws a nose with a light source from the upper left. The bridge is hatched vertically, the right side plane diagonally, and the tip with curved strokes. After blending the right side and the underside, the lit left side still shows hatch. The nostrils have dark inner edges and thin lighter rims. Explain why this meets the lesson convention.
Worked answer
The hatching uses three directions tied to the bridge, side plane, and tip, so the strokes follow the form. Blending is selective: the shadowed right side and underside are blended, while the lit left side keeps visible hatch texture. The nostrils are drawn as openings with dark inner edges and lighter rims, not solid ovals. The light direction is consistent, and the refinement step restores the bridge line and nostril edges. This matches the convention and would score well on the rubric.
Four practice exercises
Exercise 1
On a blank nose outline, hatch only the bridge with vertical strokes and the right side plane with diagonal strokes. Leave the left side plane clear. State your light direction.
Show answer and check
A nose outline with vertical hatch on the bridge, diagonal hatch on the right side plane, and a clear left side plane. The stated light direction is, for example, upper left.
Why: The exercise isolates hatching direction and plane assignment before blending. Keeping one plane clear makes the light direction checkable.
Check: Confirm three things: bridge strokes are vertical, right side strokes are diagonal, and the left side has no hatch. Confirm the stated light direction matches the shadowed side.
Exercise 2
Take the hatched nose from the previous exercise and blend only the right side plane and the underside of the tip. Keep the bridge hatch visible. Describe how you checked that blending did not spread to the lit side.
Show answer and check
The right side plane and underside are blended along their hatch directions; the bridge hatch and left side remain visible. The check is a visual scan of the lit side for smudging, with gentle erasing if needed.
Why: Selective blending is the core skill. The check method makes the boundary between blended and unblended areas explicit.
Check: Look at the lit side under good light. If hatch lines are still distinct, blending stayed in bounds. If smudged, erase gently and re-hatch.
Exercise 3
Draw two nostril shapes on a nose outline. Make the inner edge darker than the rim. Then compare the nostril darkness with the side-plane shadow and state which is darker.
Show answer and check
Two nostril shapes with dark inner edges and thin lighter rims. The comparison states, for example, that the side-plane shadow is slightly darker than the nostril interior.
Why: Nostril form depends on edge contrast, not solid fill. Comparing values prevents the nostrils from becoming flat black ovals.
Check: Squint at the drawing. The nostrils should read as openings, not solid shapes. The stated comparison should match what you see.
Exercise 4
Complete a full nose rendering using the three-direction hatch, selective blending, and refined nostrils. Then list one area where you added a second hatch layer instead of blending more, and explain why.
Show answer and check
A complete nose with consistent hatch directions, selective blending, and refined nostrils. The list names one area, for example the right side plane, where a second hatch layer was added because blending had already reached its limit without flattening the form.
Why: This task integrates all steps and asks the learner to justify a decision, which reveals whether the method is understood rather than copied.
Check: Use the rubric: three directions, selective blending, nostril form, consistent light direction, refined edges. Confirm the stated reason matches the visible drawing.
Common mistakes
- Hatching in random directions across the whole nose. Limit yourself to three directions tied to the bridge, side planes, and tip, and keep each direction inside its plane.
- Blending everything until the hatch disappears. Blend only the shadowed planes and the underside of the tip; leave visible hatch on the lit side.
- Drawing nostrils as solid black ovals. Use a dark inner edge with a thin lighter rim so the nostril reads as an opening.
- Pressing hard to darken instead of layering strokes. Add a second pass in the same direction with light pressure; this darkens without flattening the paper.
Self-check rubric
- Hatching uses no more than three directions, each tied to a named plane.
- Blending is limited to shadowed areas; visible hatch remains on the lit side.
- Nostrils read as openings with a dark inner edge and a thin lighter rim.
- One light direction is stated and followed consistently.
- Edges are refined after blending; the bridge line remains visible.
- Valid alternatives are accepted: either side may be shadowed, and stroke spacing may vary if consistent.
Questions and answers
Can I use a different light direction?
Yes. Choose one direction and keep it consistent. The rubric checks consistency, not a single correct side.
What if I do not have a paper stump?
A dry brush or a folded tissue works. Blend with light pressure along the hatch direction.
How dark should the nostrils be?
Close to the darkest side-plane shadow but not solid black. Compare the two values and adjust one.
Do I need to measure anything?
Only if you want repeatable spacing. Measure your own paper and pencil, and label any chosen numbers as hypothetical examples.