Free original lessons
Draw a Teacup: Rim Ellipse, Handle, and Saucer
Learn to draw a cylindrical teacup with an elliptical rim, a curved handle attached at two points, and a matching saucer using simple construction steps.
Free lesson
Four exercises
Worked answers
Object Drawing Lessons
This lesson teaches a reliable construction for a cylindrical teacup: an elliptical rim, a body that tapers slightly to the base, a handle attached at two points, and a saucer ellipse that shares the cup's perspective. Work on plain paper with a pencil and eraser. Use light construction lines first, then firm up the final contour. The convention for judging proportions is simple: measure the rim's width and height with a ruler or by marking paper, and compare those measurements to the body height and saucer width. Letter styles and handwriting vary, so the rubric rewards consistent proportions and clear attachment points rather than a single perfect line.
Practice materials: Printable downloads are not available for this lesson yet. Use the instructions and four exercises below.
Reference illustration
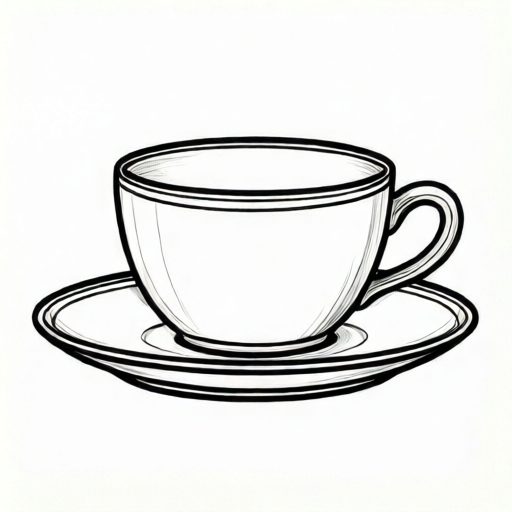
Use the stated measurements and conventions for each exercise.
Set the rim ellipse and body cylinder
Begin with a light horizontal line for the rim's long axis. Mark the rim width, then mark the rim height as a smaller distance on the vertical axis. A teacup rim seen from slightly above is an ellipse, not a circle. Draw the ellipse through those four marks, keeping it symmetrical.
From the widest points of the ellipse, drop two nearly vertical side lines that taper inward slightly toward the base. Close the base with a shallow curve that mirrors the rim's curvature but is narrower. This gives a cylindrical cup form with a slight taper, which reads as a teacup rather than a straight-sided mug.
- Mark the rim width and rim height on two crossing axes.
- Draw a symmetrical ellipse through the four marks.
- Drop tapered side lines from the ellipse's widest points.
- Close the base with a shallow curve narrower than the rim.
Attach the handle at two clear points
Choose a side of the cup and mark two attachment points on the body: an upper point near the rim and a lower point about halfway down. The handle curve leaves the upper point outward, arcs away from the body, and returns to the lower point. Keep the handle's outer curve smooth and its inner curve parallel enough to suggest thickness.
The attachment points matter more than the exact handle shape. Both points should sit on the body contour, not float beside it. A handle that meets the body at two distinct points looks attached; one that touches at a single point looks pasted on.
- Mark an upper and a lower attachment point on one side of the body.
- Draw the outer handle curve from upper to lower point, arcing outward.
- Draw the inner curve to suggest handle thickness.
- Erase construction lines inside the handle opening.
Build the saucer ellipse and check alignment
The saucer is a wider, flatter ellipse centered under the cup. Mark its width and height on crossing axes, then draw the ellipse. Add a second, slightly smaller ellipse inside it to suggest the saucer's recessed center. The cup's base should sit within that inner ellipse.
Check alignment by comparing the rim ellipse's long axis with the saucer ellipse's long axis. They should be parallel or nearly so. If the saucer tilts differently from the rim, the drawing will look unstable. Adjust the saucer axes before firming up lines.
- Mark the saucer width and height on crossing axes.
- Draw the outer saucer ellipse.
- Add a smaller inner ellipse for the recessed center.
- Confirm the cup base sits inside the inner ellipse and axes are parallel.
Firm up contours and judge proportions
With construction lines in place, darken the final cup contour, handle, and saucer edges. Erase the light axes and any lines that cross the handle opening. Keep the rim ellipse clean and unbroken.
Judge proportions by measuring, not by memory. For example, a hypothetical teacup might have a rim width of 8 cm, a rim height of 3 cm, a body height of 7 cm, and a saucer width of 12 cm. These numbers are examples only; measure your own drawing and compare ratios. The rim height should be noticeably smaller than the rim width, and the saucer should be wider than the cup.
- Darken final contours over the construction lines.
- Erase axes and interior construction marks.
- Measure rim width, rim height, body height, and saucer width.
- Compare ratios and adjust any contour that is clearly off.
Worked example
A student draws a teacup with a rim width of 8 cm and rim height of 3 cm, a body height of 7 cm, a handle attached at two points, and a saucer width of 12 cm. The saucer's long axis is parallel to the rim's long axis. Check the proportions and attachment.
Worked answer
The rim height (3 cm) is smaller than the rim width (8 cm), so the ellipse reads correctly. The body height (7 cm) is close to the rim width, giving a cylindrical cup. The saucer width (12 cm) is wider than the cup, which is correct. The handle has two attachment points on the body contour. The drawing passes the proportion and attachment checks.
Four practice exercises
Exercise 1
Draw a teacup with a rim width of 10 cm and rim height of 4 cm. The body height is 8 cm. Add a handle with two attachment points and a saucer width of 14 cm. Describe the rim ellipse and saucer alignment.
Show answer and check
The rim ellipse has width 10 cm and height 4 cm, so it is wider than tall. The body height is 8 cm, tapering to a narrower base. The handle attaches near the rim and halfway down the body. The saucer ellipse has width 14 cm and its long axis is parallel to the rim's long axis.
Why: The rim height is smaller than the rim width, which makes a valid ellipse. The saucer is wider than the cup and aligned with the rim, so the construction is consistent.
Check: Measure the rim width and height and confirm height is smaller. Check that the handle has two attachment points on the body contour. Confirm the saucer's long axis is parallel to the rim's long axis.
Exercise 2
A drawing shows a cup with rim width 9 cm, rim height 5 cm, body height 6 cm, and a handle that touches the body at one point. The saucer width is 11 cm. Identify two problems and state fixes.
Show answer and check
Problem one: the handle touches at only one point, so it looks pasted on. Fix: mark two attachment points on the body contour and connect the handle between them. Problem two: the rim height (5 cm) is more than half the rim width (9 cm), making the ellipse too tall. Fix: reduce the rim height so it is clearly smaller than the width.
Why: A handle needs two attachment points to read as attached. An ellipse for a teacup rim seen from slightly above should have a height noticeably smaller than its width.
Check: Count the handle attachment points on the body contour. Compare rim height to rim width and confirm the height is clearly smaller.
Exercise 3
Draw a teacup with rim width 7 cm, rim height 2.5 cm, body height 6 cm, and saucer width 10 cm. The saucer's long axis is tilted 20 degrees away from the rim's long axis. State whether the alignment is acceptable and what to change.
Show answer and check
The alignment is not acceptable because the saucer's long axis should be parallel or nearly parallel to the rim's long axis. Change the saucer so its long axis matches the rim's long axis, then redraw the saucer ellipse.
Why: A tilted saucer axis makes the cup look unstable. Parallel axes keep the perspective consistent.
Check: Compare the two long axes. If they differ by more than a small amount, redraw the saucer with a parallel axis.
Exercise 4
A student draws a teacup with rim width 8 cm, rim height 3 cm, body height 7 cm, a two-point handle, and saucer width 12 cm. The cup base sits outside the saucer's inner ellipse. Identify the problem and the fix.
Show answer and check
The problem is that the cup base sits outside the saucer's inner ellipse, so the cup appears to float or overlap incorrectly. Fix: enlarge the saucer's inner ellipse or reposition the cup base so it sits inside the inner ellipse.
Why: The saucer's inner ellipse represents the recessed center where the cup rests. The base should sit within it for a stable construction.
Check: Trace the cup base and confirm it lies inside the saucer's inner ellipse. If not, adjust the inner ellipse or the base position.
Common mistakes
- Drawing the rim as a full circle instead of an ellipse. Mark a rim height smaller than the rim width and draw a symmetrical ellipse through four marks.
- Making the handle touch the body at only one point. Mark two distinct attachment points on the body contour and connect the handle curve between them.
- Tilting the saucer ellipse differently from the rim ellipse. Keep the long axes of the rim and saucer parallel, then redraw the saucer if needed.
- Using straight vertical sides that make the cup look like a mug. Taper the side lines slightly inward toward a narrower base curve.
Self-check rubric
- Rim is drawn as a symmetrical ellipse with height clearly smaller than width.
- Body tapers slightly inward from rim to a narrower base curve.
- Handle attaches at two distinct points on the body contour and arcs outward.
- Saucer is a wider ellipse with its long axis parallel to the rim's long axis.
- Cup base sits inside the saucer's inner ellipse.
- Final contours are clean and construction lines are erased.
- Proportions are measured and consistent in the same units.
Questions and answers
How do I know the rim ellipse is the right height?
Measure the rim width and rim height on your drawing. The height should be clearly smaller than the width, and the ellipse should be symmetrical across both axes.
Where should the handle attach?
Place one attachment point near the rim and one about halfway down the body, both on the body contour. The handle arcs outward between them.
Does the saucer have to be perfectly centered?
It should sit under the cup with its long axis parallel to the rim's long axis. Small centering differences are acceptable if the cup base stays inside the saucer's inner ellipse.
Can I use different letter styles or handwriting in labels?
Yes. The rubric judges proportions and attachment clarity, not a single handwriting style. Any legible labeling convention is acceptable.