Free original lessons
Realistic Full-Body Pencil Dragon: Scale Texture and Tonal Shading
Learn to draw a realistic dragon with consistent scale texture and full-body tonal shading using a defined pencil convention, step-by-step guidance, and checkable practice.
Free lesson
Four exercises
Worked answers
Object Drawing Lessons
This lesson teaches a repeatable pencil method for rendering a realistic dragon body with scale texture and coherent full-body shading. You will define a simple scale convention, map light and shadow across the whole body, and apply tonal steps that stay consistent from head to tail. The approach uses only pencil, paper, and an eraser, and it treats scale direction and tonal value as measurable choices rather than guesswork. Because letter styles and scale shapes vary, the rubric accepts any consistent convention that you define and follow. All planned resources are free but not yet built; the instructional text below is self-contained.
Practice materials: Printable downloads are not available for this lesson yet. Use the instructions and four exercises below.
Reference illustration
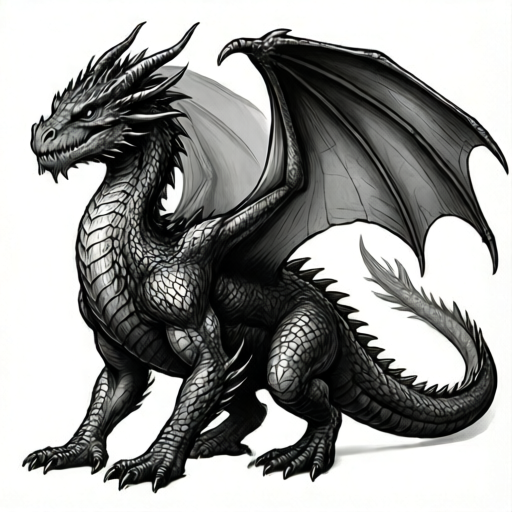
Use the stated measurements and conventions for each exercise.
Define a scale convention before drawing
A scale convention is a short written rule for how each scale is shaped, sized, and oriented. Write it at the top of your page, for example: rounded diamond scales, 4 mm wide, pointing toward the tail, rows offset by half a scale. This makes texture checkable and prevents random marks.
Scale size should shrink gradually toward the extremities. Choose a starting width for the torso and a smaller width for the limbs and tail, then interpolate. Keep the ratio simple, such as torso scales twice the width of toe scales, so you can verify it by counting.
Orientation follows body flow. Scales on the torso point toward the tail; on the limbs they point toward the toes; on the neck they point toward the head. Mark flow arrows lightly on the outline before adding texture.
- Write your scale convention in one sentence: shape, width, direction, row offset.
- Mark three flow arrows on the body: neck to head, torso to tail, limbs to toes.
- Draw one test row of five scales at torso width and measure the row length.
- Draw a second test row at limb width and compare the two widths.
- Adjust the convention until both rows look consistent and the widths differ by your chosen ratio.
Map full-body tonal zones
Full-body shading means one light source and one value plan across the entire dragon. Choose a single light direction, such as upper left, and mark it on the page. Then divide the body into four tonal zones: highlight, midtone, shadow, and core shadow.
Assign a pencil grade to each zone. For example, highlight uses 2H, midtone uses HB, shadow uses 2B, and core shadow uses 4B. These grades are hypothetical examples; test them on your paper and adjust to the values you can actually produce.
Keep zone boundaries soft where the body curves and sharper where forms overlap, such as under the jaw or behind the knee. The same four-zone plan must appear on the head, torso, limbs, and tail so the body reads as one object.
- Draw a light arrow showing the light direction.
- Outline four zones on the body with light pencil lines.
- Test each pencil grade on a scrap area and label the value it produces.
- Shade the torso first, then repeat the same zone pattern on limbs and tail.
- Check that every body part has all four zones represented.
Integrate texture with shading
Texture and tone must agree. A scale in shadow should be darker than the same scale in highlight, and the gap between scales should not be uniformly dark. Shade the body first in broad tonal steps, then draw scales over the tone, adjusting pencil pressure to match the zone beneath.
Where zones change, let scale edges soften. In core shadow, scale edges can nearly disappear; in highlight, keep edges crisp but light. This variation makes the texture feel wrapped around the form rather than pasted on.
Work in passes: a light pass for scale placement, a mid pass for tone, and a final pass for core shadows and edge cleanup. Stop each pass when the check method passes, not when the drawing feels finished.
- Complete a broad tonal pass with no scales.
- Draw scale rows in a light pass, following flow arrows.
- Increase pressure only inside shadow and core-shadow zones.
- Soften scale edges where zones transition.
- Erase highlight scale edges lightly to restore crispness.
Check consistency across the whole body
Consistency is the main realism signal. Compare scale width on the torso, forelimb, and tail by counting scales across a fixed 20 mm span. The counts should follow your chosen ratio within one scale.
Compare tonal values by holding the page at arm's length and squinting. Each body part should show a clear highlight, midtone, shadow, and core shadow. If a limb lacks a highlight or the tail lacks a core shadow, the body will look assembled rather than unified.
Finally, check flow. Every scale should point along its local flow arrow. Any scale pointing against the arrow is a texture error, not a style choice, under your written convention.
- Count scales across 20 mm on torso, forelimb, and tail.
- Squint at the page and confirm four zones on each body part.
- Trace each flow arrow and flag scales pointing against it.
- Correct the smallest number of scales needed to restore consistency.
- Record the final counts and zone check on the page margin.
Worked example
A dragon outline is 180 mm long from snout to tail tip. The torso is 60 mm wide, each forelimb is 20 mm wide, and the tail tapers from 30 mm to 10 mm. Using a convention of rounded diamond scales 4 mm wide on the torso and 2 mm wide on the toes, with rows offset by half a scale, plan the scale counts across a 20 mm span on the torso, forelimb, and tail tip, and state the four tonal zones to apply.
Worked answer
Torso: 20 mm divided by 4 mm gives 5 scales across the span. Forelimb: interpolate between 4 mm and 2 mm; at mid-limb use 3 mm, giving about 7 scales across 20 mm. Tail tip: 20 mm divided by 2 mm gives 10 scales. Rows are offset by half a scale everywhere. Apply four zones with one upper-left light: highlight on the upper-left surfaces, midtone on forward-facing surfaces, shadow on lower-right surfaces, and core shadow under the jaw, behind the knee, and beneath the tail. Check by counting scales across 20 mm on each part and squinting to confirm all four zones appear on head, torso, limbs, and tail.
Four practice exercises
Exercise 1
A dragon torso is 50 mm wide and a forelimb is 15 mm wide. Your convention uses 5 mm torso scales and 2.5 mm limb scales. How many scales fit across a 20 mm span on each part, and what is the width ratio?
Show answer and check
Torso: 20 divided by 5 equals 4 scales. Forelimb: 20 divided by 2.5 equals 8 scales. The ratio is 5 to 2.5, or 2 to 1.
Why: Divide the fixed span by the scale width for each part, then express the two widths as a simple ratio. The ratio confirms the extremity scales are half the torso width.
Check: Multiply each count by its scale width: 4 times 5 equals 20 mm and 8 times 2.5 equals 20 mm. Both return the original span.
Exercise 2
A tail tapers from 30 mm to 10 mm over 100 mm of length. If scale width shrinks linearly from 3 mm to 1 mm, what scale width applies at 50 mm along the tail, and how many scales fit across a 20 mm span there?
Show answer and check
At 50 mm the width is 2 mm, and 20 divided by 2 equals 10 scales across the span.
Why: Halfway along the taper, the width is halfway between 3 mm and 1 mm, which is 2 mm. Dividing the span by this width gives the count.
Check: Confirm the midpoint width lies between the end widths and that 10 times 2 mm equals 20 mm.
Exercise 3
A dragon is lit from the upper right. List the four tonal zones and state where each appears on the head, torso, and forelimb, assuming the light stays fixed.
Show answer and check
Highlight on upper-right surfaces, midtone on forward-facing surfaces, shadow on lower-left surfaces, and core shadow under the jaw, along the lower torso, and behind the elbow.
Why: A single fixed light produces the same relative zone pattern on every body part. Overlaps and recesses create core shadow regardless of body part.
Check: Squint at the drawing and confirm each part shows all four zones in the same relative positions.
Exercise 4
You count 6 scales across 20 mm on the torso and 9 scales across 20 mm on the forelimb. Your written convention says the forelimb scale width is half the torso width. Does the count match the convention, and what is the corrected forelimb count?
Show answer and check
No. Half the torso width means twice the count, so the forelimb should show 12 scales across 20 mm, not 9.
Why: Torso width is 20 divided by 6, about 3.33 mm. Half that is about 1.67 mm, and 20 divided by 1.67 is about 12 scales.
Check: Multiply 12 by 1.67 mm to get about 20 mm, and confirm the ratio of counts is 2 to 1.
Common mistakes
- Drawing scales at one uniform size across the whole body. Set a torso width and a smaller extremity width, then interpolate between them along each limb and the tail.
- Shading each body part separately with different light directions. Mark one light arrow before shading and repeat the same four-zone pattern on every body part.
- Making every gap between scales equally dark. Vary gap darkness with the tonal zone beneath, keeping gaps light in highlights and darker only in shadow.
- Letting scale direction change randomly across the torso. Draw flow arrows first and check each scale against its local arrow before increasing pressure.
Self-check rubric
- A written scale convention states shape, width, direction, and row offset.
- Scale width decreases from torso to extremities by a stated ratio within one scale.
- Every scale points along its local flow arrow.
- One light direction is marked and used on all body parts.
- Each body part shows highlight, midtone, shadow, and core shadow.
- Scale edges soften in shadow and stay crisp in highlight.
- Scale counts across a 20 mm span match the planned ratio within one scale.
- Valid alternative conventions are accepted if they are written, consistent, and checkable.
Questions and answers
Do I need a specific scale shape to be realistic?
No. Realism comes from consistency, size gradation, and agreement with tone. Any shape works if your written convention defines it and you follow it across the body.
How many pencil grades do I need?
Four grades are enough for four tonal zones. Test them on your paper first, because the same grade can produce different values on different surfaces.
Should I shade first or draw scales first?
Shade broad tonal zones first, then draw scales over them. This keeps texture tied to form and prevents scales from fighting the light.
How do I know when the shading is consistent?
Squint at the page from arm's length. Each body part should show highlight, midtone, shadow, and core shadow in the same relative positions.