Free original lessons
Realistic Horse Head Drawing: Proportion, Eye Placement, and Pencil Shading
Learn to draw a realistic horse head using measured proportions, eye and ear placement, jaw curve, and controlled pencil shading from two angles.
Free lesson
Four exercises
Worked answers
Object Drawing Lessons
A believable horse head depends less on fancy shading than on a few reliable relationships: where the eye sits between poll and muzzle, how the muzzle tapers, how the jaw curves back toward the throat, and how the ears angle from the top of the skull. This lesson gives you a simple, measurable convention for those relationships, then shows how to shade the head so the form reads clearly. You will work from a proportion scaffold and a shaded reference plate, both planned as free printables, and you will draw the head from a side view and a three-quarter view. All measurements are relative to the head length you choose, so the method scales to any paper size. Use a pencil you can control, a soft eraser, and paper that accepts light pressure without smudging badly. The goal is a head that looks structurally correct and convincingly shaded, not a portrait of one specific horse.
Practice materials: Printable downloads are not available for this lesson yet. Use the instructions and four exercises below.
Reference illustration
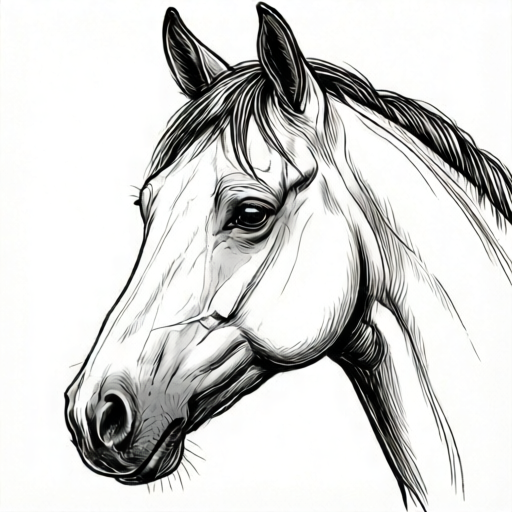
Use the stated measurements and conventions for each exercise.
Set a proportion convention before you draw
Define the head length as the distance from the top of the poll, the highest point between the ears, to the front of the muzzle. Call this one head unit. Every other measurement in this lesson is a fraction of that unit, so the drawing stays consistent whether your head unit is 10 cm or 20 cm.
Place the eye line at about one third of the head unit down from the poll when the head is in a neutral side view. The exact fraction varies with breed and head carriage, so treat one third as a starting convention and adjust after comparing your scaffold to a real horse photograph. The muzzle tapers from the cheek toward the nose; the jaw curve runs from below the ear back and down toward the throat, forming a soft arc rather than a straight line.
Mark the ear angle from the poll: draw a short line from the poll toward the tip of each ear and note the angle it makes with the vertical. In a relaxed side view the ear often leans slightly forward; in an alert three-quarter view it may stand more upright. Record your chosen angle in degrees as a hypothetical example, such as 20 degrees forward of vertical, and keep it consistent across both views.
- Draw a vertical line for the face axis and mark the poll and muzzle front to set the head unit.
- Mark the eye line at one third of the head unit below the poll and check it against a reference photo.
- Sketch the muzzle taper as two converging lines from the cheek to the nose.
- Draw the jaw curve as a soft arc from below the ear toward the throat.
- Add ear lines from the poll at your recorded angle and compare both views for consistency.
Place the eye and ear with checkable relationships
The eye is not centered on the side of the head. In side view it sits roughly halfway between the poll and the muzzle front horizontally, and close to the eye line vertically. A useful check is to measure from the eye to the poll and from the eye to the muzzle front; these distances should be similar, within about one tenth of the head unit.
The ear base sits just behind and above the eye on the skull. Draw a line from the eye to the ear base and compare its length with the ear length; in many relaxed poses the ear is roughly half to two thirds of that distance. These are conventions, not fixed rules, so verify against your reference and adjust.
In three-quarter view the far eye appears closer to the face edge and slightly higher or lower depending on head tilt. Keep the eye line continuous across the face and check that both eyes sit on the same imaginary band. Ear placement follows the same poll-to-ear-base relationship, but the far ear may be partly hidden by the near ear or the forehead.
- Mark the eye position and measure eye-to-poll and eye-to-muzzle distances.
- Adjust the eye until those two distances are within one tenth of the head unit.
- Mark the ear base behind and above the eye, then draw the ear at your recorded angle.
- Repeat on the three-quarter view, keeping both eyes on one eye band.
- Check that the far ear is partly hidden or offset consistently with the head turn.
Shade the head so the form reads
Shading should describe planes, not decorate the outline. Decide where the light comes from, then shade the side of the face away from the light, the underside of the jaw, the hollow behind the eye, and the shadow inside the ear. Keep the muzzle bridge lighter unless your light source says otherwise.
Build tone in layers: first a light even layer over the shadow side, then a second layer in the deepest areas such as under the jaw and inside the ear. Use the side of the pencil for broad areas and the tip for edges. Avoid outlining the whole head with a hard line; let edges appear where tone changes.
A shaded reference plate planned for the printable will show these zones, but you can shade from life or a photo now. Check your shading by squinting: the dark areas should form a simple shape that supports the head structure, not a random patchwork.
- Choose one light direction and mark the shadow side lightly.
- Layer tone first on the broad shadow side, then deepen under the jaw and inside the ear.
- Keep the muzzle bridge and cheek highlights lighter where the light falls.
- Soften edges where form turns gradually and sharpen edges only at clear boundaries.
- Squint at the drawing to check that the dark shapes read as one coherent form.
Draw the head from two angles
The practice sheet planned for the printable will include a faint proportion scaffold for a side view and a three-quarter view. Until then, draw your own scaffold using the head unit and eye line described above. The side view is the clearest place to learn the muzzle taper and jaw curve; the three-quarter view tests whether your eye and ear placement holds when the head turns.
Draw the side view first, then rotate the same scaffold mentally for the three-quarter view. Keep the head unit the same in both drawings so you can compare proportions directly. The far side of the face compresses in three-quarter view, so the distance from the near eye to the far eye edge shortens.
Compare the two drawings side by side. The eye line, ear angle, and jaw curve should feel related, not copied. If one view looks wrong, measure the eye-to-poll and eye-to-muzzle distances again before changing the shading.
- Draw the side-view scaffold and complete the head with eye, ear, jaw, and muzzle.
- Draw the three-quarter scaffold using the same head unit.
- Place the near eye and far eye on one eye band and check the shortened far-side distance.
- Shade both views with the same light direction.
- Compare the two drawings and correct proportion errors before refining tone.
Worked example
A side-view horse head has a head unit of 15 cm. The eye is marked 5 cm below the poll. The distance from the eye to the poll is 7 cm and from the eye to the muzzle front is 8 cm. Is the eye placement acceptable under the convention, and what adjustment would you make?
Worked answer
The eye line at 5 cm below the poll is exactly one third of 15 cm, so the vertical placement matches the convention. The horizontal check compares 7 cm and 8 cm; the difference is 1 cm, which is less than one tenth of the head unit (1.5 cm), so the placement is acceptable. No adjustment is needed, but you could move the eye 0.5 cm toward the muzzle to make the two distances equal if you want a stricter check.
Four practice exercises
Exercise 1
A side-view scaffold uses a head unit of 20 cm. Mark the eye line at one third of the head unit below the poll. The eye is then placed 9 cm from the poll and 10 cm from the muzzle front. Does the horizontal placement pass the convention check?
Show answer and check
Yes, it passes. The difference between 9 cm and 10 cm is 1 cm, which is less than one tenth of the head unit (2 cm).
Why: The eye line is at 20 divided by 3, about 6.7 cm below the poll, which matches the one-third convention. The horizontal check requires the two distances to be within one tenth of the head unit, and 1 cm is within 2 cm.
Check: Subtract the smaller distance from the larger and compare the result with one tenth of the head unit. If the difference is smaller, the placement passes.
Exercise 2
In a three-quarter view with a head unit of 18 cm, the near eye is 8 cm from the poll and 7 cm from the muzzle front. The far eye is drawn 11 cm from the poll. Is the far eye consistent with the near eye under the convention?
Show answer and check
No. The far eye is too far from the poll for a three-quarter view; it should be closer to the near eye and the far-side distance should shorten.
Why: In three-quarter view the far side of the face compresses, so the far eye should not be farther from the poll than the near eye by a large margin. The near-eye distances differ by 1 cm, which is within one tenth of 18 cm (1.8 cm), so the near eye is acceptable. The far eye at 11 cm is 3 cm beyond the near eye's 8 cm, which is more than 1.8 cm and suggests the head turn is not reflected.
Check: Compare the far-eye distance with the near-eye distance and with one tenth of the head unit. If the far eye is farther by more than one tenth of the head unit, adjust it toward the near eye.
Exercise 3
A muzzle is drawn 6 cm wide at the nose on a head unit of 15 cm. The cheek width is 10 cm. Does the muzzle taper match the convention of a nose width about one third of the head unit?
Show answer and check
Yes. One third of 15 cm is 5 cm, and 6 cm is close to that convention; the muzzle also tapers from 10 cm at the cheek to 6 cm at the nose.
Why: The convention gives a nose width of about 5 cm for a 15 cm head unit. A 6 cm nose is within a reasonable margin and the taper from 10 cm to 6 cm shows converging lines rather than a blunt muzzle.
Check: Divide the head unit by three and compare with the nose width. Also check that the nose width is smaller than the cheek width, confirming a taper.
Exercise 4
A shaded side-view head has its light coming from the upper left. The artist shades the right side of the face, the underside of the jaw, the hollow behind the eye, and the inside of the ear. The muzzle bridge is left light. Does the shading plan follow one light direction?
Show answer and check
Yes. With light from the upper left, the right side, under-jaw, eye hollow, and ear interior are shadow zones, and the muzzle bridge stays light.
Why: The chosen zones are consistent with a single light direction from the upper left. The shadow side is opposite the light, the under-jaw receives less light, and the eye hollow and ear interior are recessed areas. Keeping the muzzle bridge light supports the same direction.
Check: Name the light direction, then list each shaded zone and ask whether it faces away from that light. If all zones are consistent, the shading plan passes.
Common mistakes
- Making the muzzle too blunt or too wide. Taper the muzzle with two converging lines from the cheek to the nose and check the width at the nose against about one third of the head unit.
- Placing the eye too high or too low on the face. Mark the eye line at one third of the head unit below the poll, then measure eye-to-poll and eye-to-muzzle and adjust until they are within one tenth of the head unit.
- Drawing the jaw as a straight line. Replace the straight line with a soft arc from below the ear toward the throat, and check that the arc curves outward before turning down.
- Shading randomly without a light direction. Choose one light direction, shade the opposite side and the underside of the jaw first, then deepen only the hollow behind the eye and inside the ear.
- Copying the side-view ear angle into the three-quarter view without adjustment. Keep the recorded ear angle as a convention but offset the far ear and shorten the far-side distances to match the head turn.
Self-check rubric
- Head unit is clearly defined and used consistently in both views.
- Eye line is marked at about one third of the head unit below the poll, with eye-to-poll and eye-to-muzzle distances within one tenth of the head unit.
- Muzzle tapers with converging lines and the nose width is checked against about one third of the head unit.
- Jaw curve is a soft arc from below the ear toward the throat, not a straight line.
- Ear angle is recorded and applied consistently, with the far ear offset in three-quarter view.
- Shading follows one light direction and groups the shadow side, under-jaw, eye hollow, and ear interior into coherent shapes.
- Edges are soft where form turns gradually and sharper only at clear boundaries.
- Valid alternative proportions are accepted when the recorded measurements and checks support them.
Questions and answers
How long should the head unit be?
Choose any length that fits your paper, such as 12 cm as a hypothetical example. All other measurements are fractions of that unit, so the drawing scales.
Where exactly should the eye go?
Start with the eye line at one third of the head unit below the poll and the eye roughly halfway between poll and muzzle front. Then measure eye-to-poll and eye-to-muzzle and adjust until they are within one tenth of the head unit.
Do I need a real horse to practice?
No. Use a clear photograph or the planned shaded reference plate. The proportion checks work from any clear side or three-quarter view.
How do I know my shading is working?
Squint at the drawing. The dark areas should form a simple shape that supports the head structure, with the shadow side, under-jaw, eye hollow, and ear interior reading as related zones.