Free original lessons
Drawing Facial Structure with Skull Planes, Cheekbones and Jaw Construction
Learn to build a face from skull mass, cheekbone planes and jaw lines using a repeatable construction sequence and simple landmark checks.
Free lesson
Four exercises
Worked answers
Object Drawing Lessons
Facial structure becomes manageable when you stop copying features and start building the head as a set of connected planes. This lesson treats the skull as a mass, the cheekbones as angled shelves, and the jaw as a constructed line that ties the lower face together. You will work from large shapes to smaller landmarks, using a convention where x-height means the distance from baseline to midline in any lettering or labeling you add. Letter styles vary, so the rubric accepts any legible style that respects that convention. All measurements are simple and checkable, and any numerical values are hypothetical examples you can replace with measurements from your own paper and tools.
Practice materials: Printable downloads are not available for this lesson yet. Use the instructions and four exercises below.
Reference illustration
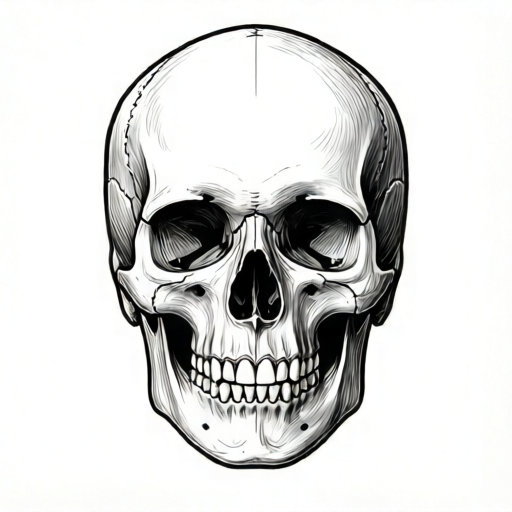
Use the stated measurements and conventions for each exercise.
Start with the skull mass, not the features
Begin by drawing a rounded mass for the cranium and a tapering lower block for the face. Think of the head as two connected volumes: an upper sphere-like mass and a lower wedge that narrows toward the chin. Keep the outline light so you can adjust proportions before adding planes.
Place a vertical midline and a horizontal line through the approximate eye level. These two lines are your reference grid. On a typical adult head, the eye line sits near the middle of the total head height, but treat that as a starting guide rather than a rule. Measure your own drawing and adjust.
- Draw a light oval for the cranium, wider at the top than at the temples.
- Add a tapering lower block from the temples to the chin.
- Mark a vertical midline and a horizontal eye-level line.
- Check that the lower block is roughly half the total head height; adjust if needed.
Build cheekbone planes as angled shelves
The cheekbones are not dots; they are planes that catch light and create the transition from the side of the head to the front of the face. Draw them as short angled lines from the outer eye corners toward the ear area, then slope them down toward the jaw. These lines describe the shelf of the zygomatic area without labeling anatomy.
Keep the left and right cheekbone planes roughly symmetrical in angle and length. A simple check is to compare the distance from the midline to each cheekbone line at the same height. If one side is noticeably longer, adjust before continuing.
- Mark the outer corner of each eye on the eye-level line.
- Draw a short angled line from each outer eye corner toward the ear area.
- Slope a second line from the cheekbone shelf down toward the jaw corner.
- Compare left and right lengths at the same height and adjust for balance.
Construct the jaw line and chin
The jaw line connects the lower cheekbone plane to the chin. Draw it as a constructed line with a clear corner near the ear and a gentle curve toward the chin. Avoid making the jaw a single smooth arc; the corner gives the lower face structure.
Place the chin on the midline and check its width against the eye line. A common starting guide is that the chin width is narrower than the distance between the outer eye corners, but measure your own drawing rather than assuming. Keep the jaw line light until the chin and cheekbone planes agree.
- Mark a jaw corner below each ear area.
- Draw a line from each jaw corner toward the chin, keeping a slight angle at the corner.
- Place the chin on the midline and check its width against the eye line.
- Refine the jaw line so it meets the cheekbone plane without a gap or overlap.
Use landmark guides and a blank grid to check the build
A landmark guide is a set of reference points: midline, eye line, cheekbone shelf, jaw corner and chin. A blank grid helps you compare distances without measuring every line. Draw a simple grid of squares over your construction and check that the eye line, cheekbone shelf and jaw corner fall at consistent heights on both sides.
Label your landmarks using a clear lettering convention. X-height is the distance from baseline to midline, and letter styles vary, so any legible style that keeps that proportion is acceptable. The goal is a construction you can read and correct, not a single universal answer.
- Draw a light grid of equal squares over the head construction.
- Mark the midline, eye line, cheekbone shelf, jaw corner and chin on the grid.
- Compare left and right landmark heights and adjust any obvious mismatch.
- Label each landmark with legible lettering that respects the x-height convention.
Worked example
Construct a face from planes on a sheet where the total head height is 12 cm. Use a midline, an eye line at about half the head height, cheekbone shelves from the outer eye corners, jaw corners below the ears, and a chin on the midline. Check left-right balance with a simple grid.
Worked answer
Draw a 12 cm tall head mass with a midline. Place the eye line at about 6 cm from the top as a starting guide. Mark outer eye corners on that line, draw cheekbone shelves toward the ear area, then jaw corners below the ears and a chin on the midline. Use a grid of 2 cm squares to compare landmark heights; adjust any side that differs by more than one small square. Label landmarks with legible lettering that respects the x-height convention.
Four practice exercises
Exercise 1
On a sheet, draw a head mass 10 cm tall with a midline and an eye line at about half the height. Add cheekbone shelves from the outer eye corners and jaw corners below the ears. Check left-right balance with a 2 cm grid.
Show answer and check
A 10 cm head mass with a midline, an eye line near 5 cm from the top as a starting guide, cheekbone shelves from the outer eye corners, jaw corners below the ears, and a chin on the midline. The grid check shows landmark heights within one small square on both sides.
Why: The construction follows the sequence: skull mass, reference lines, cheekbone planes, jaw corners, chin. The grid provides a simple checkable comparison without relying on a single universal answer.
Check: Measure the head height and eye-line height with a ruler. Count grid squares between left and right landmarks at the same level; adjust if the difference exceeds one small square.
Exercise 2
Draw a face construction where the jaw line has a clear corner below each ear and a chin on the midline. Use a 12 cm head height and a 3 cm grid. Describe how you checked that the jaw corners are at the same height.
Show answer and check
A 12 cm head construction with jaw corners below each ear, a chin on the midline, and a 3 cm grid overlay. The jaw corners fall on the same grid line or within one small square of each other.
Why: The jaw corner is a structural landmark; comparing heights on a grid makes the check simple and repeatable. The chin on the midline ties the lower face together.
Check: Place the grid over the drawing and note the grid line nearest each jaw corner. If they differ by more than one small square, adjust the lower corner upward or the higher corner downward.
Exercise 3
Construct a face from planes on a 14 cm tall head. Mark the eye line at about 7 cm from the top as a starting guide, draw cheekbone shelves, and label the midline, eye line, cheekbone shelf, jaw corner and chin using legible lettering that respects the x-height convention.
Show answer and check
A 14 cm head construction with a midline, an eye line near 7 cm from the top, cheekbone shelves, jaw corners and chin, plus legible labels for each landmark. Any letter style is acceptable if the x-height convention is respected.
Why: Labeling makes the construction readable and checkable. The x-height convention gives a consistent standard while allowing valid alternative letter styles.
Check: Confirm each label is legible and that the baseline-to-midline distance is consistent across labels. Check that all five landmarks are labeled and that the eye line is near the stated starting guide.
Exercise 4
Draw a face construction and then test it: compare the distance from the midline to each cheekbone line at the same height. If one side is longer by more than one grid square, adjust it. Use a 9 cm head height and a 1.5 cm grid.
Show answer and check
A 9 cm head construction with cheekbone lines compared at the same height using a 1.5 cm grid. Any difference greater than one small square is adjusted so the left and right cheekbone lengths are balanced within the grid check.
Why: The cheekbone planes should read as balanced shelves. A grid comparison gives a simple arithmetic check without requiring a single universal answer.
Check: Count grid squares from the midline to each cheekbone line at the same height. If the counts differ by more than one square, shorten the longer line or extend the shorter one and recheck.
Common mistakes
- Drawing features before the skull mass and jaw are balanced. Complete the skull mass, cheekbone planes and jaw line first, then add features only after the construction checks pass.
- Making the jaw a single smooth arc with no corner. Mark a jaw corner below each ear area and draw a slight angle there before curving toward the chin.
- Treating cheekbones as dots instead of planes. Draw short angled lines that describe the shelf from the outer eye corner toward the ear area and down toward the jaw.
- Ignoring left-right balance until the end. Compare cheekbone line lengths and jaw corner heights at the same level after each construction step.
Self-check rubric
- Skull mass and lower face block are drawn before features.
- Midline and eye-level line are present and used as references.
- Cheekbone planes are drawn as angled shelves, not dots.
- Jaw line includes a corner near the ear and connects to the chin.
- Left-right landmark heights and cheekbone lengths are compared and adjusted.
- Landmark labels are legible and respect the x-height convention; alternative letter styles are acceptable.
Questions and answers
Do I need to label bones or muscles?
No. This lesson builds facial structure from planes and landmarks only; labeling anatomy is outside the scope.
What does x-height mean here?
X-height is the distance from baseline to midline in any lettering or labeling you add. Letter styles vary, so keep that proportion consistent and legible.
Are the numerical guides fixed rules?
No. Any numbers mentioned are hypothetical examples. Measure your own paper and tools, and adjust the construction to your drawing.
How do I know when the construction is balanced?
Use the grid check: compare landmark heights and cheekbone line lengths on both sides at the same level. Small differences are acceptable if the overall structure reads clearly.