Free original lessons
Shad Drawing: Body Outline, Fin Placement, and Scale Detail
Learn to draw a shad with accurate body shape, labeled fin positions, and a repeatable scale pattern using a clear construction sequence and self-checks.
Free lesson
Four exercises
Worked answers
Object Drawing Lessons
This lesson teaches a shad-specific drawing method: build a fusiform body outline, place the dorsal, pectoral, pelvic, anal, and caudal fins in anatomically plausible positions, then add a scale pattern that follows the body's curvature. You will use a simple convention for scale rows and a rubric that accepts valid stylistic variation. All measurements are hypothetical examples; measure your own paper and tools before drawing.
Practice materials: Printable downloads are not available for this lesson yet. Use the instructions and four exercises below.
Reference illustration
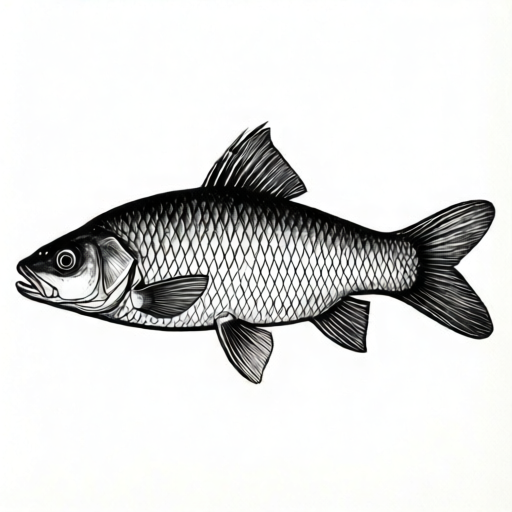
Use the stated measurements and conventions for each exercise.
Body Outline: Fusiform Shape and Proportions
A shad has a streamlined, fusiform body that is deepest roughly one-third of the body length behind the snout and tapers toward the tail. Begin with a light construction line: a horizontal axis for the body's centerline and a vertical line marking the deepest point, roughly one-third of the body length from the snout. Draw the dorsal (top) and ventral (bottom) curves as smooth arcs that meet at the snout and narrow to the caudal peduncle. Keep the belly curve slightly fuller than the back curve for a natural shad profile.
Use a simple proportion convention: body length from snout tip to caudal fin base equals about three times the maximum body depth. Mark the snout, the deepest point, and the caudal peduncle first, then connect with curves. Check symmetry by folding the paper along the centerline or by measuring the distance from the centerline to the top and bottom curves at three points.
- Draw a horizontal centerline and mark snout tip, deepest point, and caudal peduncle.
- Set maximum body depth as one-third of body length (hypothetical example: 18 cm length, 6 cm depth).
- Draw the dorsal curve from snout to peduncle, then the ventral curve, keeping the belly slightly fuller.
- Erase construction marks only after confirming smooth, continuous outlines.
Fin Placement: Dorsal, Pectoral, Pelvic, Anal, and Caudal
Place fins relative to body landmarks, not by eye alone. The dorsal fin sits above the deepest body point (which is about one-third of body length from the snout). Pectoral fins attach just behind the head, low on the side. Pelvic fins sit below and slightly behind the dorsal fin's front edge. The anal fin sits on the ventral edge, closer to the tail than the pelvic fins. The caudal fin attaches at the peduncle and is forked in shad; draw two lobes with a notch.
Use a fin-length convention: dorsal fin height about one-quarter of body depth; pectoral fin length about one-fifth of body length; caudal fin length about one-quarter of body length. These are hypothetical examples for practice. Check placement by drawing light vertical guides from each fin's base to the centerline and confirming the order of fin bases along the body from head to tail: pectoral, dorsal, pelvic, anal, caudal base.
- Mark the dorsal fin base above the deepest point; draw a triangular fin with a slightly rounded leading edge.
- Attach pectoral fins just behind the head, angled downward and backward.
- Place pelvic fins below the dorsal fin's front third, smaller than pectorals.
- Draw the anal fin on the ventral edge near the tail, then the forked caudal fin at the peduncle.
- Label each fin lightly and check order along the body.
Scale Detail: Rows That Follow the Body
Shad scales are small and overlapping. Use a row convention: draw curved scale rows that follow the body's contour, spaced evenly, with each scale overlapping the one behind it. Start rows at the lateral line (a faint line along the mid-side) and work outward. Keep scale size consistent: about one-tenth of body depth per scale in this convention. Vary row curvature near the belly and back to match the outline.
Check scale detail by counting rows across the deepest point and confirming even spacing. A valid alternative is a simplified pattern of short curved strokes rather than full scale outlines, as long as rows follow the body and overlap consistently.
- Draw a faint lateral line from behind the head to the caudal peduncle.
- Mark evenly spaced points along the lateral line for scale row starts.
- Draw curved rows outward toward back and belly, overlapping each scale slightly.
- Check row count and spacing at the deepest point; adjust before darkening.
Self-Check and Rubric Use
Before finalizing, check body proportion, fin order, and scale row consistency. Use the rubric to score each feature from 1 to 3. A score of 2 or 3 on all features indicates a complete shad drawing. Valid alternatives include simplified scale strokes, slightly different fin shapes, and minor proportion changes, provided the anatomical order and body shape remain recognizable.
- Measure body length and depth; confirm the 3:1 ratio within a small tolerance.
- Confirm fin order: pectoral, dorsal, pelvic, anal, caudal base.
- Count scale rows at the deepest point; confirm even spacing.
- Score each rubric feature and revise the lowest-scoring one.
Worked example
Draw a shad side view on paper 20 cm wide. Use body length 15 cm and maximum depth 5 cm. Place all five fins and add scale rows at 1 cm spacing along the lateral line.
Worked answer
Mark the snout at 1 cm from the left edge and the caudal peduncle (caudal fin base) at 16 cm, giving a body length of 15 cm. Place the deepest point 5 cm behind the snout (one-third of 15 cm), with maximum depth 5 cm split as 2.5 cm above and 2.5 cm below the centerline. Draw the dorsal fin base directly above the deepest point, with height 1.25 cm (one-quarter of 5 cm depth). Attach the pectoral fin base about 2 cm behind the snout, with length 3 cm (one-fifth of 15 cm). Place the pelvic fin base about 7 cm behind the snout, below the front third of the dorsal fin, with length 2 cm. Draw the anal fin on the ventral edge about 13 cm behind the snout, closer to the tail than the pelvic fins. Draw the forked caudal fin at the peduncle with length 3.75 cm (one-quarter of 15 cm), so its tips reach about 19.75 cm from the left edge, within the 20 cm paper. Begin scale rows every 1 cm along the lateral line and curve them outward toward back and belly, overlapping each scale consistently.
Four practice exercises
Exercise 1
On a 24 cm wide paper, draw a shad with body length 18 cm and maximum depth 6 cm. Mark the deepest point and place the dorsal fin base above it. State the dorsal fin height using the one-quarter depth convention.
Show answer and check
Deepest point at 6 cm from snout; dorsal fin base above it; dorsal fin height 1.5 cm.
Why: Body depth 6 cm; one-quarter of depth is 1.5 cm. Deepest point is one-third of body length from snout: 18 divided by 3 equals 6 cm.
Check: Measure from snout to deepest point (should be about 6 cm) and measure dorsal fin height (about 1.5 cm). Confirm the fin base aligns vertically with the deepest point.
Exercise 2
Draw a shad body outline 12 cm long and 4 cm deep. Place pectoral, pelvic, and anal fins. Use pectoral length one-fifth of body length and pelvic length half of pectoral length. List the fin order from head to tail.
Show answer and check
Pectoral length 2.4 cm; pelvic length 1.2 cm; order of the fins placed: pectoral, pelvic, anal (with the caudal base as the tail reference).
Why: Pectoral length is 12 divided by 5 equals 2.4 cm. Pelvic is half of 2.4 equals 1.2 cm. Fin order follows body landmarks from head to tail.
Check: Measure pectoral and pelvic fin lengths against the calculated values. Trace a line from head to tail and confirm the order of fin bases.
Exercise 3
A shad drawing has body length 15 cm and depth 5 cm. You plan scale rows every 1 cm along a 12 cm lateral line. How many row starts will you mark, and what is the scale size convention if each scale is one-tenth of body depth?
Show answer and check
12 row starts; scale size 0.5 cm. Mark row starts at 1, 2, ..., 12 cm along the lateral line (12 starts, excluding the 0 cm endpoint).
Why: 12 cm lateral line divided by 1 cm spacing equals 12 starts. One-tenth of 5 cm depth equals 0.5 cm per scale.
Check: Count marks along the lateral line (should be 12) and measure one scale against 0.5 cm.
Exercise 4
Draw a forked caudal fin for a shad with body length 16 cm. Use caudal fin length one-quarter of body length. Describe how you check the notch is centered and the two lobes are equal.
Show answer and check
Caudal fin length 4 cm; notch centered on the peduncle axis; lobes equal by measuring from notch to each lobe tip.
Why: 16 divided by 4 equals 4 cm. A centered notch and equal lobe lengths produce a symmetrical fork.
Check: Measure caudal fin length (about 4 cm), then measure from the notch to each lobe tip; the two measurements should match within a small tolerance.
Common mistakes
- Drawing a deep, round body instead of a fusiform shad shape. Set maximum depth to one-third of body length and taper smoothly to the peduncle.
- Placing the dorsal fin too far forward or backward. Align the dorsal fin base above the deepest body point using a vertical guide.
- Drawing scale rows as straight lines that ignore body curvature. Curve each row to follow the outline and overlap scales consistently.
- Making the caudal fin rounded instead of forked. Draw two lobes with a clear notch at the center of the caudal fin.
Self-check rubric
- Body outline is fusiform with deepest point about one-third of body length from the snout and smooth taper to peduncle (1-3).
- All five fins are present and in correct order along the body (1-3).
- Caudal fin is forked with a clear notch (1-3).
- Scale rows follow body curvature with even spacing and consistent overlap (1-3).
- Labels or self-check marks show fin positions and scale row count (1-3).
Questions and answers
Do I need to draw every scale?
No. A simplified pattern of overlapping curved strokes in rows is a valid alternative if rows follow the body and spacing is even.
How do I know the fins are in the right order?
Use vertical guides: pectoral behind the head, dorsal above the deepest point, pelvic below the dorsal front, anal near the tail, caudal at the peduncle. From head to tail the fin bases run pectoral, dorsal, pelvic, anal, caudal base.
What if my body proportion is slightly off?
Small deviations are acceptable if the body remains streamlined and the deepest point is near one-third of body length from the snout. Check with the 3:1 length-to-depth convention.
Can I use a different scale size?
Yes, as long as scale size is consistent and rows follow the body contour. State your convention before drawing.