Free original lessons
Crappie Drawing: Body, Fins, and Scale Construction
Learn to draw a crappie with correct body shape, fin placement, and scale rows using a simple construction method and checkable steps.
Free lesson
Four exercises
Worked answers
Object Drawing Lessons
This lesson teaches a repeatable method for drawing a crappie: a deep-bodied sunfish with a sloping forehead, joined spiny and soft dorsal fins, a large anal fin, and overlapping scale rows. You will build the fish from a few measured guide lines, place fins by proportion, and add scales in staggered rows. The convention for scale rows is a staggered grid: each row offsets half a scale from the row above, and scales overlap from head to tail. Letter styles and exact scale shapes vary, so the rubric rewards consistent row spacing and overlap direction rather than one universal pattern. All measurements below are hypothetical examples; measure your own paper and tools before drawing.
Practice materials: Printable downloads are not available for this lesson yet. Use the instructions and four exercises below.
Reference illustration
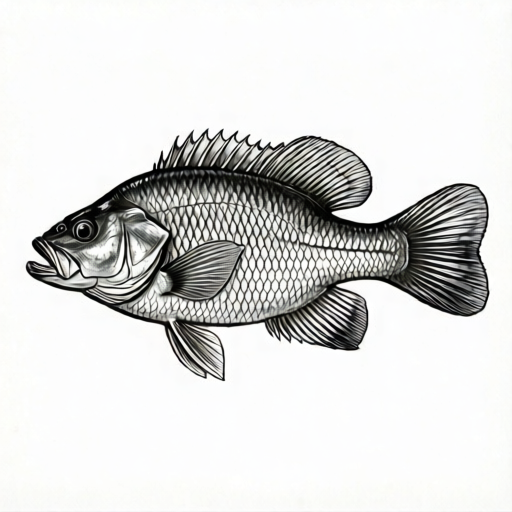
Use the stated measurements and conventions for each exercise.
Body Outline and Proportions
Start with a horizontal body line equal to the fish length. Crappie bodies are deep: a common proportion is body depth about one-third of total length, but treat that as a starting guide, not a rule. Mark the deepest point slightly behind the midpoint. The forehead slopes down to the mouth, and the back rises in a gentle curve to the dorsal fin base.
Draw the outline in two arcs: a back curve from the snout over the deepest point to the tail base, and a belly curve from the lower jaw to the tail base. Keep the belly fuller than the back. The tail base should be narrow, roughly one-eighth of body depth.
- Draw a horizontal line for total length and mark the midpoint.
- Mark body depth as about one-third of length at a point just behind the midpoint.
- Sketch the back arc and belly arc to meet at a narrow tail base.
- Check that the forehead slopes and the belly is fuller than the back.
Fin Placement
Crappie have a spiny dorsal fin joined to a soft dorsal fin along the back, a large anal fin below, and a forked tail. Place the dorsal fin base from about one-third to two-thirds of the body length, measured from the snout. The spiny portion is shorter and taller; the soft portion is longer and lower. The anal fin sits below the soft dorsal, roughly from two-thirds to four-fifths of body length.
Pectoral fins sit just behind the gill cover, and pelvic fins sit below and slightly behind the pectorals. Draw fins as folded fans: a base line, then rays that spread outward. Keep fin rays slightly curved and spaced evenly.
- Mark the dorsal fin base from one-third to two-thirds of body length.
- Divide that base into a shorter spiny front and a longer soft rear.
- Place the anal fin below the soft dorsal, from two-thirds to four-fifths of body length.
- Add pectoral and pelvic fins behind the gill cover and below it.
- Draw fin rays as evenly spaced curved lines from the base.
Scale Rows and Overlap
Use a staggered row convention: draw scale rows as arcs that curve toward the tail, with each row offset half a scale from the row above. Scales overlap from head to tail, so the free edge of each scale points toward the tail. Row spacing should be consistent; a practical example is rows about one-tenth of body depth apart, but measure your own drawing and adjust.
Begin at the lateral line, a faint line running from the gill cover to the tail base. Draw the first row along that line, then add rows above and below, offsetting each by half a scale. Stop rows at the fin bases and gill cover. Keep scale size smaller near the tail and slightly larger near the head.
- Draw a faint lateral line from gill cover to tail base.
- Mark row spacing as a consistent fraction of body depth.
- Draw the first scale row along the lateral line with free edges pointing tailward.
- Add rows above and below, offsetting each by half a scale.
- Stop rows at fin bases and the gill cover, and vary scale size gradually.
Checking and Refining
Check proportions with simple arithmetic: if total length is 18 units, body depth is about 6 units, and the tail base is about 0.75 units. Check fin bases against body length fractions. Check scale rows by counting offsets: each row should shift by half a scale, and overlap direction should be consistent.
Refine by erasing guide lines lightly and darkening the final outline. Keep fin rays and scale rows visible but not crowded. If a fin base crosses a scale row, stop the row at the fin base rather than drawing through it.
- Measure total length, body depth, and tail base width; compare with your chosen proportions.
- Check dorsal and anal fin base positions against body length fractions.
- Verify scale row offsets and overlap direction.
- Erase guides and darken final lines without crowding.
Worked example
A crappie drawing uses total length 18 units. Find body depth, tail base width, and the dorsal fin base start and end positions using the lesson proportions.
Worked answer
Body depth is about 6 units (one-third of 18). Tail base width is about 0.75 units (one-eighth of body depth). Dorsal base starts at about 6 units and ends at about 12 units from the snout (one-third and two-thirds of 18).
Four practice exercises
Exercise 1
A crappie drawing has total length 24 units. Using the lesson proportions, calculate body depth and tail base width.
Show answer and check
Body depth is about 8 units; tail base width is about 1 unit.
Why: Body depth is one-third of 24, which is 8. Tail base width is one-eighth of body depth, and one-eighth of 8 is 1.
Check: Multiply total length by one-third and body depth by one-eighth; confirm the arithmetic.
Exercise 2
Total length is 30 units. Find the start and end positions of the dorsal fin base from the snout using one-third and two-thirds of body length.
Show answer and check
Start at 10 units and end at 20 units from the snout.
Why: One-third of 30 is 10, and two-thirds of 30 is 20. The dorsal base runs between those marks.
Check: Divide 30 by 3 and multiply by 1 and 2; confirm the two positions differ by one-third of length.
Exercise 3
A scale row has 12 scales. The next row is offset by half a scale. Describe where the first scale of the next row begins relative to the first scale of the previous row.
Show answer and check
The next row begins half a scale width to the right or left of the previous row's first scale, depending on the chosen offset direction, and continues with the same spacing.
Why: A half-scale offset means each scale in the new row sits between two scales of the row above. The direction can be chosen but must stay consistent.
Check: Measure one scale width, divide by two, and confirm each new scale center lies halfway between adjacent scales above.
Exercise 4
A drawing has body depth 9 units. Using the example row spacing of one-tenth of body depth, calculate the spacing between scale rows.
Show answer and check
Row spacing is about 0.9 units.
Why: One-tenth of 9 is 0.9. This is a hypothetical example spacing, not a fixed rule.
Check: Divide body depth by 10 and compare with the measured gap between adjacent scale rows.
Common mistakes
- Drawing a shallow, torpedo-shaped body. Increase body depth to about one-third of length and make the belly fuller than the back.
- Separating the spiny and soft dorsal fins. Draw one continuous dorsal base with a shorter spiny front and longer soft rear.
- Placing the anal fin too far forward. Align the anal fin below the soft dorsal, from about two-thirds to four-fifths of body length.
- Drawing scale rows as a square grid. Offset each row by half a scale and point free edges toward the tail.
Self-check rubric
- Body depth is close to the chosen proportion and the belly is fuller than the back.
- Forehead slopes to the mouth and the tail base is narrow.
- Dorsal fin base is continuous with a shorter spiny front and longer soft rear.
- Anal fin sits below the soft dorsal within the stated fraction range.
- Scale rows are staggered, offset by half a scale, and overlap toward the tail.
- Fin rays and scale rows are evenly spaced and stop at fin bases.
- Valid alternative scale shapes and letter styles are accepted if row spacing and overlap direction are consistent.
Questions and answers
How deep should the body be?
A starting guide is about one-third of total length, measured at the deepest point just behind the midpoint. Adjust after measuring your own drawing.
Where do the dorsal fins go?
The joined dorsal base runs from about one-third to two-thirds of body length from the snout, with the spiny portion shorter and taller.
How do I draw scales consistently?
Use staggered rows: each row offsets half a scale from the row above, and free edges point toward the tail. Keep row spacing consistent.
Can scale shapes vary?
Yes. The rubric checks row spacing, offset, and overlap direction, not one exact scale shape.