Free original lessons
Easy Wolf Face Drawing: Muzzle, Ears, and Eye Placement
Learn to draw a wolf face using a simple oval, muzzle wedge, and ear triangles. Includes a convention, rubric, worked example, and four practice tasks.
Free lesson
Four exercises
Worked answers
Object Drawing Lessons
This lesson teaches an easy wolf face drawing using a clear construction order: face oval, muzzle wedge, ear triangles, then eye placement. The convention is simple and checkable: the face oval is taller than wide; the muzzle is a wedge that starts between the eyes and narrows toward the nose; ears are triangles set on the upper sides of the oval; eyes sit on a horizontal midline that passes through the top of the muzzle. X-height is the distance from baseline to midline in lettering; here we use a drawing midline for the face instead. Letter styles vary, and so do wolf faces: fur length, ear tilt, and eye shape can differ while the construction still reads as a wolf. Use the rubric to judge proportion and placement, not to force one exact outline. All measurements below are hypothetical examples for practice; measure your own paper and tools if you scale the drawing.
Practice materials: Printable downloads are not available for this lesson yet. Use the instructions and four exercises below.
Reference illustration
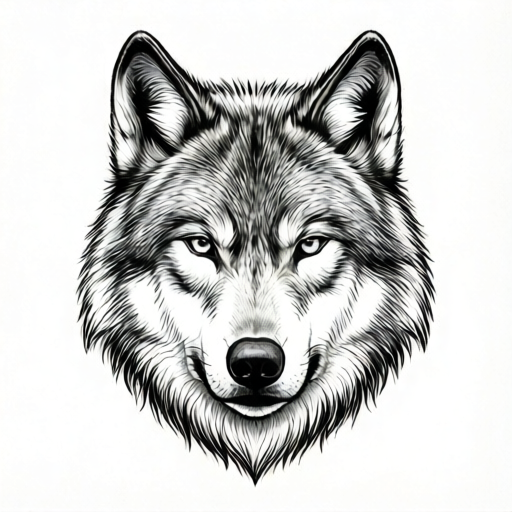
Use the stated measurements and conventions for each exercise.
Set the face oval and midline
Start with a light oval that is taller than wide. A practical example is an oval 8 cm tall and 6 cm wide on a 15 cm by 20 cm sheet. Mark a horizontal midline halfway down the oval; this is the eye line. Mark a vertical center line from top to bottom. These two guides keep the muzzle and ears balanced.
Keep the oval light so you can adjust it. The midline is not the nose line; it is the eye line. The nose will sit lower, near the bottom third of the oval.
- Draw a light vertical center line about 10 cm long.
- Draw an oval 8 cm tall and 6 cm wide centered on the line.
- Mark the horizontal midline at 4 cm from the top of the oval.
- Check that the oval is taller than wide by comparing height and width with a ruler or by eye.
Build the muzzle wedge
The muzzle is a wedge, not a circle. Start at the midline between the eyes and draw two lines that angle outward slightly, then narrow toward the nose. A simple example: the muzzle top is 3 cm wide at the eye line, and the nose end is 1.5 cm wide, placed 2 cm below the eye line. The nose sits at the narrow end.
The muzzle should overlap the lower part of the oval. Its top edge can pass through the eye line, which helps place the eyes later. Keep the wedge symmetrical around the center line unless you intentionally draw a turned head.
- Mark a point on the center line 2 cm below the eye line for the nose.
- Mark two points on the eye line, 1.5 cm left and right of center, for the top of the muzzle.
- Connect each top point to the nose point with a straight or slightly curved line.
- Draw a small rounded triangle or oval at the nose point for the nose pad.
Place ears and eyes
Eyes sit on the horizontal midline. Place each eye center about 1 cm from the center line, so the distance between eye centers is about 2 cm. Draw each eye about 1 cm wide and 0.6 cm tall, then add a pupil. With centers 1 cm from the center line, each eye spans from 0.5 cm to 1.5 cm on its side, leaving a 1 cm gap between the inner edges. The eyes should be level with each other unless the head is turned. Check that the gap between the inner edges of the eyes is roughly equal to one eye width.
- Mark ear base points on the oval about 1 cm below the top, 2 cm left and right of center.
- Draw each ear as a triangle with a 2 cm base and a 3 cm height, tilting outward.
- Mark eye centers on the midline, 1 cm left and right of center.
- Draw eyes about 1 cm wide and 0.6 cm tall, then add pupils.
- Check that the muzzle top sits between the eyes and that the ears are above the eyes.
Refine fur and contrast
Add short fur strokes along the cheeks and ear edges. Keep them light and directional, following the oval. Darken the nose, pupils, and ear inner edges for contrast. Do not outline every fur stroke; a few grouped strokes read better than many random marks.
Use the rubric to check proportion, placement, and clarity. A valid wolf face can have rounder eyes, shorter ears, or a wider muzzle if the construction order and relative placement remain clear.
- Add 3 to 5 short fur strokes on each cheek, angled downward.
- Shade the inner ear with light diagonal lines.
- Darken the nose pad and pupils.
- Erase the center line and midline lightly, leaving faint guides if needed.
Worked example
Draw a front-facing wolf face on a 15 cm by 20 cm sheet using the convention: oval 8 cm tall and 6 cm wide, eye line at 4 cm from the top, muzzle top 3 cm wide at the eye line, nose 1.5 cm wide and 2 cm below the eye line, ears with 2 cm bases and 3 cm heights set 1 cm below the top, eye centers 1 cm from center, eyes 1 cm wide. Describe the construction and check the proportions.
Worked answer
Draw a vertical center line. Draw the oval 8 cm tall and 6 cm wide. Mark the eye line 4 cm from the top. Mark the nose point 2 cm below the eye line on the center line. Mark muzzle top points 1.5 cm left and right of center on the eye line, and connect them to the nose point. Draw a small nose pad at the nose point. Mark ear bases 1 cm below the top and 2 cm left and right of center; draw triangles 2 cm wide at the base and 3 cm tall, tilting outward. Mark eye centers 1 cm left and right of center on the eye line; draw eyes 1 cm wide and 0.6 cm tall, so the gap between inner edges is about 1 cm. Check: oval height 8 cm is greater than width 6 cm; muzzle narrows from 3 cm to 1.5 cm; ears sit above the eyes; the gap between inner eye edges is about 1 cm, close to one eye width. Add light fur strokes and darken the nose and pupils.
Four practice exercises
Exercise 1
On a 15 cm by 20 cm sheet, draw a wolf face oval 9 cm tall and 6 cm wide. Mark the eye line 4.5 cm from the top. Place the nose 2 cm below the eye line. Describe where the muzzle top points go if the muzzle top is 3 cm wide at the eye line.
Show answer and check
The muzzle top points go 1.5 cm left and 1.5 cm right of the center line on the eye line. Connect each to the nose point 2 cm below the eye line.
Why: A 3 cm wide muzzle top centered on the vertical line splits into 1.5 cm on each side. The nose is on the center line below the eye line, so the wedge narrows downward.
Check: Measure the distance between the two muzzle top points; it should be about 3 cm. Check that the nose point is on the center line and 2 cm below the eye line.
Exercise 2
Draw a wolf face with an oval 8 cm tall and 6 cm wide. Place ear bases 1 cm below the top and 2 cm left and right of center. Each ear is a triangle with a 2 cm base and 3 cm height. Where are the ear tips relative to the oval top?
Show answer and check
Each ear tip is about 2 cm above the oval top if the ear rises 3 cm from a base 1 cm below the top. The tips are outward from the center by about 2 cm.
Why: The base is 1 cm below the top, and the ear height is 3 cm, so the tip is 3 cm minus 1 cm equals 2 cm above the top. The base is 2 cm from center, so the tip stays on that side.
Check: Measure from the oval top to each ear tip; it should be about 2 cm. Check that the ear bases are on the upper sides, not at the top center.
Exercise 3
A student draws eyes 1.5 cm from the center line on a face oval 6 cm wide. The eyes are 1 cm wide. Is the spacing between the eyes close to one eye width? Explain.
Show answer and check
The spacing between eye centers is 3 cm, which is three eye widths, not one. To make the gap between the inner edges close to one eye width, place eye centers about 1 cm from the center line, giving 2 cm between centers and a 1 cm gap between inner edges for 1 cm-wide eyes.
Why: Spacing between centers equals 1.5 cm plus 1.5 cm equals 3 cm. One eye width is 1 cm, so 3 cm is three widths. Moving each center to 1 cm from the center line gives 2 cm between centers; with 1 cm-wide eyes, each inner edge is 0.5 cm from the center line, leaving a 1 cm gap equal to one eye width.
Check: Measure the distance between eye centers and compare it to the eye width. For this convention, the gap between the inner edges of the eyes should be roughly equal to one eye width, about 1 cm when the eye is 1 cm wide and centers are 1 cm from the center line.
Exercise 4
Draw a wolf face using the convention, then add three short fur strokes on each cheek. A cheek fur stroke is 1 cm long and angled downward. Describe how you check that the fur does not hide the muzzle or eye placement.
Show answer and check
Place the fur strokes on the lower sides of the oval, outside the muzzle wedge and below the eyes. Check that the muzzle outline and eye line are still visible after adding fur.
Why: Fur strokes should support the face shape, not cover the construction guides. Keeping them on the cheeks and away from the muzzle and eyes preserves the readable wolf face.
Check: Look at the drawing from about 30 cm away. The muzzle wedge, nose, and eyes should still be clear. If fur crosses the muzzle top or eye line, move or shorten those strokes.
Common mistakes
- Drawing the muzzle as a circle centered on the face. Use a wedge that starts between the eyes and narrows to the nose, with the nose below the eye line.
- Placing ears on the very top center of the oval. Set ear bases on the upper sides, about 1 cm below the top, and tilt them outward.
- Putting eyes above or below the midline. Mark the horizontal midline first and place eye centers on it, about 1 cm from the center line so the gap between the inner eye edges is about one eye width.
- Making the face oval wider than tall. Check height and width with a ruler; a wolf face oval should be taller than wide in this convention.
Self-check rubric
- Face oval is taller than wide and centered on the vertical guide.
- Eye line is horizontal and placed about halfway down the oval.
- Muzzle is a wedge that starts between the eyes and narrows toward the nose.
- Nose sits at the narrow end of the muzzle, below the eye line.
- Ears are set on the upper sides of the oval, not at the top center.
- Eyes sit on or near the eye line and are roughly level.
- Fur strokes and shading support the face without hiding the construction.
- Valid alternatives: rounded ear tips, wider or narrower muzzle, rounder eyes, and different fur length are acceptable if placement and proportion remain clear.
Questions and answers
Do I need to measure exactly?
No. The numbers are hypothetical examples. Use them as a starting proportion, then adjust to your paper size. The check is relative: oval taller than wide, muzzle narrowing downward, ears on upper sides, eyes on the midline.
Can the ears be rounded?
Yes. Rounded ear tips are a valid alternative. Keep the ear base on the upper side of the oval and the tip above the base. The rubric rewards clear placement, not a single ear shape.
Where does the nose go?
Place the nose at the narrow end of the muzzle wedge, below the eye line. In the example, it is 2 cm below the eye line, but you can adjust if the muzzle looks too short or long.
How do I know the eyes are level?
Use the horizontal midline as a guide. Mark both eye centers on that line. If you draw a turned head, the eyes may shift, but for a front-facing wolf face they should sit on the same line.