Free original lessons
Draw Girl Hairstyles: Loose vs Tied Shape Construction
Learn to draw girl hairstyles by comparing loose and tied silhouettes, strand flow, and simple shape construction with practice exercises.
Free lesson
Four exercises
Worked answers
Object Drawing Lessons
This lesson teaches how to construct girl hairstyles by focusing on the overall silhouette and strand flow of loose versus tied hair. You will learn a repeatable method for building hairstyles from basic shapes, then apply it to four practice tasks. The approach uses a simple convention: hair mass is drawn as a closed outline, and strand flow is indicated by lines that follow the direction of the hair from root to tip. All measurements are hypothetical examples; measure your own paper and tools. No prior drawing experience is required, but you should have a pencil, eraser, and paper.
Practice materials: Printable downloads are not available for this lesson yet. Use the instructions and four exercises below.
Reference illustration
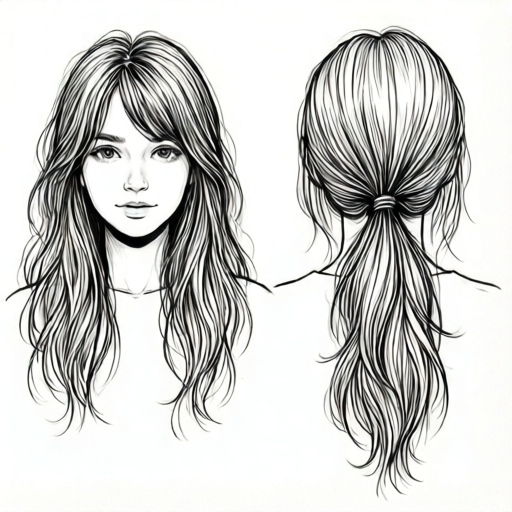
Use the stated measurements and conventions for each exercise.
Understanding Loose and Tied Silhouettes
Loose hair falls freely from the scalp, creating a silhouette that widens below the head and often ends in irregular points or curves. Tied hair is gathered at one or more points, so the silhouette narrows at the tie and then may flare into a ponytail, bun, or braid. The key difference is where the hair mass is constrained: loose hair has no constraint below the scalp, while tied hair has at least one pinch point.
To compare, start by drawing a simple head shape (an oval) and a shoulder line. For loose hair, sketch a large shape that surrounds the head and flows down past the shoulders, widening gradually. For tied hair, sketch a smaller shape that hugs the head, then add a distinct gathered section at the tie point and a separate shape for the tail or bun. Keep the outlines simple and closed; you can refine later.
- Draw an oval for the head and a horizontal line for the shoulders.
- For loose hair, sketch a closed outline that starts at the top of the head, widens as it falls, and ends in soft points near the shoulders or below.
- For tied hair, sketch a closed outline that follows the head closely, then add a small circle or band at the tie point, and a separate closed shape for the tail or bun.
- Label the tie point and the direction of strand flow with a few light arrows.
Strand Flow and Direction
Strand flow lines show how hair moves from the root (at the scalp) to the tip. In loose hair, flow lines generally radiate outward and downward, curving gently. In tied hair, flow lines converge toward the tie point, then diverge again in the tail or bun. Drawing a few flow lines before adding detail helps you keep the hairstyle consistent.
Use a light pencil for flow lines. Start at the crown or part line and draw curves that follow the silhouette. For loose hair, let the lines spread apart as they descend. For tied hair, bring lines together at the tie, then fan them out in the tail. Avoid crossing flow lines unless you intend to show overlapping strands.
- Mark the crown or part line on the head oval.
- Draw three to five light curves from the crown toward the silhouette edge, following the direction of hair growth.
- For tied hair, make the curves converge at the tie point, then add new curves for the tail.
- Check that flow lines do not contradict the silhouette outline.
Building the Hairstyle in Layers
Build the hairstyle in three layers: silhouette, flow lines, and detail strands. The silhouette is the outer boundary of the hair mass. Flow lines indicate direction. Detail strands are short lines that suggest individual hairs or clumps, added last. This layering keeps the drawing organized and makes it easy to adjust proportions.
When comparing loose and tied styles, draw them side by side on the same page. Use the same head oval and shoulder line for both so the comparison is fair. The loose version will have a larger, softer silhouette; the tied version will have a smaller head-hugging shape plus a distinct tail or bun. Label each drawing with the style name.
- Draw two identical head ovals side by side with shoulder lines.
- On the left, build a loose hair silhouette that widens below the head.
- On the right, build a tied hair silhouette with a clear tie point and a separate tail shape.
- Add flow lines to both, then add a few detail strands.
- Label the tie point on the tied version and note the widest part of the loose version.
Worked example
Draw a side-by-side comparison of loose hair and a high ponytail using the same head oval and shoulder line. Label the tie point and the widest part of the loose silhouette.
Worked answer
Two head ovals of equal size are drawn side by side with matching shoulder lines. The left drawing shows a loose silhouette that starts at the crown, widens gradually, and ends in soft points near the shoulders; the widest part is labeled near the bottom third. The right drawing shows a head-hugging shape that narrows at a small band near the top back of the head (the tie point), then a separate tail shape that flares outward and downward; the tie point is labeled. Flow lines on the left radiate outward and down; on the right they converge at the tie and then fan out in the tail.
Four practice exercises
Exercise 1
Draw a loose hairstyle silhouette on a head oval. The hair should reach the shoulders. Mark the widest point of the silhouette with a small dot and label it 'widest'.
Show answer and check
A closed outline that starts at the crown, widens as it falls, and ends near the shoulder line in soft points. The widest point is marked with a dot and labeled 'widest'.
Why: Loose hair falls freely, so the silhouette should widen below the head. Marking the widest point helps you check that the shape is not a straight block.
Check: Verify that the outline is closed, that it widens below the head, and that the dot is at the widest horizontal span. The label 'widest' should be present.
Exercise 2
Draw a tied hairstyle with a low ponytail on a head oval. Show the tie point as a small band. Draw three flow lines that converge at the tie and then fan out in the tail.
Show answer and check
A head-hugging silhouette that narrows at a small band near the lower back of the head, plus a separate tail shape that flares downward. Three flow lines converge at the band and then spread in the tail.
Why: Tied hair is gathered at a point, so the silhouette must narrow there. Flow lines converging at the tie and diverging in the tail show the change in direction.
Check: Check that the band is visible, that the silhouette narrows at the band, and that the tail is a separate shape. Confirm that flow lines meet at the band and then spread.
Exercise 3
Compare loose hair and a bun on the same head oval size. Draw both side by side. Label the bun's gather point and the loose hair's tip region.
Show answer and check
Two equal head ovals side by side. Left: loose silhouette widening to soft points; tip region labeled near the bottom. Right: head-hugging shape with a small gather point at the back and a rounded bun shape above or behind it; gather point labeled.
Why: Using the same head size makes the comparison fair. The bun is a tied style, so it needs a gather point and a distinct rounded mass.
Check: Verify equal head ovals, a labeled gather point on the bun, a labeled tip region on the loose hair, and that the bun is a separate rounded shape.
Exercise 4
Draw a loose hairstyle and a high ponytail side by side using the same head oval. Add two flow lines to each. For the loose style, flow lines should spread apart; for the ponytail, they should converge at the tie then fan out.
Show answer and check
Two equal head ovals. Left: loose silhouette with two flow lines that start near the crown and spread apart as they descend. Right: head-hugging shape with a tie band near the top back, a tail shape, and two flow lines that meet at the band and then diverge in the tail.
Why: Flow lines show direction. Loose hair spreads; tied hair converges at the tie and then diverges. Comparing them side by side highlights the difference.
Check: Check that head ovals are equal, that loose flow lines spread apart, that ponytail flow lines meet at the band and then diverge, and that the tie band is visible.
Common mistakes
- Drawing loose hair as a single straight block without widening or tapering. Let the silhouette widen gradually below the head and end in irregular points or curves to suggest natural fall.
- Forgetting to show a clear tie point on tied hair, making it look like loose hair. Add a small band or circle at the gather point and make the silhouette narrow there before the tail flares out.
- Making flow lines cross randomly, which creates a tangled look. Draw flow lines that follow the silhouette and converge or diverge smoothly; avoid unnecessary crossings.
- Using different head sizes for the two styles, which makes comparison unfair. Draw identical head ovals and shoulder lines for both styles before adding hair.
Self-check rubric
- Both styles use the same head oval and shoulder line size.
- Loose silhouette widens below the head and ends in irregular points or curves.
- Tied silhouette has a clear tie point where the hair mass narrows.
- Tied style includes a separate tail or bun shape.
- Flow lines follow the silhouette and show direction from root to tip.
- Labels identify the tie point and the widest part of the loose silhouette.
- Drawing is neat enough to compare the two shapes clearly.
Questions and answers
Do I need to draw a face to practice hairstyles?
No. This lesson focuses on hair shape construction. You can use a simple oval for the head and a shoulder line; facial features are not required.
How many flow lines should I draw?
Three to five light curves are enough to establish direction. You can add more detail strands later if you wish.
Can I use a ruler for the head oval?
Yes, but freehand ovals are fine. The goal is to compare shapes, not to achieve perfect geometry.
What if my tied hair looks too similar to loose hair?
Check that the silhouette narrows at the tie point and that the tail or bun is a separate shape. Also ensure flow lines converge at the tie.