Free original lessons
Mortar and Pestle Drawing: Bowl Form, Rim Ellipse, and Interior Shadow
Learn to draw a mortar and pestle with correct bowl form, rim ellipse, pestle proportion, and shading for interior cavity shadow and rim highlight.
Free lesson
Four exercises
Worked answers
Object Drawing Lessons
This lesson teaches a reliable sequence for drawing a mortar and pestle using simple construction lines and controlled shading. You will build the bowl from an ellipse, place the pestle with a proportion guide, and shade the interior cavity so the rim reads clearly. The convention for line quality is explicit: construction lines are light and removable, final contour lines are darker and continuous, and shading uses layered strokes that follow the form. Letter styles and handwriting vary, so the rubric rewards clear, consistent marks rather than a single perfect line. All measurements are hypothetical examples; measure your own paper and reference object to set real values.
Practice materials: Printable downloads are not available for this lesson yet. Use the instructions and four exercises below.
Reference illustration
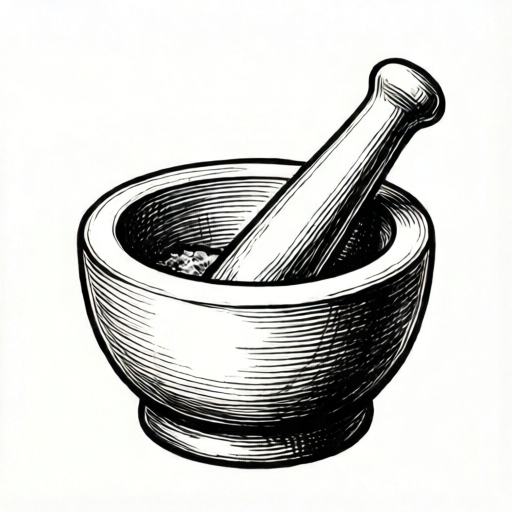
Use the stated measurements and conventions for each exercise.
Constructing the Bowl and Rim Ellipse
Begin by drawing a light vertical axis and a horizontal axis crossing near the lower third of your page. The bowl is a rounded vessel, so its widest opening is an ellipse seen in perspective. Draw the rim ellipse first: a flattened oval whose width is greater than its height. A hypothetical example is a rim ellipse 10 cm wide and 4 cm tall, but adjust to your reference.
From the ends of the rim ellipse, drop curved side lines that taper slightly inward toward a rounded base. Keep both sides symmetrical about the vertical axis. The base is a smaller curve, not a sharp point. Check that the bowl depth is roughly one and a half times the rim ellipse height in this example, then measure your own object to confirm.
- Draw a light vertical axis and a horizontal axis.
- Sketch the rim ellipse with width greater than height.
- Drop curved side lines from the ellipse ends toward a rounded base.
- Refine the bowl contour so both sides mirror each other.
Placing the Pestle with a Proportion Guide
The pestle is a club-shaped tool that rests inside the bowl. Use a proportion guide: compare the pestle length to the bowl height. In a hypothetical example, the pestle is about 1.2 times the bowl height, with a thicker rounded end and a narrower handle. Place the thicker end inside the bowl near the interior shadow area.
Draw the pestle as a simple tapered cylinder before adding details. Its axis should tilt slightly, not stand perfectly vertical, so the tool looks rested rather than floating. Check that the pestle overlaps the rim correctly: the part inside the bowl is partially hidden by the front rim, while the handle rises above the back rim.
- Mark the pestle length using the bowl height as a unit.
- Draw a light tapered cylinder for the pestle body.
- Tilt the pestle slightly and place the thick end inside the bowl.
- Erase hidden lines where the front rim overlaps the pestle.
Shading the Interior Cavity and Rim Highlight
The interior cavity is the darkest area because it receives less light. Shade it with layered strokes that curve with the bowl's inner surface. Keep the darkest values near the back interior wall and under the pestle, then lighten gradually toward the front rim. This creates depth without outlining every edge.
Leave a narrow unshaded band along the front rim to suggest a highlight. The highlight should follow the rim ellipse, not a straight line. Use a consistent shading direction and build value in two or three passes. A hypothetical value scale from light to dark can guide you, but judge contrast by looking at your own setup.
- Block in the interior cavity with light curved strokes.
- Darken the back wall and the area under the pestle.
- Soften transitions toward the front rim.
- Leave a narrow highlight band along the front rim.
Checking Form and Shading Consistency
Step back and check the drawing against three questions: Does the rim ellipse read as a flat oval in perspective? Does the pestle sit inside the bowl without floating? Does the interior shadow make the cavity feel hollow? Adjust construction lines before darkening final contours.
Use the rubric to evaluate line clarity, proportion, ellipse accuracy, shading logic, and highlight placement. Valid alternatives include a wider or narrower rim ellipse, a steeper pestle tilt, or a softer shadow, as long as the form remains coherent and the shading follows the bowl's curvature.
- Compare rim ellipse width and height to your reference.
- Check pestle overlap at the front and back rim.
- Confirm the darkest interior values sit away from the light source.
- Refine final contours only after construction checks pass.
Worked example
Draw a mortar and pestle on a page where the bowl height is 6 cm. Use a rim ellipse 8 cm wide and 3 cm tall. Place a pestle 7 cm long with its thick end inside the bowl. Shade the interior cavity and leave a rim highlight.
Worked answer
Draw a light vertical axis. Sketch the rim ellipse 8 cm wide and 3 cm tall. Drop curved sides to a rounded base 6 cm below the rim. Draw a tapered pestle 7 cm long, tilted slightly, with the thick end inside the bowl and the handle above the back rim. Erase hidden lines at the front rim. Shade the back interior and under the pestle darkest, lighten toward the front, and leave a narrow unshaded band along the front rim.
Four practice exercises
Exercise 1
A bowl has a rim ellipse 12 cm wide and 5 cm tall. The bowl height is 8 cm. State the ratio of rim width to rim height and the ratio of bowl height to rim height.
Show answer and check
Rim width to rim height is 12:5. Bowl height to rim height is 8:5.
Why: Divide the width by the height for the first ratio, and the bowl height by the rim height for the second. Both use the same units, so the ratios are checkable.
Check: Confirm 12 divided by 5 equals 2.4, and 8 divided by 5 equals 1.6. Compare with your written ratios.
Exercise 2
A pestle is 9 cm long. The bowl height is 6 cm. If the pestle is placed with 2 cm inside the bowl, how much of the pestle rises above the rim?
Show answer and check
7 cm rises above the rim.
Why: Subtract the inside length from the total pestle length: 9 cm minus 2 cm equals 7 cm.
Check: Add the inside length and the above-rim length: 2 cm plus 7 cm equals 9 cm, matching the total.
Exercise 3
You shade the interior in three passes. Pass one covers the whole cavity, pass two covers the back half, and pass three covers the back quarter. Describe which area receives the darkest value and why.
Show answer and check
The back quarter receives the darkest value because it receives all three shading passes, while the front receives only one.
Why: Layered passes build value. The area with the most overlapping passes becomes darkest, which supports the interior cavity shadow.
Check: Count the passes per area: front 1, back half 2, back quarter 3. The highest count should correspond to the darkest area.
Exercise 4
A rim highlight is planned as a band 0.5 cm wide along a front rim curve of 10 cm. If you divide the band into five equal segments, what is each segment length?
Show answer and check
Each segment is 2 cm long.
Why: Divide the total curve length by the number of segments: 10 cm divided by 5 equals 2 cm.
Check: Multiply 2 cm by 5 to get 10 cm, confirming the total curve length.
Common mistakes
- Drawing the rim as a perfect circle instead of an ellipse. Flatten the oval so its width is clearly greater than its height, matching the viewing angle.
- Making the pestle float above the bowl or pass through the rim. Check overlap: the front rim hides part of the pestle, and the thick end rests inside the cavity.
- Shading the interior evenly with no dark back wall. Darken the back interior and under the pestle, then lighten toward the front rim.
- Outlining the entire rim with a hard line and no highlight. Soften the rim contour and leave a narrow unshaded band along the front edge.
Self-check rubric
- Rim ellipse reads as a flattened oval in perspective, not a circle.
- Bowl sides are symmetrical and taper to a rounded base.
- Pestle proportion is plausible and the overlap at the rim is correct.
- Interior cavity shadow is darkest at the back and under the pestle.
- Rim highlight follows the front edge without a hard outline.
- Line quality is consistent: light construction lines, darker final contours.
- Valid alternatives are accepted if form and shading logic remain coherent.
Questions and answers
How do I know the rim ellipse is correct?
The ellipse should look like a flattened oval seen at an angle. Its width is greater than its height, and both sides mirror across the vertical axis. Measure your reference to set the actual ratio.
Where should the pestle be placed?
Place the thick end inside the bowl near the interior shadow, with the handle rising above the back rim. Tilt it slightly so it looks rested, and erase hidden lines where the front rim overlaps.
How dark should the interior cavity be?
The back interior and the area under the pestle should be the darkest values. Lighten gradually toward the front rim, leaving a narrow highlight band along the front edge.
Can I use different proportions?
Yes. The rubric rewards coherent form and consistent shading, not one fixed size. A wider bowl or longer pestle is valid if the ellipse, overlap, and shadow logic remain clear.