Free original lessons
Facial Shading Practice: Light Direction and Plane Shadows
Learn to shade faces by mapping light direction to plane shadows. Practice with a defined convention, worked example, and four self-contained exercises.
Free lesson
Four exercises
Worked answers
Object Drawing Lessons
Facial shading becomes manageable when you treat the face as a set of planes rather than a smooth surface. This lesson teaches a repeatable method: choose a light direction, identify which planes face the light, and shade the planes that turn away. You will use a simple convention for value zones and a rubric that accepts valid stylistic alternatives. No prior portrait experience is needed, but you should be able to draw basic geometric shapes. All practice tasks are self-contained; where a diagram would help, the text describes it precisely so you can sketch it yourself.
Practice materials: Printable downloads are not available for this lesson yet. Use the instructions and four exercises below.
Reference illustration
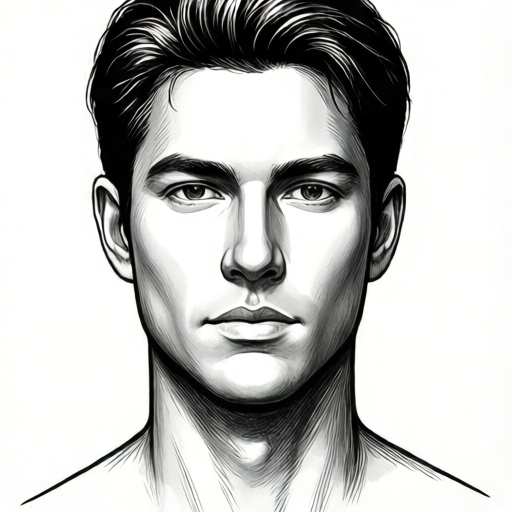
Use the stated measurements and conventions for each exercise.
Set a Light Direction and Define Value Zones
Every shading decision follows from one choice: where is the light coming from? Pick a single direction, such as upper left, and state it before you shade. Consistency matters more than realism at this stage.
Use a three-zone convention: light (planes facing the light), mid (planes parallel to the light), and shadow (planes turned away). You may subdivide shadow into core shadow and reflected light if you wish, but keep the three-zone logic visible.
Mark the light direction with an arrow on your paper. This arrow is your reference for every plane decision.
- Draw a face outline and mark a light-direction arrow in one corner.
- Label three value zones on a scrap strip: light, mid, shadow.
- Identify the forehead, cheek, nose, and jaw as planes and note which way each faces.
- Assign each plane to a zone based on the arrow.
Map Plane Shadows on the Face
The forehead is a broad plane that tilts back; under upper-left light, its left side is light and its right side moves to mid or shadow. The cheek is a curved plane, so it transitions gradually; treat it as a series of small planes.
The nose creates a cast shadow on the cheek opposite the light. The jaw underside is almost always in shadow unless light comes from below. The eye socket is a recessed plane, so it reads darker than the brow.
Keep edges soft where planes curve and sharper where planes meet at an angle, such as the side of the nose.
- Shade the forehead first, splitting it into light and mid zones.
- Shade the cheek with a gradient from light to mid.
- Add the nose cast shadow on the opposite cheek.
- Darken the eye socket and jaw underside.
- Check that every shadow traces back to the light arrow.
Shade Features Without Overworking
Features are small planes. The nose has a top plane, two side planes, and an underside. The lips have an upper plane facing up and a lower plane facing down. The ear is a set of ridges and hollows.
Shade features last and lightly. If a feature shadow contradicts the main light direction, remove it. A common error is shading both sides of the nose equally, which flattens the form.
Use your pencil at a consistent angle and build value in two or three passes rather than pressing hard once.
- Shade the nose top as light, sides as mid, underside as shadow.
- Shade the upper lip plane as mid and the lower lip plane as light or mid depending on tilt.
- Add a small shadow inside the ear hollows.
- Compare feature shadows to the light arrow and correct contradictions.
Review and Refine with a Checklist
Step back and check three things: does every shadow have a light-direction reason, are the three zones still distinguishable, and are edges appropriate to plane curvature?
If a shadow looks wrong, trace it to a plane. If the plane faces the light, the shadow is likely a cast shadow from another feature, not a form shadow.
Refine by adjusting value contrast, not by adding new shadows. Stronger contrast between light and shadow usually improves readability more than extra detail.
- Verify the light arrow is still visible and consistent.
- Check that light, mid, and shadow zones remain distinct.
- Trace each shadow to a plane or a cast source.
- Adjust contrast rather than adding new shadows.
Worked example
A face outline is drawn with a light arrow pointing from the upper left. The forehead tilts back, the left cheek faces left, the nose projects forward, and the jaw underside faces down. Assign each plane to light, mid, or shadow and explain one cast shadow.
Worked answer
Forehead: left side light, right side mid because it tilts away from upper-left light. Left cheek: light to mid gradient as it curves away. Nose: top plane light, left side mid, right side shadow, underside shadow. Jaw underside: shadow because it faces down. Cast shadow: the nose casts a shadow on the right cheek because the light comes from the left and the nose blocks it. All assignments trace to the upper-left arrow.
Four practice exercises
Exercise 1
Draw a simple face outline. Mark a light arrow from the upper right. Shade the forehead, left cheek, nose, and jaw underside using the three-zone convention. Describe your zone assignments in one sentence each.
Show answer and check
Forehead: right side light, left side mid. Left cheek: mid to shadow because it turns away from upper-right light. Nose: top light, right side mid, left side shadow, underside shadow. Jaw underside: shadow. A cast shadow from the nose falls on the left cheek.
Why: Upper-right light means planes facing right and up are light; planes facing left or down move to mid or shadow. The nose blocks light on its left side, creating a cast shadow.
Check: Trace each shadow to the upper-right arrow. Confirm three zones are visible and the nose cast shadow falls opposite the light.
Exercise 2
Sketch two small face outlines side by side. On the first, mark light from the upper left; on the second, light from the upper right. Shade only the nose and cheek planes on both. State one difference between the two versions.
Show answer and check
First face: nose left side light, right side shadow; right cheek receives cast shadow. Second face: nose right side light, left side shadow; left cheek receives cast shadow. The cast shadow switches cheeks.
Why: Changing the light arrow mirrors which planes face the light and which receive cast shadows. The nose form shadow flips sides.
Check: Compare each nose shadow to its own light arrow. Confirm the cast shadow is on the cheek opposite the light in both versions.
Exercise 3
Draw a face outline with light from the upper left. Shade the eye socket, upper lip, and lower lip planes. Explain why the eye socket is darker than the brow.
Show answer and check
Eye socket: shadow because it is recessed and faces away from upper-left light. Brow: light or mid because it faces up and left. Upper lip: mid because it faces up but tilts. Lower lip: light or mid depending on tilt. The socket is darker because it is a recessed plane receiving less direct light.
Why: Recessed planes face away from the light source and often receive cast shadow from the brow, so they read darker than protruding planes.
Check: Check that the socket shadow is justified by recess and brow cast shadow, not by arbitrary darkening. Confirm lip planes follow their tilt.
Exercise 4
Draw a face outline with light from the upper left. Shade the full face using the three-zone convention. Then write two sentences: one naming a form shadow and one naming a cast shadow.
Show answer and check
Form shadow example: the right side of the forehead is mid because it tilts away from the light. Cast shadow example: the nose casts a shadow on the right cheek. The jaw underside is shadow because it faces down.
Why: Form shadows come from a plane turning away from the light; cast shadows come from an object blocking the light. Both must trace to the upper-left arrow.
Check: Verify that the named form shadow corresponds to a plane turning away and the named cast shadow corresponds to a blocking feature. Confirm zones remain distinct.
Common mistakes
- Shading both sides of a feature equally. Decide which side faces the light and keep the opposite side darker; check against the light arrow.
- Using the same edge hardness everywhere. Soften edges on curved planes like cheeks and sharpen edges where planes meet at angles like the nose side.
- Adding shadows without a light-direction reason. For each shadow, name the plane or cast source; remove any shadow you cannot justify.
- Pressing hard in one pass and losing control. Build value in two or three light passes, adjusting pressure gradually.
Self-check rubric
- Light direction is marked and every shadow traces to a plane or cast source.
- Light, mid, and shadow zones are distinguishable.
- Edge hardness matches plane curvature: soft on curves, sharper at angles.
- Feature shadows do not contradict the main light direction.
- Valid stylistic alternatives are accepted if the light logic remains consistent.
Questions and answers
Do I need to draw a realistic face first?
No. This lesson focuses on shading planes. A simple face outline is enough; proportion construction is outside this task.
Can I use more than three value zones?
Yes. The three-zone convention is a minimum. You may subdivide shadow into core and reflected light, but keep the logic traceable to the light direction.
What if my light comes from the front?
Front light flattens plane differences. Choose an angled direction such as upper left or upper right to make plane shadows visible for practice.
How do I know if my shading is correct?
Use the rubric: every shadow must trace to a plane or cast source, zones must be distinct, and edges must match curvature. Valid stylistic alternatives are accepted.