Free original lessons
Drawing Old and Young Woman Faces: Proportion and Feature Contrast
Compare facial proportions of old and young women, then draw both side by side using a defined convention and a checkable rubric.
Free lesson
Four exercises
Worked answers
Object Drawing Lessons
This lesson teaches you to draw an old woman and a young woman side by side, focusing on how aging changes facial proportions and feature contrast. You will use a simple convention: the face is divided into three horizontal zones from chin (baseline) to hairline, with the eye line marked separately as a reference midline. Because individual faces vary, the rubric accepts valid alternatives rather than a single correct drawing. All measurements are hypothetical examples; measure your own reference or drawing. No downloads or files exist yet; the resource plan describes what is planned.
Practice materials: Printable downloads are not available for this lesson yet. Use the instructions and four exercises below.
Reference illustration
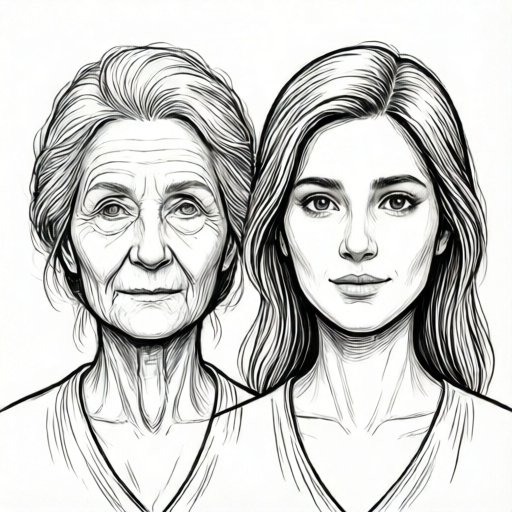
Use the stated measurements and conventions for each exercise.
Defining the proportion convention
Use a chin-to-hairline convention: mark the chin as baseline and the hairline as the top. Divide the vertical distance into three equal zones: chin to nose base, nose base to brow, brow to hairline. This is a teaching convention, not a universal rule. Mark the eye line separately as a reference midline; it usually falls inside the nose-base-to-brow zone. For a young woman, the eye line typically sits near the vertical midpoint of the whole face; for an old woman, the eye line may appear slightly lower relative to the hairline because forehead height and hairline position change. Record your own reference measurements in centimeters or arbitrary units, and label any chosen numbers as hypothetical.
Feature contrast means differences in edge sharpness, value contrast, and spacing. Young faces often show smoother transitions and tighter spacing between features; old faces may show looser spacing, deeper creases, and more contrast at the jaw and neck. These are tendencies, not requirements.
- Draw two vertical axes 10 cm apart on a blank sheet; label left 'old' and right 'young'.
- Mark baseline (chin) and hairline on each axis using your reference, then mark the eye line as a separate reference midline.
- Divide each axis into three equal zones and label them.
- Lightly sketch an oval face outline for each, adjusting width by observation.
Placing features by zone
Place the nose base at the lower zone boundary and the brow at the upper zone boundary. The eye line is marked separately and usually falls inside the nose-base-to-brow zone. The mouth sits roughly one-third of the way from nose base to chin; this is a hypothetical example. For the old woman, allow the jaw to appear slightly wider or softer and the neck to show more vertical creases. For the young woman, keep the jaw line smoother and the neck shorter in appearance. Check symmetry by folding the paper vertically through each axis; adjust until left and right halves are acceptably balanced.
- Mark nose base and brow on both axes.
- Mark the eye line on each axis inside the nose-base-to-brow zone, spaced about one eye-width apart (hypothetical).
- Draw the mouth one-third down from nose base to chin.
- Add ears between brow and nose base, then check fold symmetry.
Adding age-specific contrast
Use line weight and value to show contrast. For the old woman, add short crease lines at the outer eye, nasolabial fold, and neck; keep them broken rather than continuous. For the young woman, use fewer creases and smoother shading. Hair can differ in volume and texture, but avoid stereotyping: an old woman may have dark hair and a young woman may have gray. The goal is proportion contrast, not a single correct look.
- Add three to five crease marks on the old face only where your reference shows them.
- Shade the young face with soft gradients and the old face with slightly sharper value changes.
- Compare the two drawings side by side and adjust spacing so differences are visible but not exaggerated.
Checking and refining
Use the rubric to check zone equality, feature placement, contrast, and symmetry. Measure actual distances on your drawing with a ruler; do not assume printer tolerances. If a zone is more than 10 percent different from the others, adjust. Keep all units consistent (centimeters or arbitrary units). Valid alternatives include different hair styles, face shapes, and crease patterns as long as the proportion logic is explained.
- Measure each zone and record values.
- Fold-check symmetry and note any offset.
- Compare old and young contrast using the rubric descriptors.
- Make one refinement pass and re-check.
Worked example
On a blank sheet, draw two vertical axes 10 cm apart. Using the chin-to-hairline convention, mark chin, nose base, brow, and hairline for an old woman and a young woman, and mark the eye line separately as a reference midline. Use hypothetical zone heights of 3 cm each. Add one crease mark on the old face and none on the young face. Check symmetry by folding.
Worked answer
Each axis has four zone marks: chin at 0 cm, nose base at 3 cm, brow at 6 cm, hairline at 9 cm (hypothetical). The eye line is marked separately at 4.5 cm on both, inside the nose-base-to-brow zone. The old face has a broken crease at the outer eye; the young face has smooth shading. Fold check shows halves within 0.5 cm. This satisfies zone equality and contrast.
Four practice exercises
Exercise 1
Draw two axes 8 cm apart. Mark chin at 0, nose base at 2.5, brow at 5, hairline at 7.5 (hypothetical cm). Mark the eye line separately at 3.75 cm. Sketch an old woman on the left and a young woman on the right. Add two broken creases to the old face only. Fold-check symmetry.
Show answer and check
A drawing with four zone marks per axis, eye line at 3.75 cm, two broken creases on the old face, and a fold check note.
Why: The zone heights are equal (2.5 cm each), so the chin-to-hairline convention is applied consistently. The eye line is marked separately at the midpoint of the total height (3.75 cm), which is a valid choice. Creases are limited to the old face to create contrast.
Check: Measure each zone with a ruler; confirm each is 2.5 cm within 0.25 cm. Fold the paper through each axis and confirm halves are within 0.5 cm. Count creases: exactly two on the old face, zero on the young face.
Exercise 2
Using the same axes and zone marks as Exercise 1, draw the young woman with the eye line at 4.0 cm and the old woman with the eye line at 3.5 cm. Explain in one sentence why this creates proportion contrast. Add no creases to either face.
Show answer and check
A drawing with eye lines at 4.0 cm (young) and 3.5 cm (old), plus a sentence noting that the eye line position relative to the zones differs.
Why: Moving the separately marked eye line changes the apparent forehead and lower-face proportions. The young face has a slightly higher eye line, the old face slightly lower, which is a valid contrast choice. No creases means contrast comes from proportion alone.
Check: Measure the eye line height on each axis; confirm 4.0 cm and 3.5 cm within 0.2 cm. Read the sentence and confirm it mentions eye line position or zone proportion. Confirm no crease marks are present.
Exercise 3
Draw two axes 12 cm apart. Use hypothetical zone heights of 4 cm each (chin 0, nose base 4, brow 8, hairline 12). Mark the eye line separately at 6 cm on both. Draw the old woman with a jaw width of 6 cm and the young woman with a jaw width of 5 cm. Add one nasolabial crease to the old face. Fold-check symmetry.
Show answer and check
A drawing with equal zones, eye lines at 6 cm, jaw widths 6 cm and 5 cm, one nasolabial crease on the old face, and a fold check note.
Why: Equal zones satisfy the chin-to-hairline convention. The jaw width difference creates proportion contrast without relying on many creases. The single crease is a valid minimal contrast choice.
Check: Measure zones (each 4 cm within 0.4 cm), eye lines (6 cm within 0.3 cm), and jaw widths (6 cm and 5 cm within 0.5 cm). Confirm exactly one nasolabial crease on the old face. Fold-check each axis.
Exercise 4
Draw two axes 10 cm apart. Mark chin 0, nose base 3, brow 6, hairline 9 (hypothetical cm). Mark the eye line separately at 4.5 cm on both. Draw the old woman with three broken creases (outer eye, nasolabial, neck) and the young woman with smooth shading and no creases. Write one sentence explaining how contrast is shown. Fold-check symmetry.
Show answer and check
A drawing with the specified marks, three broken creases on the old face, smooth shading on the young face, a contrast sentence, and a fold check note.
Why: The zones are equal and the eye line is marked separately at the midpoint. Contrast is shown through crease count and shading style, which is a valid alternative to proportion changes. The sentence explains the choice.
Check: Measure zones (3 cm each within 0.3 cm) and eye line (4.5 cm within 0.3 cm). Count creases: three on old, zero on young. Read the sentence and confirm it mentions creases or shading. Fold-check each axis.
Common mistakes
- Making the old face identical to the young face except for added wrinkles. Adjust zone heights and feature spacing first, then add creases; compare jaw and neck proportions.
- Assuming the eye line is always exactly at the midpoint. Measure your own reference and label the value as a hypothetical example; allow variation.
- Using continuous dark lines for every crease. Use broken, lighter marks and reserve strong contrast for a few key folds.
- Ignoring symmetry check. Fold the paper through each axis and adjust until halves are acceptably balanced.
Self-check rubric
- Zones are equal within 10 percent or differences are explained.
- Features sit on or near the marked zone boundaries.
- Old and young faces show visible proportion or contrast differences.
- Symmetry fold check is performed and noted.
- Valid alternatives (hair, face shape, crease pattern) are accepted if reasoning is given.
- Units are consistent and numerical values are labeled hypothetical.
Questions and answers
Do I need a printed plate to do this lesson?
No. The plate is planned but not built. You can use any two reference faces or draw from observation; the convention and rubric work on blank paper.
Are the numerical proportions universal?
No. They are hypothetical teaching examples. Measure your own reference and keep units consistent.
Can I draw the old woman with smooth skin?
Yes, if your reference shows it. The rubric rewards explained proportion contrast, not a stereotype.
How do I check symmetry without a mirror?
Fold the paper vertically through each face axis and compare the halves; adjust lightly.