Free original lessons
Blushing Face Drawing: Cheek Shading and Expression Cues
Learn to place and shade cheek blush and pair it with eye and mouth cues to show a convincing blushing expression on a simple face plate.
Free lesson
Four exercises
Worked answers
Object Drawing Lessons
This lesson focuses on one narrow skill: making a drawn face read as blushing. You will learn where blush sits on the cheeks, how to shade it in layers, and how eye and mouth cues combine with that shading to signal embarrassment, warmth, or delight. Full facial feature construction is out of scope; assume a simple face plate with eyes, nose, and mouth already positioned. Work in pencil on paper, and use the convention below so your results are checkable.
Practice materials: Printable downloads are not available for this lesson yet. Use the instructions and four exercises below.
Reference illustration
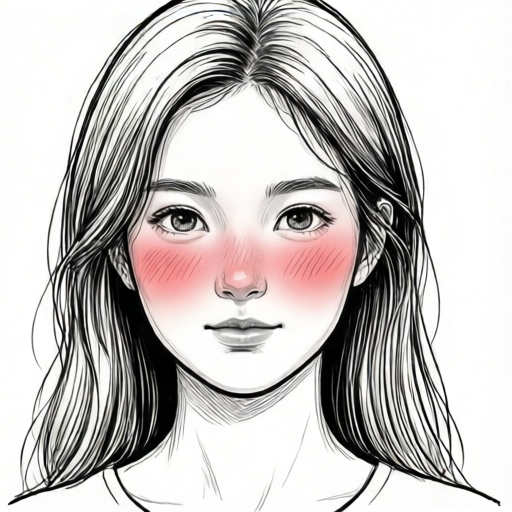
Use the stated measurements and conventions for each exercise.
Define the blush zone on the face plate
Treat the face plate as an oval. Mark a vertical midline and a horizontal midline. The blush zone on each cheek is a soft oval centered halfway between the vertical midline and the outer edge of the face, and slightly below the horizontal midline. Keep the zone inside the cheek area and away from the nose bridge and jaw edge.
Use a light pencil ring to outline the zone before shading. The ring is a guide, not a border; blush should fade outward. A common error is placing blush too high, near the eyes, which reads as makeup rather than a flush. Another is placing it too low, on the jaw, which reads as a shadow.
- Draw the face oval and mark vertical and horizontal midlines.
- Mark a small dot on each cheek at the center of the intended blush zone.
- Draw a light oval ring around each dot, about one-fifth of the face width across.
- Check that both rings sit at the same height and distance from the midline.
Shade blush in three light layers
Blush reads best as a gradient: strongest at the center of the zone, fading to nothing at the ring. Build it in three passes rather than pressing hard once. Use a soft pencil and light pressure, and keep the pencil moving in small circles.
Between passes, compare the two cheeks. They should match in intensity unless the expression calls for asymmetry, such as a one-sided smirk. If one cheek is darker, lift graphite with a soft eraser before adding more.
- Pass one: fill the center third of each ring with very light circular strokes.
- Pass two: extend shading to the middle third, keeping the center darkest.
- Pass three: feather the outer edge so the ring disappears into the cheek.
- Compare both cheeks under the same light and adjust the lighter one.
Pair blush with eye and mouth cues
Blush alone can read as warmth or fever. Expression cues narrow the meaning. For embarrassment, use slightly narrowed eyes with the gaze shifted down or aside, and a small closed mouth pulled to one side. For delighted embarrassment, use curved smiling eyes and an open smile. For shy warmth, use soft eyes looking slightly away and a small closed smile.
Keep cues consistent: a broad open smile with tightly narrowed eyes can read as strained rather than blushing. Choose one eye variant and one mouth variant from the guide and commit to them before shading, so the blush supports rather than fights the expression.
- Choose the emotion you want: embarrassment, delighted embarrassment, or shy warmth.
- Select the matching eye variant and mouth variant.
- Draw the cues lightly before finalizing blush intensity.
- Step back and check that eyes, mouth, and blush tell the same story.
Control intensity and check your result
Intensity is controlled by how many passes you make and how wide the darkest center is, not by pressing harder. As a working convention, set the darkest center width relative to face width: light about one-twelfth of face width, medium about one-tenth, strong about one-eighth. A light blush has a small dark center and a wide fade; a strong blush has a larger dark center and a tighter fade. Decide the intensity before you start and write it down as a target. These proportions are chosen examples, not fixed standards; adjust them to your paper and pencil.
Check your drawing by comparing it to your stated target and by checking symmetry, placement, and cue consistency. Because letter styles and hand pressure vary, accept any result that meets the rubric rather than matching one universal sample.
- State a target intensity in words, such as light, medium, or strong.
- Count your passes and note the width of the darkest center.
- Check placement against the midlines and the ring guides.
- Confirm eye and mouth cues match the chosen emotion.
Worked example
A face oval is 10 cm wide and 14 cm tall. Midlines cross at the center. Place blush zones and state a medium intensity target using three passes.
Worked answer
Each blush center sits 2.5 cm from the vertical midline (halfway between the midline and the 5 cm outer edge) and 1 cm below the horizontal midline. Each ring is about 2 cm across. Medium intensity means three light passes with the darkest center about 1 cm wide and a fade that reaches the ring edge.
Four practice exercises
Exercise 1
On a face oval 8 cm wide and 12 cm tall, mark both blush centers using the convention. State the distance from the vertical midline and below the horizontal midline.
Show answer and check
Each center is 2 cm from the vertical midline (halfway between the midline and the 4 cm outer edge) and slightly below the horizontal midline, for example about 1 cm below. The 1 cm offset is a chosen example, not a derived value.
Why: Half of the 4 cm half-width is 2 cm, placing the center halfway between midline and outer edge. A small offset below the horizontal midline keeps blush off the eye line.
Check: Measure both centers with a ruler; they should match each other and sit inside the cheek area, away from nose bridge and jaw edge.
Exercise 2
You want light blush. Describe the three passes and the approximate darkest center width for a 10 cm wide face.
Show answer and check
Pass one fills the center third lightly; pass two extends to the middle third; pass three feathers the outer edge. For light blush, the darkest center is about one-twelfth of the 10 cm face width, so about 0.8 cm wide.
Why: Light blush uses a small dark center and a wide fade, achieved by keeping early passes small and feathering outward.
Check: Compare the dark center width to the stated 0.8 cm and confirm the ring edge is no longer visible.
Exercise 3
Choose the embarrassed set: narrowed eyes with gaze aside and a small closed mouth pulled to one side. Describe how blush intensity should support this and one check.
Show answer and check
Use medium blush with matched cheeks and a soft fade. Check that the gaze direction and mouth pull agree with the shy, downward mood.
Why: Embarrassment reads as restrained, so medium blush with consistent cues avoids a delighted or strained look.
Check: Step back and confirm eyes, mouth, and blush all suggest the same restrained emotion; adjust the odd cue out.
Exercise 4
A drawing has strong blush on the left cheek and light blush on the right, with a symmetric smile. Identify the likely problem and the fix.
Show answer and check
The asymmetry conflicts with the symmetric smile. Either match the cheeks or change the mouth to a one-sided smirk to justify asymmetry.
Why: Cue consistency is a rubric item; asymmetry should be intentional and supported by the expression.
Check: Compare cheek intensities side by side and confirm the mouth cue explains any difference.
Common mistakes
- Pressing hard in one pass to get strong blush. Build intensity with three light passes and a wider dark center instead of heavy pressure.
- Leaving a visible pencil ring around the blush. Feather the outer edge in the third pass until the ring fades into the cheek.
- Placing blush too high near the eyes or too low on the jaw. Center each zone halfway between midline and outer edge, slightly below the horizontal midline.
- Using a broad open smile with tightly narrowed eyes. Match cues from the same emotion set so eyes and mouth agree.
Self-check rubric
- Blush zones are centered halfway between midline and outer edge, slightly below the horizontal midline, and matched in height.
- Shading uses at least three light passes with the darkest area at the center and a feathered outer edge.
- Intensity matches the stated target in words, judged by center width and fade, not by pressure.
- Eye and mouth cues come from the same emotion set and support the blush.
- Valid alternatives are accepted when placement, layering, and cue consistency meet these checks.
Questions and answers
Do I need a printed template to practice?
No. Draw a simple face oval with midlines on any paper. A printable face plate is planned but not yet built; the text steps are self-contained.
How do I know if my blush is too strong?
Compare the darkest center width to your stated target. If the center is wider than planned or the fade is tight, lift graphite with a soft eraser and re-feather.
Can the two cheeks differ?
Yes, when the expression calls for asymmetry, such as a one-sided smirk. Otherwise keep them matched in intensity and placement.
What if my eye and mouth cues conflict?
Redraw one cue from the same emotion set. Consistency matters more than any single cue.