Free original lessons
Drawing a Salmon: Body, Fins, and Scale Pattern
Learn to construct a salmon step by step: body shape, fin placement, and a simple scale pattern. Includes a worked example, practice tasks, and a fair rubric.
Free lesson
Four exercises
Worked answers
Object Drawing Lessons
This lesson teaches a clear, repeatable way to draw a salmon using basic shapes and measured proportions. You will build the body from a tapered oval, place the fins at consistent landmarks, and add a scale pattern that reads as salmon without needing detailed rendering. The focus is on construction and proportion, not on artistic shading. All measurements are relative to the fish's length, so the method works at any size. A simple convention is used for scale marks: short curved strokes that follow the body contour, spaced evenly. Because letter styles and hand pressure vary, the rubric accepts any consistent, legible pattern that follows the body form. Work through the worked example first, then try the four practice tasks. Each task is self-contained and includes a check method so you can verify your own result.
Practice materials: Printable downloads are not available for this lesson yet. Use the instructions and four exercises below.
Reference illustration
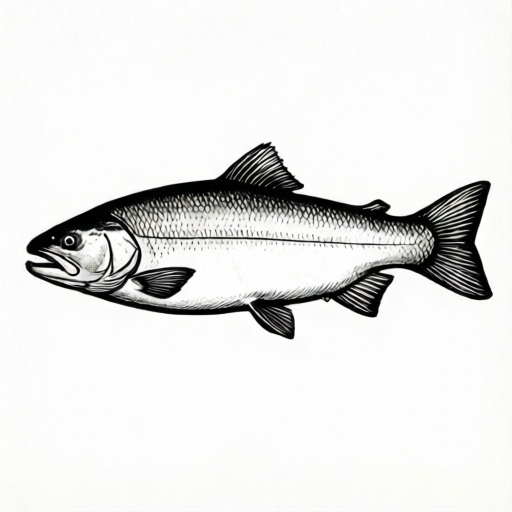
Use the stated measurements and conventions for each exercise.
Building the Body Shape
Start with a horizontal center line equal to the fish's total length. Mark the head end and the tail end. The salmon body is streamlined: deepest just behind the head, tapering to a narrow caudal peduncle before the tail fin. Using the total length as one unit, place the deepest point at about one-third of the length from the head. The body depth there is roughly one-quarter of the total length. These are hypothetical example proportions; adjust only if you keep them consistent.
Draw a smooth tapered oval through these landmarks: a rounded head, a deep shoulder, a gentle taper to the peduncle, and a slight bulge before the tail. Keep the top and bottom contours asymmetric: the back curves more than the belly. Check symmetry by folding the paper along the center line or by measuring distances from the center line at three points.
- Draw a horizontal center line and mark total length L.
- Mark the deepest point at about L/3 from the head.
- Set body depth at about L/4 at that point.
- Draw the back contour with a gentle curve and the belly with a shallower curve.
- Taper to a narrow peduncle about L/10 deep before the tail fin.
Placing the Fins
Salmon have a dorsal fin on the back, an adipose fin near the tail, an anal fin on the belly near the peduncle, pelvic fins under the belly, and pectoral fins behind the head. Use the center line and body depth as guides. Place the dorsal fin above the deepest point, with its base about L/6 long. The adipose fin sits about L/8 ahead of the tail fin. The anal fin mirrors the dorsal fin's position on the belly, slightly smaller. Pelvic fins sit about halfway between the head and the tail, below the belly line. Pectoral fins attach just behind the head, angled slightly downward.
Draw each fin as a simple triangular or rounded flap with a clear base on the body. Keep fin sizes proportional: the dorsal and anal fins are the largest paired-looking fins, the pectoral fins are smaller, and the adipose fin is a small rounded flap. Check placement by measuring from the head end: dorsal base center at about L/3, pelvic base at about L/2, anal base at about 2L/3, adipose at about 7L/8.
- Mark the dorsal fin base above the deepest point, base length about L/6.
- Mark the adipose fin about L/8 ahead of the tail fin.
- Mark the anal fin on the belly opposite the dorsal fin, slightly smaller.
- Mark the pelvic fins at about L/2 from the head, below the belly.
- Mark the pectoral fins just behind the head, angled down.
- Draw each fin as a simple flap with a clear base on the body.
Adding the Scale Pattern
Use a simple convention: short curved strokes that follow the body contour, arranged in staggered rows. Start at the shoulder and work toward the tail. Space strokes evenly, about one stroke width apart, and keep the curve direction consistent: strokes curve toward the tail on the upper body and toward the head on the lower body, following the body's curve. This is a convention, not a universal rule; any consistent pattern that follows the body form is acceptable.
Keep the pattern legible: avoid crowding near the fins and leave the head and fin bases clear. Check consistency by scanning row by row: each row should have similar spacing and curve direction. If strokes cross fin bases, erase them and redraw the fin edge cleanly.
- Choose a stroke length about L/20 and keep it consistent.
- Start at the shoulder and work toward the tail in staggered rows.
- Curve strokes to follow the body contour, direction consistent within each row.
- Leave head and fin bases clear of scale marks.
- Check spacing row by row and redraw any crowded areas.
Checking Proportion and Consistency
Measure your drawing against the landmarks: deepest point at about L/3, body depth about L/4, peduncle about L/10, dorsal base center at about L/3, pelvic at about L/2, anal at about 2L/3, adipose at about 7L/8. Small deviations are fine if the overall shape reads as a salmon. Use a ruler or a marked strip of paper to compare distances.
Check the scale pattern for even spacing and consistent curve direction. Check that fins attach cleanly to the body and that no scale strokes cross fin bases. If a landmark is off, adjust the contour rather than redrawing everything.
- Measure deepest point and body depth against L.
- Measure fin base centers from the head end.
- Scan scale rows for even spacing and consistent curve direction.
- Check fin bases for clean attachment and no crossing strokes.
- Adjust the contour if a landmark is off, keeping other landmarks fixed.
Worked example
Draw a salmon with total length 12 cm. Use the lesson proportions: deepest point at L/3, body depth L/4, peduncle L/10, dorsal base center at L/3 with base length L/6, pelvic at L/2, anal at 2L/3, adipose at 7L/8. Add a scale pattern with stroke length about L/20.
Worked answer
Center line 12 cm. Deepest point at 4 cm from the head. Body depth 3 cm there. Peduncle depth 1.2 cm. Dorsal base center at 4 cm, base length 2 cm. Pelvic base at 6 cm. Anal base at 8 cm. Adipose at 10.5 cm. Scale stroke length about 0.6 cm, staggered rows from shoulder to tail, leaving head and fin bases clear.
Four practice exercises
Exercise 1
Draw a salmon with total length 10 cm using the lesson proportions. Mark the deepest point, body depth, and peduncle depth. Add dorsal, pelvic, anal, and adipose fins at the specified landmarks.
Show answer and check
Deepest point at 3.3 cm from the head; body depth 2.5 cm; peduncle depth 1 cm; dorsal base center at 3.3 cm with base length 1.7 cm; pelvic at 5 cm; anal at 6.7 cm; adipose at 8.75 cm.
Why: Apply L/3, L/4, L/10, L/6, L/2, 2L/3, and 7L/8 to L=10 cm. These hypothetical proportions keep the shape readable and checkable.
Check: Measure each landmark from the head end with a ruler; confirm values within about 0.5 cm and that fins attach cleanly.
Exercise 2
A student draws a salmon with total length 16 cm but places the dorsal fin base center at 10 cm from the head. Identify the error and state the correct position and base length using the lesson proportions.
Show answer and check
The dorsal base center should be at about L/3 = 5.3 cm from the head, not 10 cm. The base length should be about L/6 = 2.7 cm.
Why: The dorsal fin is placed above the deepest point, which is at about L/3. Placing it at 10 cm puts it too far back, near the anal fin region.
Check: Measure from the head end: L/3 of 16 cm is about 5.3 cm; L/6 is about 2.7 cm. Compare with the drawing.
Exercise 3
Describe how to add a scale pattern to a salmon of total length 20 cm using the lesson convention. Include stroke length, row spacing, and where to leave clear areas.
Show answer and check
Use stroke length about L/20 = 1 cm. Arrange staggered rows from shoulder to tail with spacing about one stroke width. Curve strokes to follow the body contour, consistent direction per row. Leave the head and fin bases clear.
Why: The convention uses short curved strokes in staggered rows; L/20 gives a legible stroke length for a 20 cm fish. Clear areas prevent clutter at fins and head.
Check: Scan rows: stroke length near 1 cm, spacing even, curve direction consistent, no strokes crossing fin bases or head.
Exercise 4
Draw a salmon with total length 8 cm. After drawing, check three landmarks: deepest point, anal fin base center, and adipose fin position. State the expected values and one adjustment if a landmark is off by more than 1 cm.
Show answer and check
Deepest point at about 2.7 cm; anal base center at about 5.3 cm; adipose at about 7 cm. If the anal base is off by more than 1 cm, move it to about 5.3 cm and adjust the belly contour slightly to keep the fin attached.
Why: Apply L/3, 2L/3, and 7L/8 to L=8 cm. Adjusting one landmark while keeping others fixed preserves overall proportion.
Check: Measure from the head end with a ruler; confirm values within about 1 cm and that the fin base sits on the body contour.
Common mistakes
- Making the body uniformly oval instead of tapered. Set the deepest point at about L/3 and taper to a peduncle about L/10 deep; check with a ruler.
- Placing the dorsal fin too far back or too small. Center the dorsal base at about L/3 from the head and make its base about L/6 long.
- Scale strokes crossing fin bases or the head. Leave head and fin bases clear; erase crossing strokes and redraw the fin edge cleanly.
- Inconsistent scale spacing or curve direction. Work row by row with a fixed stroke length about L/20 and a consistent curve direction per row.
Self-check rubric
- Body shape: tapered oval with deepest point near L/3 and peduncle near L/10 deep.
- Fin placement: dorsal base center near L/3, pelvic near L/2, anal near 2L/3, adipose near 7L/8.
- Fin attachment: each fin has a clear base on the body and no scale strokes cross it.
- Scale pattern: consistent stroke length and spacing, curve direction follows body contour, head and fin bases clear.
- Legibility: overall drawing reads as a salmon at a glance; valid alternative patterns accepted if consistent.
Questions and answers
Do I need to draw exact proportions?
No. The proportions are hypothetical examples to keep the shape readable. Keep them consistent and check with simple measurements.
Can I use a different scale pattern?
Yes. The convention is short curved strokes in staggered rows. Any consistent, legible pattern that follows the body form is acceptable under the rubric.
How do I check fin placement without a ruler?
Use a marked strip of paper equal to the total length and fold it into thirds and eighths to compare landmark positions.
What if my salmon looks too deep or too thin?
Measure body depth at the deepest point. If it is far from about L/4, adjust the contour while keeping the deepest point at about L/3.