Free original lessons
Continuous Contour Line Portraits: One Unbroken Line
Learn to draw a face with a single continuous line, capturing contour and features without lifting your pen. Includes steps, rubric, and practice tasks.
Free lesson
Four exercises
Worked answers
Object Drawing Lessons
Continuous contour line drawing asks you to describe a face using one unbroken line. Instead of sketching separate shapes, you let the line travel from hair to jaw, around eyes, nose, and mouth, and back again without lifting the pen. This builds careful observation and confident hand movement. The goal is not photorealism but a clear, expressive record of facial structure. You will use a simple convention: the line may cross itself and may retrace, but it must never leave the paper. Work slowly enough to see where the line should go next, and accept that small deviations are part of the style. The exercises below use plain language and checkable steps so you can judge your own progress.
Practice materials: Printable downloads are not available for this lesson yet. Use the instructions and four exercises below.
Reference illustration
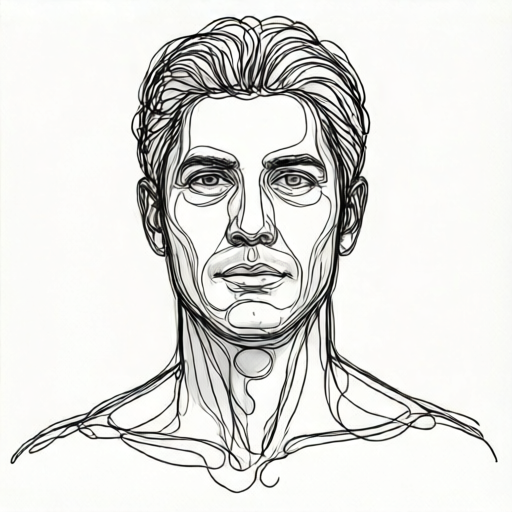
Use the stated measurements and conventions for each exercise.
Set Up and Choose a Reference
Place your paper so you can see the reference face clearly. Use a pencil or fine-tip pen; a pen makes continuity obvious because you cannot erase. Decide a starting point, such as the top of the head or the side of the jaw, and keep the pen on the paper until the portrait is finished.
Define your convention before drawing: the line may cross itself, may double back, and may pass through features, but it must not lift. This convention is what makes the drawing continuous. Letter styles and feature shapes vary between people, so there is no single correct outline; aim for recognizable placement and smooth, deliberate movement.
- Tape or hold the paper steady and place the reference where you can glance without turning your head far.
- Mark a starting point on the paper with the pen already touching down.
- Plan the first route in your mind: hairline to temple to jaw, for example.
- Keep the pen down and begin; pause only to look, not to lift.
Build the Contour in One Route
Begin at the top of the head and move along the hairline toward one ear. Continue down the side of the face to the jaw, then across the chin and up the other side. From there, travel inward to the eye region, around the eye shape, and out to the nose. Let the line cross earlier lines when needed; crossings are allowed and help you move between features.
For the eyes, draw the upper lid curve, then the lower lid, then a small loop for the iris if you wish. Move to the nose by tracing the bridge down one side and around the nostril, then back up the other side. For the mouth, trace the upper lip curve, the lower lip, and the corners. Finish by returning to the hair or jaw so the line ends on the face rather than in empty space.
- Travel from hairline to ear, then down to jaw and across chin.
- Move up the opposite side and inward toward the first eye.
- Trace each eye as a closed or nearly closed loop, then cross to the nose.
- Trace nose bridge and nostrils, then mouth curves, then return to hair or jaw.
Check Continuity and Placement
After the line ends, check that it never lifted. Gaps mean the line broke; crossings and retraces are fine. Next, check feature placement using simple proportions: eyes roughly halfway down the head, nose base about halfway between eyes and chin, mouth between nose and chin. These are guidelines, not rules, because faces vary.
Use a self-check rubric: line continuity (no lifts), feature placement (eyes, nose, mouth in believable positions), contour clarity (jaw and hairline readable), and line confidence (smooth rather than shaky). Score each from 1 to 3 and note one improvement for the next attempt.
- Trace the line with your finger to confirm no gaps.
- Compare eye, nose, and mouth heights to the halfway guidelines.
- Check that jaw and hairline are distinguishable.
- Write one specific change for the next drawing.
Worked example
A reference face is shown with eyes halfway down the head, nose base midway between eyes and chin, and mouth between nose and chin. Starting at the top of the head, describe a continuous route that ends at the jaw without lifting the pen.
Worked answer
Start at the top center of the head. Move left along the hairline to the temple, down the side of the face to the jaw, across the chin, and up the right side to the right temple. Cross inward to the right eye, trace the upper lid, lower lid, and a small iris loop. Travel to the nose bridge, down the right side, around the right nostril, up the left side, and around the left nostril. Move to the mouth: upper lip curve, lower lip curve, and corners. Return along the left cheek to the jaw and stop. The line never lifts; it crosses earlier lines near the eyes and nose.
Four practice exercises
Exercise 1
Using the convention that the line may cross but never lift, plan a route for a face where the eyes are halfway down the head and the nose base is midway between eyes and chin. Start at the left ear and end at the right ear. Describe the route in order.
Show answer and check
Start at the left ear, move up the side of the head to the top, across the hairline to the right side, down to the right ear, then inward to the right eye. Trace the right eye, cross to the nose, trace the bridge and nostrils, move to the mouth, trace lips, then travel along the jaw to the left ear and stop.
Why: The route follows the contour first, then visits features in a logical order, using crossings to move between them without lifting.
Check: Trace the described route with a finger: confirm it starts at the left ear, ends at the right ear, and never leaves the face area.
Exercise 2
A student draws a continuous line portrait but the eyes are placed near the top of the head and the mouth is very low. Using the halfway guidelines, state two specific placement corrections and one continuity check.
Show answer and check
Move the eyes down to roughly halfway between the top of the head and the chin. Move the mouth up to between the nose base and the chin. Continuity check: trace the line to confirm there are no gaps where the pen lifted.
Why: The guidelines give checkable positions; the continuity check addresses the defining convention.
Check: Measure with a finger: eyes should be near the middle height of the head; mouth should sit between nose base and chin.
Exercise 3
Describe how to draw the nose and mouth in one continuous route without lifting the pen, starting from the left eye and ending at the right cheek. Include at least one crossing.
Show answer and check
From the left eye, travel down the left side of the nose bridge, around the left nostril, across the base of the nose to the right nostril, up the right side of the bridge, crossing the first bridge line near the top. Move to the upper lip, trace it to the right corner, trace the lower lip back to the left corner, then travel up to the right cheek and stop.
Why: The route connects features in sequence and uses a crossing at the bridge to return without lifting.
Check: Confirm the described path visits left eye, nose, mouth, and right cheek in order and includes a crossing at the bridge.
Exercise 4
You have a reference face and a blank face outline. Explain how to use the outline to practice continuity, and give one self-check for feature placement after the drawing.
Show answer and check
Place the pen on the outline at the top of the head and follow the outline down one side to the jaw, then inward to the eyes, nose, and mouth, using crossings to move between features, and return to the outline. After drawing, check that the eyes are near halfway down the head and the mouth is between nose and chin.
Why: The outline provides a ready contour to follow, so the student can focus on keeping the line unbroken while placing features.
Check: Trace the line for gaps; then compare eye and mouth heights to the halfway guidelines.
Common mistakes
- Lifting the pen to fix a feature. Accept the deviation and continue from where the pen is; crossings and retraces keep the line continuous.
- Drawing features as separate closed shapes without connecting them. Plan a route that travels from one feature to the next, using the face contour as a bridge.
- Placing eyes too high or mouth too low. Use the halfway guidelines: eyes near the middle of the head, nose base midway between eyes and chin, mouth between nose and chin.
- Moving too fast and losing the reference. Pause to look at the reference before each segment; slow the hand while keeping the pen down.
Self-check rubric
- Line continuity: the pen never lifted; crossings and retraces are present but no gaps.
- Feature placement: eyes near halfway down the head, nose base between eyes and chin, mouth between nose and chin.
- Contour clarity: jaw, hairline, and face edges are readable.
- Line confidence: strokes are deliberate and smooth rather than shaky.
- Convention adherence: the drawing uses one unbroken line and does not shade or render.
Questions and answers
Can the line cross itself?
Yes. Crossing and retracing are allowed under the convention; only lifting the pen breaks continuity.
Do I need to draw every feature in one pass?
No. You may revisit areas by traveling along existing lines, as long as the pen stays down.
What if my portrait looks uneven?
Unevenness is acceptable in this style. Check feature placement and continuity first, then adjust your route next time.
How long should the drawing take?
There is no fixed time. Work slowly enough to observe; a simple portrait may take ten to twenty minutes.