Free original lessons
Lip Contours and Highlights: A Close-Up Shading Study
Learn to draw lips with clear contour lines and controlled highlight shading, using a defined convention and a checkable rubric for close-up studies.
Free lesson
Four exercises
Worked answers
Object Drawing Lessons
This lesson teaches a close-up lip study using contour and highlight shading. You will define the lip outline, place a shine on the lower lip, and shade the crease and cupid's bow with graded values. The convention is simple: the lip midline is the horizontal line where upper and lower lips meet; the lip baseline is the lowest point of the lower lip; x-height means the vertical distance from baseline to midline. Letter styles and lip shapes vary, so the rubric rewards consistent placement and value control rather than one universal outline. All measurements are hypothetical examples; measure your own paper and reference. Work on a single close-up study, not a full face.
Practice materials: Printable downloads are not available for this lesson yet. Use the instructions and four exercises below.
Reference illustration
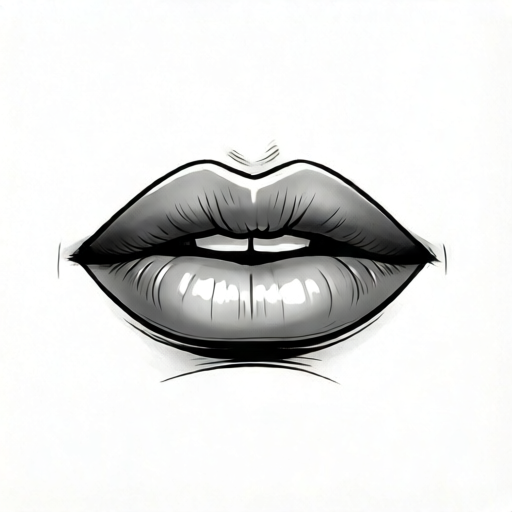
Use the stated measurements and conventions for each exercise.
Set the contour frame
Begin with a light rectangle on your paper, for example 10 cm wide and 6 cm tall. Mark a horizontal midline at about 3 cm from the top and a baseline at about 5 cm. These are hypothetical values; adjust to your reference. The midline is where the lips meet, and the baseline is the lowest edge of the lower lip.
Draw the cupid's bow as two small peaks above the midline, then connect the outer corners with a gentle curve. Keep the contour continuous and light so you can adjust it. The upper lip usually has a narrower band above the bow, while the lower lip is fuller below the midline.
- Mark the midline and baseline lightly.
- Place the two cupid's bow peaks symmetrically about the midline.
- Draw the outer corners and connect the upper and lower contours.
- Check that the lower lip reaches the baseline without flattening.
Place the highlight before shading
Decide where the lower-lip shine sits. A common choice is slightly off-center, about one-third of the lip width from the middle, and just above the baseline. Mark it with a small oval or a soft dash. This is a planned highlight, not a white patch added at the end.
On the upper lip, keep a smaller, softer light area near the bow. The crease between the lips stays darker than both lips. Use a value scale of five steps from light to dark and assign each area a step before you shade.
- Mark the lower-lip highlight with a light oval.
- Mark a smaller upper-lip light area near the bow.
- Assign value steps to the crease, lip body and highlight edges.
- Keep the highlight edges soft, not outlined.
Shade in graded steps
Shade the crease first with the darkest step, then work outward. The lower lip darkens toward its edges and below the highlight. The upper lip darkens toward the corners and above the bow. Blend each step into the next so the transition is gradual.
Leave the highlight area at the lightest step or unshaded. Add a thin darker line just under the lower lip to separate it from the skin, but keep it soft. Check the whole study at arm's length: the highlight should read as a shine, not a hole.
- Shade the crease with the darkest value.
- Darken the lower-lip edges and the area below the highlight.
- Darken the upper-lip corners and above the bow.
- Soften transitions and confirm the highlight reads as light.
Check contour and highlight together
Compare the contour and the highlight as a pair. The highlight should sit inside the lower lip, not cross the contour. The crease should be darker than both lips. The cupid's bow should be visible without a hard outline.
Use the rubric to score placement, value control and contour clarity. Valid alternatives include a centered highlight, a wider bow or a fuller lower lip, provided the values and placement remain consistent.
- Trace the contour with your eye and check for breaks.
- Confirm the highlight is inside the lip shape.
- Compare the crease value with the lip values.
- Score the study with the rubric and note one adjustment.
Worked example
On a 10 cm by 6 cm frame, the midline is at 3 cm and the baseline at 5 cm. The lower-lip highlight is placed 3 cm from the left edge and 4 cm from the top. Is the highlight inside the lower lip if the lower lip spans from 2 cm to 8 cm horizontally and from 3 cm to 5 cm vertically?
Worked answer
Yes. The highlight at 3 cm horizontal and 4 cm vertical lies within the lower lip's horizontal span of 2 cm to 8 cm and vertical span of 3 cm to 5 cm.
Four practice exercises
Exercise 1
A frame is 12 cm wide and 7 cm tall. The midline is at 3.5 cm and the baseline at 6 cm. A highlight is placed at 4 cm from the left and 5 cm from the top. The lower lip spans 2 cm to 10 cm horizontally and 3.5 cm to 6 cm vertically. Is the highlight inside the lower lip?
Show answer and check
Yes, the highlight is inside the lower lip.
Why: Horizontal 4 cm is between 2 cm and 10 cm; vertical 5 cm is between 3.5 cm and 6 cm.
Check: Compare both coordinates with the stated spans; both must fall inside.
Exercise 2
A study uses five value steps, where 1 is lightest and 5 is darkest. The crease is step 5, the lower lip edges are step 4, and the highlight is step 1. Which area is darkest, and should the crease be lighter or darker than the lips?
Show answer and check
The crease is darkest at step 5, and it should be darker than the lips.
Why: Step 5 is the darkest value; the crease must contrast with the lip body.
Check: Confirm the crease value is higher than the lip-edge value on the five-step scale.
Exercise 3
A lower lip spans 3 cm to 9 cm horizontally. A highlight is planned at 1 cm from the left edge. Is this placement valid inside the lip?
Show answer and check
No, 1 cm is outside the lower lip's horizontal span of 3 cm to 9 cm.
Why: The highlight must lie within the lip contour; 1 cm is less than 3 cm.
Check: Check that the highlight coordinate is greater than or equal to the left lip edge.
Exercise 4
A frame has a midline at 4 cm and a baseline at 6 cm. A student draws the lower lip ending at 5 cm. What is the vertical gap to the baseline, and what adjustment keeps the lower lip full?
Show answer and check
The gap is 1 cm; extend the lower lip to the baseline at 6 cm while keeping a gentle curve.
Why: Baseline minus lip end equals 6 cm minus 5 cm, which is 1 cm.
Check: Subtract the lip end from the baseline and confirm the contour reaches the baseline without flattening.
Common mistakes
- Outlining the highlight with a hard line. Soften the highlight edge by blending outward and leaving the center light.
- Making the crease lighter than the lips. Darken the crease to the darkest step and keep the lips lighter.
- Flattening the lower lip at the baseline. Keep a gentle curve at the baseline and check the midline-to-baseline distance.
- Placing the highlight outside the lip contour. Move the highlight inside the lower lip and recheck the contour.
Self-check rubric
- Contour is continuous and light, with a visible cupid's bow and outer corners.
- Midline and baseline are marked and the lower lip reaches the baseline without flattening.
- Highlight is inside the lower lip and reads as light, not outlined.
- Crease is darker than both lips and transitions are graded.
- Valid alternatives are accepted if placement and values remain consistent.
Questions and answers
Do I need a full face to practice?
No. This lesson is a close-up lip study only. Keep the frame around the lips and omit other facial features.
How large should the study be?
A hypothetical 10 cm by 6 cm rectangle works well. Measure your own paper and adjust the midline and baseline to your reference.
Can the highlight be centered?
Yes. A centered highlight is a valid alternative if it stays inside the lower lip and the values remain consistent.
What does x-height mean here?
X-height is the vertical distance from the baseline to the midline. Use it to keep the lower lip proportion consistent.